

Table of Contents
- Quick Comparison: Best Gunpla Customization Supplies 2026
- Essential Cutting and Sanding Tools for Clean Builds
- How to Panel Line Gunpla: Markers, Washes, and Tools
- Best Airbrush for Gunpla: Kits, Thinners, and Maintenance
- Water Slide Decal Application Guide for Custom Builds
- Adhesives, Top Coats, and Finishing Supplies
- Workspace Setup, Safety, and Digital Tool Integration
- Conclusion: Building Your Customization Kit
- Frequently Asked Questions
Last Updated: September 14, 2026
Quick Comparison: Best Gunpla Customization Supplies 2026
Finding the best gunpla customization supplies 2026 has to offer starts with one hard truth: your nippers matter more than your paint. Most beginners blow their first budget on an airbrush and regret it by kit three, because a bad cut leaves damage no top coat can hide. This guide from Utopia Toys and Models breaks down the tools that earn their place on your bench.
| Supply | Category | Best For | Standout Feature |
|---|---|---|---|
| Tamiya Extra Thin Cement | Adhesive | Seam line removal | Capillary-action brush applicator |
| X-Acto Precision Knife | Cutting | Nub and decal trimming | Interchangeable blade system |
| Tamiya Sanding Sponge | Surface prep | Curved armor panels | Flexible foam backing |
| Mr. Color Thinner | Airbrush support | Lacquer paint flow | Doubles as airbrush cleaner |
| Mr. Hobby Mr. Super Clear | Top coat | Final finish and decal sealing | Flat, semi-gloss, and gloss options |
| Scalemates | Digital tool | Backlog and kit tracking | Free kit database |
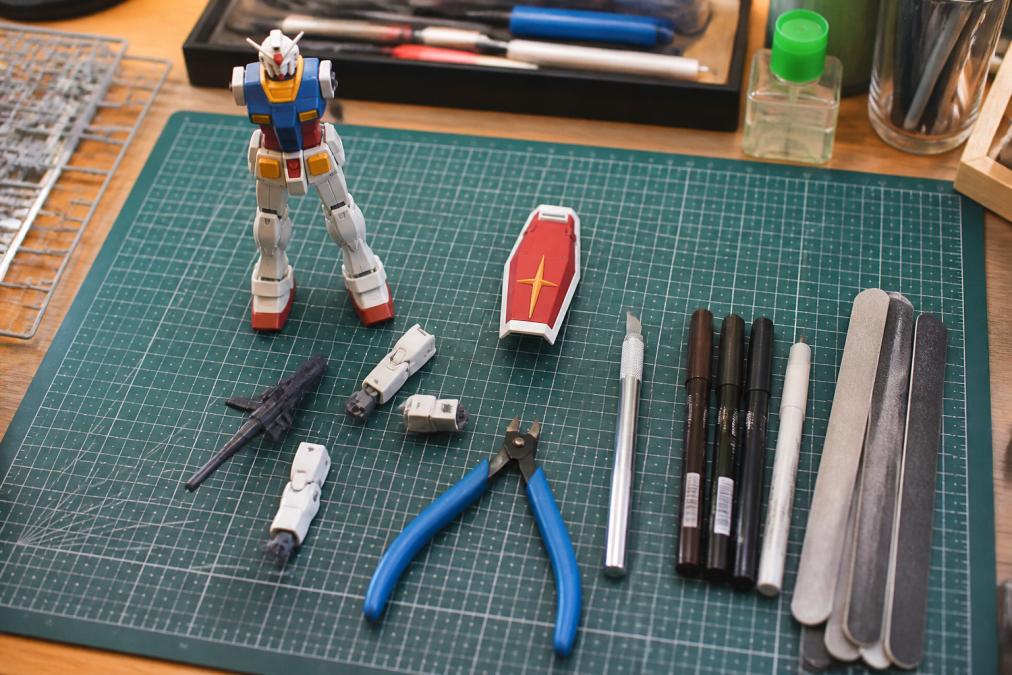
A common mistake is buying a "beginner kit" that bundles ten tools you'll never touch. Buy the four that matter first, then expand.
Essential Cutting and Sanding Tools for Clean Builds
Clean builds come down to two steps: cut away from the part, then sand the nub flat. Skip either and the gate mark shows through primer.
For cutting, sharp side cutters handle the sprue, while a hobby knife with a fresh X-Acto blade trims what the nippers leave. Never cut flush with nippers: leave a millimeter of plastic and shave it down, or you risk stress marks that turn white under paint.
For sanding, flexible sponges beat rigid hobby files on curved armor. Tamiya Sanding Sponge sets run from 400 to 1500 grit, contour to rounded surfaces, and wash clean for reuse (TAMIYA SANDING SPONGE SHEET 320). Work up through the grits, then finish with polishing compound on visible armor.
- 400-600 grit: removing nub stubs
- 800-1000 grit: smoothing scratches
- 1200-1500 grit: pre-paint prep
How to Panel Line Gunpla: Markers, Washes, and Tools
Panel lining is the highest-impact upgrade per minute spent, and the first technique most builders should learn. The best gunpla customization supplies 2026 buyers reach for are fine-tip markers for quick work and pour-type markers or washes for recessed detail.
Fine-tip markers suit beginners: draw along the line, let it dry briefly, then wipe the excess with a soft eraser or lightly dampened swab. Pour-type markers flow into grooves on their own, giving cleaner results on deep lines but demanding more control.
Washes behave differently. Thin a dark wash, flood the panel line, and let capillary action pull it through. Clean up after it dries with a swab barely touched to thinner, not soaked, or you'll strip surrounding paint.
Best Airbrush for Gunpla: Kits, Thinners, and Maintenance
The best airbrush for gunpla is a gravity-feed, dual-action model with a 0.3mm nozzle for general work and a 0.2mm option for fine detail. Gravity-feed cups waste less paint and clean faster than siphon-feed designs, and a dual-action trigger controls air and paint independently, the biggest factor in smooth, even coverage.
You don't need to spend heavily to start. A gravity-feed brush plus a compressor with a moisture trap and adjustable pressure covers most Gunpla work. Set the regulator to 15-20 PSI for general color coats and 10-12 PSI for fine detail and panel shading. In humid climates a moisture trap matters more than tank size; water in the line causes spitting no technique can fix.
Matching Thinner to Paint Type
The tool that separates smooth results from spattery ones isn't the brush, it's the thinner, and the right one depends on your paint chemistry.
- Lacquer (solvent-based): Mr. Color Thinner is formulated for lacquer paints, thins them to a consistent spraying ratio, and doubles as an airbrush cleaner. Lacquers bite into plastic and produce the hardest, most durable finish, but they require a respirator and ventilation.
- Acrylic (water-based): Thin with the manufacturer's acrylic thinner or distilled water. Acrylics are lower-odor and easier to clean up, but they dry faster in the nozzle and clog more often, so keep a damp swab handy.
- Enamel: Slower-drying and best reserved for hand-brushed detail and washes rather than full airbrush coats.
A common starting ratio is roughly 1 part thinner to 2 parts paint for lacquer, adjusted until the mix sprays like skim milk (Bot Detection). Spray in thin, overlapping passes and build color gradually rather than covering in one coat.
Tool Compatibility by Plastic Grade
Matching your setup to the plastic grade saves money and frustration.
- High Grade (HG) and Real Grade (RG): Smaller parts and tighter tolerances reward a 0.2mm nozzle for detail work. A single 0.3mm brush handles most HG builds fine.
- Master Grade (MG): The sweet spot for a 0.3mm general-purpose brush. Larger armor panels benefit from a slightly higher PSI to avoid dry spray.
- Perfect Grade (PG): Large surface area means more paint volume. A 0.3mm or 0.4mm nozzle with a larger cup reduces refill interruptions, and a compressor with a tank maintains steadier pressure across long sessions.
Maintenance That Actually Extends Brush Life
Maintenance matters more than brand. Flush the brush after every session with the solvent for your paint type, deep-clean the nozzle weekly, and store it with the needle retracted to protect the tip. Never soak the whole body in solvent; it degrades the internal seals. Replace the needle and nozzle as a matched set when the tip bends or the spray pulls to one side.
Ergonomic Considerations for Long Airbrush Sessions
Airbrushing is one of the most repetitive tasks in the hobby, and hand fatigue shows up fast. A lighter body and textured or rubberized grip reduce the pinch force needed to hold the trigger for extended passes. Route the air hose so it isn't dragging on your wrist, and support your forearm on the bench edge. Builders who spray for hours often switch to a trigger-style airbrush, which uses a downward press instead of a rearward pull and strains the index finger less.
Water Slide Decal Application Guide for Custom Builds
Water slide decals look better than stickers and last longer, but demand patience. The process: soak, position, set, seal.
Cut the decal from the sheet, soak it in lukewarm water until it slides freely, then transfer it with tweezers or a damp brush. Position it, blot the water with a soft cloth, and let it dry fully before touching it again. Applying these finishing touches requires a steady hand similar to the precision needed when posing articulated collector figures to ensure every detail remains perfectly aligned.
Decal setter softens the film so it conforms to curved surfaces and panel lines. Decal softer, applied after positioning, melts the film into recessed detail. Use setter first, softer second, and never the reverse.
Seal everything with a top coat once the decals cure. Without a clear coat, water slide decals lift at the edges over time.
- Soak time: until the decal slides, usually under a minute
- Setting solution: apply before and during positioning
- Softening solution: apply only after the decal is placed
- Cure time: let it dry fully before top coating
Adhesives, Top Coats, and Finishing Supplies
Seam line removal and permanent bonds call for liquid cement, not tube glue. Tamiya Extra Thin Cement has low viscosity, wicking into joints by capillary action and welding the plastic together. Apply it with the cap brush, press the parts together, and let the bond cure.
For finishing, Mr. Hobby Mr. Super Clear protects paint and unifies the surface. It comes in flat, semi-gloss, and gloss with UV protection to slow fading. Flat hides imperfections; gloss makes decals sit flush and gives a showroom look.
Spray top coat outdoors or in a well-ventilated space, in thin passes, and let each pass flash off before the next. Rushing this step causes runs that are painful to fix.
Workspace Setup, Safety, and Digital Tool Integration
A dedicated hobby workspace pays for itself in fewer lost parts and headaches. Start with a cutting mat, magnifying lamp, and tray for loose pieces. Add a respirator and spray booth before opening any lacquer thinner or aerosol top coat, and ventilate whenever solvents are out.
Safety Equipment: What Actually Protects You
Solvent-based lacquers and aerosol top coats release volatile organic compounds (VOCs) a dust mask won't filter (osha.gov). Match the cartridge to the hazard:
- Organic vapor cartridges for lacquer thinner, airbrush cleaning, and aerosol top coat. A simple N95 or dust mask does nothing for solvent vapor.
- Particulate pre-filters layered over the vapor cartridge to catch paint mist and sanding dust.
- Nitrile gloves for handling thinner, cement, and decal solutions. Latex breaks down against solvents.
- Eye protection when airbrushing or using a rotary tool near the face.
Replace organic vapor cartridges when you can smell solvent through the mask, or per the manufacturer's schedule. A cartridge that has been opened and stored in a humid room loses effectiveness even if unused.
Ventilation and Spray Booth Mechanics
A spray booth is a fan and filter system that pulls overspray and vapor away from your face. Look for a fan rated for the enclosure's volume and a replaceable filter. Vent the exhaust to a window or outdoors; recirculating back into the room just moves vapor around. For aerosol cans and lacquer, spray outdoors or in a garage with the door open, never in a closed bedroom or basement.
Ergonomics: Preventing Repetitive Strain
Ergonomics matter more than most builders admit. Long sessions hunched over tiny parts strain your neck, wrists, and lower back, and the damage accumulates over years. Adjustments that help:
- Raise the work to eye level with a stand or an adjustable lamp arm so you aren't bending your neck down.
- Use an ergonomic hobby knife handle with a larger, textured grip. Thin metal handles force a tighter pinch, which loads the thumb and index finger.
- Switch to a larger-grip nipper or add a grip sleeve if your hand cramps during long cutting sessions.
- Take a break every hour. Stand, stretch your hands, and look at something far away to reset your focus.
- Support your forearms on the bench edge instead of holding them unsupported in the air.
Builders who work in long sessions often rotate between two or three grip styles across a build to spread the load across different muscle groups.
Digital Tool Integration for the Modern Builder
Digital tools turn a pile of boxes into a managed backlog. Scalemates is a free kit database and collection manager that tracks your backlog and logs build progress, genuinely useful once your stash passes a dozen boxes. A lightweight digital workflow looks like this:
- Backlog tracking: Log each kit with scale, grade, and status (unbuilt, in progress, complete) so you stop buying duplicates.
- Build logging: Photograph sprue layouts and progress shots and attach them to the kit entry. If a part goes missing mid-build, the photo tells you which runner to check.
- Paint and color records: Note the exact paint, thinner ratio, and top coat used on each build so you can reproduce a finish later.
- Reference and inspiration: Save build threads and reference photos alongside the kit entry rather than scattering them across browser bookmarks.
A simple spreadsheet works for a small stash, but a dedicated database scales better once you are juggling multiple in-progress kits.
| Supply | What It Solves | Where It Fits |
|---|---|---|
| Organic vapor respirator | Solvent fumes and VOCs | Airbrushing and top coat |
| Spray booth with outdoor exhaust | Overspray and ventilation | Indoor spraying |
| Nitrile gloves | Skin contact with solvents | Thinner, cement, decals |
| Cutting mat | Protects surfaces, catches parts | Every session |
| Magnifying lamp | Fine detail and decal work | Panel lining and decals |
| Ergonomic knife and nipper grips | Hand and wrist strain | Long cutting sessions |
| Scalemates or a build log | Backlog and progress tracking | Between builds |
Conclusion: Building Your Customization Kit
The hardest part of this hobby isn't technique. It's resisting the urge to buy everything at once and then drowning in a backlog you never build. Start with nippers, a knife, sanding sponges, and a panel line marker. Add an airbrush and top coat once your fundamentals are solid.
Utopia Toys and Models stocks the Gunpla kits and customization supplies that make this progression easier, with products from Bandai and other leading brands, most items in stock and ready to ship, and clear status indicators for arriving soon and pre-order releases. We're built for builders who want to know what's actually available before they commit.
Get started with Utopia Toys and Models and build your next kit with the right tools on the bench from day one.
Frequently Asked Questions
What are the essential tools for beginners starting Gunpla customization?
Beginners need side cutters for removing parts from sprues, a hobby knife for trimming nubs, and sanding sticks in 400 to 1500 grit for smoothing surfaces. Add a cutting mat to protect your workspace and tweezers for placing small decals. Panel lining markers like the Gundam Marker pour type make detail work accessible. These basics cover snap-fit assembly and simple customization without a large investment.
Which brands offer the best airbrushing supplies for model kits?
Mr. Hobby produces the Mr. Color Thinner, which is optimized for lacquer-based paints and doubles as an airbrush cleaner. Tamiya offers compatible acrylic thinners. For top coats, Mr. Hobby Mr. Super Clear provides UV protection and consistent spray patterns in flat, semi-gloss, and gloss finishes. These brands are widely used in the Gunpla community for reliable results.
What is the difference between lacquer and acrylic paints for Gunpla?
Lacquer paints require a dedicated thinner like Mr. Color Thinner and produce a hard, durable finish, but they emit strong fumes that demand a respirator and ventilation. Acrylic paints are water-based, easier to clean up, and less toxic, though they may chip more easily without a top coat. Many builders use lacquers for base coats and acrylics for detail work.
How do I choose the right top coat for my custom Gunpla build?
Select a top coat based on the finish you want: flat for a military matte look, gloss for a shiny automotive appearance, or semi-gloss for a middle ground. Mr. Hobby Mr. Super Clear offers all three and includes UV protection to prevent yellowing. Apply in thin coats outdoors or in a well-ventilated area, and always test on a spare part first.
What are the best panel lining markers for detailed Gunpla work?
Gundam Marker pour type is popular for its fine tip and capillary action, which pulls ink into panel lines cleanly. For a wash technique, Tamiya Panel Line Accent Color flows into recesses and can be cleaned with thinner. Both work well on bare plastic or painted surfaces. Always apply a top coat afterward to protect the lines from handling wear.