

Table of Contents
- Why Scribing Panel Lines Matters for Gunpla Detail
- Best Scribing Tools for Gunpla
- Planning Your Panel Line Design
- How to Use a Scribing Guide Tape for Straight Lines
- Step-by-Step Scribing Technique
- Fixing Scribing Mistakes on Plastic Models
- Sanding and Surface Preparation After Scribing
- Conclusion
Last Updated: August 23, 2026
Why Scribing Panel Lines Matters for Gunpla Detail
Scribing panel lines on Gunpla transforms a flat plastic model into a detailed, three-dimensional replica that captures the engineering aesthetic of Gundam designs. Panel lines are the recessed lines that define mechanical segments on the model's surface, and scribing them creates depth and visual interest that painted-on lines simply cannot match.
Without scribed panel lines, even a well-painted Gundam model looks two-dimensional. The difference between a model with painted panel lines and one with actual scribed grooves is immediately obvious under any lighting condition. Light naturally catches the recessed edges, creating shadows that enhance the illusion of mechanical complexity. This technique separates casual builders from serious hobbyists.
The process requires precision, patience, and the right tools. A single mistake can crack the plastic or create an uneven line that's difficult to repair. But once you understand the fundamentals of how to scribe panel lines on gunpla, the technique becomes repeatable and reliable. Most builders see dramatic improvement in their models within their first three attempts.
Best Scribing Tools for Gunpla
Choosing the right tool is the foundation of successful scribing. Different tools excel at different line types, and many builders use multiple tools on a single model. The best approach is to start with one primary tool and add specialized options as your skills develop.
Scribing Tool Types
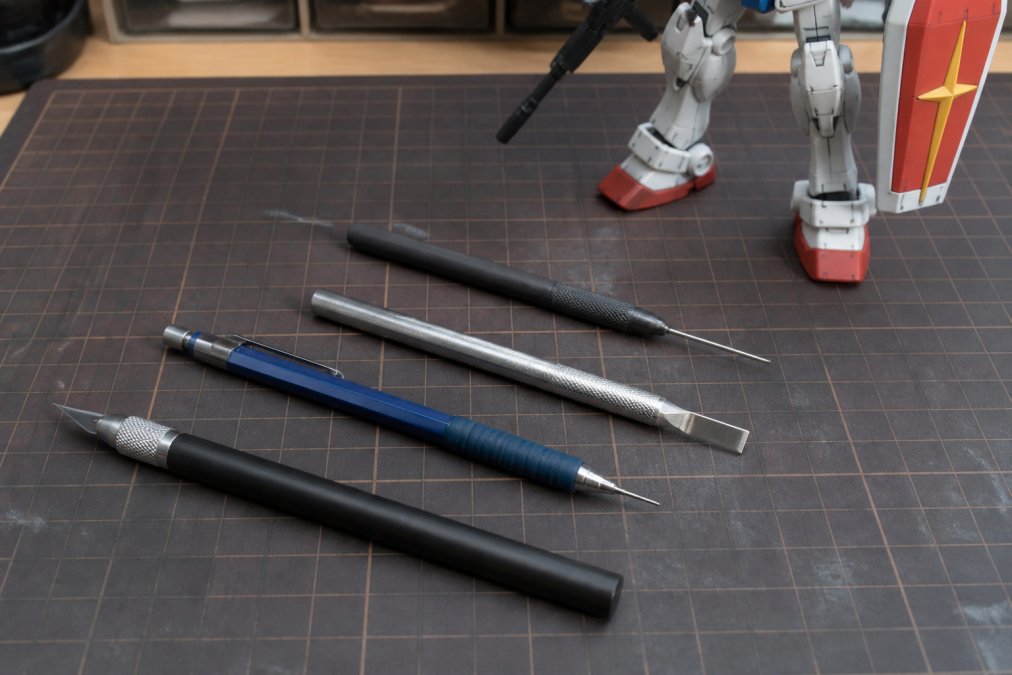
Hobby knives and chisel-style scribers are the most common starting point. These single-edged or double-edged blades create clean, controlled cuts when guided along a straightedge. A hobby knife with a sharp blade can scribe both shallow guide lines and deeper final passes. The blade angle matters, a steeper angle (45 degrees) creates sharper cuts, while a shallower angle (30 degrees) gives more control.
Mechanical pencils and needle-style scribers work best for shallow, delicate lines where you need maximum control. A 0.5mm mechanical pencil loaded with a fine lead can mark panel lines before scribing, serving as a visual guide. Needle-style scribers, essentially sharp metal points mounted in a handle, allow for precise, shallow scoring that's ideal for curved lines and intricate details.
Dedicated scribing tools like those from Tamiya or Vallejo feature specialized blade shapes designed specifically for model work. These tools often have ergonomic handles and replaceable blades, making them reliable for extended building sessions. Some feature dual-sided heads with different blade angles for both straight and curved work.
Tool Maintenance and Sharpening
A dull blade is your worst enemy when scribing. Dull tools require more pressure, increasing the risk of slipping and damaging the plastic. Keep your blades sharp by replacing them frequently, a fresh blade costs less than repairing a ruined model.
For tools with replaceable blades, swap them out every 30-45 minutes of active scribing (tamiya.com). For fixed-blade tools, use a fine whetstone or sharpening steel to maintain the edge. If you're using a mechanical pencil for marking, keep the lead sharp by rotating the pencil as you work, which distributes wear evenly.
Store your tools in a dedicated case or holder. Loose tools in a drawer will dull quickly from contact with other metal items. A simple foam insert with cutouts for each tool keeps everything organized and protected.
Planning Your Panel Line Design
Before you make a single cut, study your model's instruction manual and reference images. Gundam designs follow consistent mechanical logic, panel lines align with joints, define armor segments, and follow the model's structural grid.
Map out your panel lines using a light pencil or mechanical pencil. This preliminary sketch serves as your visual guide and helps you identify which lines need to be straight, which should curve, and where lines intersect. Pay attention to symmetry, misaligned lines on opposite sides of the model are immediately obvious.
Identify which lines are critical (those that define major segments) and which are secondary detail. Start with critical lines to build confidence, then add secondary details once you've established the main structure. This approach prevents you from spending hours on minor details only to realize a major line is misaligned.
How to Use a Scribing Guide Tape for Straight Lines
Guide tape, typically a thin, removable adhesive tape, is essential for creating perfectly straight panel lines. The tape serves as a physical barrier that keeps your blade aligned and prevents it from wandering across the plastic surface.
Position the tape along your pencil line, pressing it down firmly so no air bubbles remain. The tape should sit directly on the line you want to scribe, not beside it. Run your fingernail along the tape edge to ensure a tight seal. Any gap between the tape and the plastic allows your blade to slip underneath, creating an uneven line.
For best results, use guide tape specifically designed for model work (tamiya.com). Painter's tape is too thick and creates a ridge that your blade can catch on. Specialized model tape is thin enough to guide your blade while remaining flexible enough to conform to slightly curved surfaces.
When removing the tape, pull it away at a shallow angle rather than straight up. This prevents the tape from catching on any burrs or rough edges you've created. If the tape tears or lifts during scribing, stop immediately, smooth the area, and reposition fresh tape before continuing.
Step-by-Step Scribing Technique
Step 1: Prepare Your Workspace and Grip
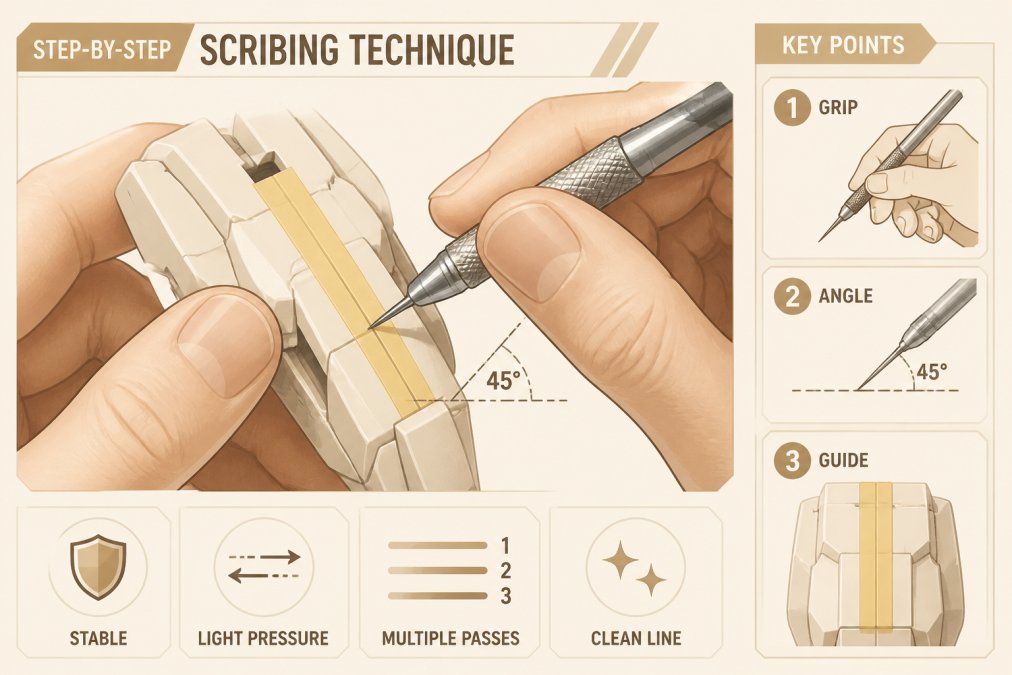
Set up your workspace with good lighting, a desk lamp or LED ring light eliminates shadows and helps you see exactly where your blade is going. Position the model so you're looking down at the panel line at roughly a 45-degree angle. This angle gives you the best view of your blade position and the most control over pressure.
Your grip determines everything. Hold the scribing tool like a pencil, not like a knife. Your hand should be relaxed, with your forearm supported by the work surface or a cushion. A tense grip leads to shaking hands and uneven lines. Keep your other hand behind the blade (never in front of it) to stabilize the model and guide the blade's direction.
Step 2: Making Light Passes
The biggest mistake beginners make is trying to cut the entire depth in one pass. Instead, make multiple light passes, gradually deepening the line. Start with barely enough pressure to score the plastic surface, you should hear a faint scratching sound, not a loud scraping noise.
Each pass should be shallow enough that you can feel the blade in the groove without resistance. The plastic should peel away in tiny shavings, not chunks. If you see large plastic fragments or hear a grinding sound, you're pressing too hard. Reduce pressure and make another pass instead.
Light passes give you control and allow you to correct course if the blade starts to drift. After three or four shallow passes, you'll have a visible groove. Continue making passes until the line reaches your desired depth. Most panel lines look best at 0.5-1mm depth, deep enough to catch light but not so deep that it weakens the plastic structure (peer-reviewed research).
Step 3: Scribing Curved Lines and Complex Shapes
Curved lines require a different approach than straight lines. Guide tape works only for straight sections, so you'll need to scribe curved lines freehand using light pencil marks as your guide.
For gentle curves, keep your hand relaxed and let your arm move naturally along the curve rather than trying to steer with your wrist. Your body should move with the tool, not just your fingers. Imagine you're drawing the line with a pencil, that's the motion you want.
For tight curves and complex geometric patterns, slow down significantly. Make very light passes and check your progress frequently. Greeble details (small mechanical details on armor) often require multiple shallow passes to define properly. A steady hand matters more than speed on intricate work.
Step 4: Cleaning Up Debris and Plastic Burrs
After each section, brush away plastic shavings with a soft brush or compressed air. Shavings can accumulate in your groove and make it difficult to see your progress. They can also catch your blade on the next pass, causing it to jump.
Once you've finished scribing, inspect the line for burrs, small raised edges of plastic along the groove. These occur naturally when the blade pushes plastic aside rather than cutting it cleanly. Use a fine sanding sponge or micro-abrasive pad to gently smooth the burrs without enlarging the groove.
For stubborn burrs, use a hobby knife held nearly parallel to the surface and carefully shave them away. Work slowly and check frequently, it's easy to remove too much plastic and widen the line unintentionally.
Fixing Scribing Mistakes on Plastic Models
Mistakes happen, even to experienced builders. The good news is that most scribing errors are repairable, though the fix depends on the type of mistake.
Crooked or misaligned lines can often be re-scribed in the correct position. If the old line is shallow, you can simply scribe a new line next to it and then fill the mistake with plastic putty. Apply the putty with a putty knife, smooth it flush with the surface, and sand it smooth once it dries. The area will be nearly invisible once primed and painted.
Lines that are too deep or have damaged edges are trickier. If the damage is minor, sand the area smooth and re-scribe shallower than the original depth. If the damage is extensive, use plastic putty to fill the groove, sand smooth, and re-scribe the line at the correct depth.
Cracked or split plastic around a scribing line indicates you pressed too hard or the plastic was too brittle. This is difficult to repair invisibly. Your best option is to use plastic cement to glue any loose pieces back in place, then fill the crack with putty. Sand and repaint the area. On future models, reduce pressure and make more passes instead of trying to cut deep in one attempt.
Lines that are too wide result from a dull blade or a blade that wandered during scribing. Prevent this by keeping your blade sharp and using guide tape for all straight lines. If the line is too wide but not damaged, you can sometimes hide it by painting the groove a slightly darker shade than the surrounding surface, which creates the illusion of depth.
The key to fixing mistakes is working slowly and checking your progress frequently. Stop and assess after every few panel lines rather than scribing the entire model and discovering problems at the end.
Sanding and Surface Preparation After Scribing
Once all panel lines are scribed, sanding smooths the overall surface and prepares it for primer and paint. Start with 400-grit sandpaper or a fine sanding sponge, using light, circular motions. The goal is to remove any remaining burrs and smooth the transitions between scribed areas and flat surfaces.
Progress to 600-grit and then 1000-grit sandpaper for a progressively smoother surface. Be careful not to sand away your panel line detail, use light pressure and check frequently. You want to smooth the surface, not erase the grooves you just created.
After sanding, wipe the model with a damp cloth to remove all plastic dust. Any remaining dust will create a rough texture under primer and paint. Allow the model to dry completely before moving to the next step.
Primer is your final check before painting. Spray a light coat of primer and examine the panel lines in natural light. The primer will highlight any imperfections, burrs, or areas that need additional sanding. Make any final corrections at this stage before committing to color coats.
Conclusion
Scribing panel lines on Gunpla requires the right tools, careful planning, and multiple light passes rather than aggressive single cuts. The technique rewards patience, builders who take time to master light passes and consistent pressure see dramatically better results than those who rush.
At Utopia Toys and Models, we stock a full range of scribing tools, guide tape, and specialized hobby knives from trusted brands like Tamiya and Vallejo. Our team can help you select the right tools for your skill level and preferred building style. Whether you're starting your first Gundam model or refining advanced techniques, we have the supplies and expertise to support your hobby. Visit us online or in-store to build your complete scribing toolkit and take your Gunpla to the next level.
Frequently Asked Questions
What is the best scribing tool for Gunpla?
The best scribing tool depends on your panel line style. Hobby knives work well for deep, angular lines, while needle-style scribers excel at fine detail. A chisel-tip scriber is ideal for uniform panel lines. Start with a quality hobby knife or dedicated scriber from a hobby supplier, these hold sharpness better than improvised tools and reduce the risk of accidental gouges in your plastic model.
How do you keep scribed lines straight and clean?
Use guide tape along your intended line to keep the scribing tool on track. Apply light, consistent passes rather than one deep cut, multiple shallow passes create cleaner lines with fewer burrs. Maintain a steady hand by anchoring your non-scribing hand on the model, and work under good lighting. After scribing, use fine-grit sandpaper to smooth any rough edges without widening the line.
Do I need to sand after scribing panel lines?
Yes, sanding after scribing is recommended. Scribing creates plastic burrs along the edges of your panel lines. Use 320-grit to 400-grit sandpaper to smooth these burrs and blend the line with the surrounding surface. This step also prepares the model for primer and paint, ensuring a professional finish. Sand gently to avoid widening or filling in your carefully scribed detail.
How do you fix a scribing mistake on a model kit?
Minor mistakes can often be fixed with plastic putty. Fill the errant line, let it cure, then sand it smooth before re-scribing the correct line. For deeper gouges, use plastic cement to glue a patch of scrap plastic over the area, sand it flush, and re-scribe. If the mistake is on a visible panel, consider it a learning opportunity, many experienced builders keep spare parts for practice.
This article was written using GrandRanker