

Table of Contents
- What Are Stress Marks and Why They Appear on Gunpla
- Prevention: Cutting Techniques That Stop Stress Marks Before They Start
- Best Hobby Nippers for Gunpla: Choosing the Right Tool
- How to Remove Nub Marks: Step-by-Step Removal Methods
- Sanding Gunpla Parts for Beginners: Grit Progression and Technique
- Polishing and Finishing for a Professional Surface
- Common Mistakes to Avoid When Removing Stress Marks
- Conclusion
Last Updated: August 27, 2026
What Are Stress Marks and Why They Appear on Gunpla
Stress marks are visible white or discolored lines that appear on plastic surfaces after cutting. They form when the plastic's molecular structure fractures during the cutting process, creating stress whitening that persists even after the nub is removed. When you use side cutters to separate parts from the runner, the blade compresses and tears the plastic fibers rather than making a clean slice, creating micro-fractures that scatter light differently than the surrounding plastic.
Different plastic formulations respond differently to cutting stress. Older Gunpla kits stress mark more easily than newer High Grade or Real Grade models, which use tougher plastic compounds (peer-reviewed research). Darker colors like black, dark blue, and dark red show stress marks far more prominently than lighter colors. The good news is that stress marks are entirely preventable with the right approach, and multiple removal methods exist if they do appear.
Prevention: Cutting Techniques That Stop Stress Marks Before They Start
Prevention starts with understanding how to position your tools and apply pressure during cutting. The double-cut method is the gold standard: instead of making a single cut flush against the part, you make two cuts. First, remove most of the runner, leaving a small plastic tab. Second, remove that remaining tab with a fresh blade position. This distributes cutting force across two operations with smaller amounts of material, allowing plastic fibers to separate more cleanly.
Here's how to execute the double-cut method:
- Position your nippers 2-3mm away from the part, cutting away the bulk of the runner first.
- Inspect the remaining nub, roughly the size of a match head.
- Reposition your nippers to cut this final tab as close to the part as possible, using a fresh section of the blade.
- Examine the cut surface for minimal stress whitening.
Quality nippers make this method far easier. Cheap side cutters dull quickly, forcing you to apply more pressure, which creates more stress marks. When your blade is sharp, the plastic cuts cleanly.
The angle at which you hold your nippers also affects fracturing. The optimal angle is closer to 45 degrees, allowing the blade to shear the plastic rather than crush it (peer-reviewed research). Pressure control is equally critical, you should never need to squeeze with maximum force. If you're straining, either your blade is dull or you're cutting too close to the part. Excessive pressure is the single biggest cause of stress marks among builders with decent tools.
Best Hobby Nippers for Gunpla: Choosing the Right Tool
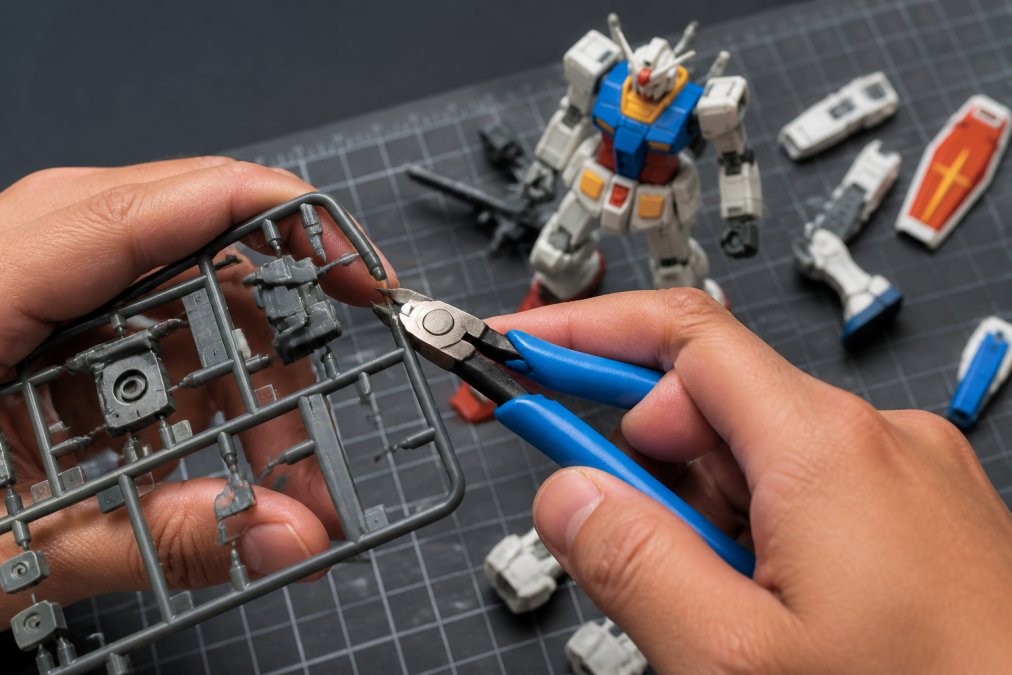
Hobby-grade nippers designed specifically for plastic model kits have blades engineered to cut cleanly through polystyrene without crushing. These tools maintain their edge far longer than generic craft nippers because they're made from harder steel and designed for repeated precision cuts. The blade geometry creates a shearing action rather than a crushing action, which is why professional builders report fewer stress marks when upgrading from budget tools.
Look for nippers with a flush-cutting design, which allows you to position the blade extremely close to your part. Double-action nippers, which move both handles toward each other, reduce the force you need to apply, making it easier to maintain control. The best nippers for Gunpla are those specifically marketed for plastic model kits, as opposed to general craft nippers or wire cutters.
Blade maintenance extends the life of your nippers significantly. After each building session, wipe your blades clean with a dry cloth. When your blades dull after hundreds of cuts, some premium nippers allow blade replacement rather than requiring you to buy entirely new tools.
How to Remove Nub Marks: Step-by-Step Removal Methods
If stress marks have already appeared, you have several proven removal methods depending on severity, plastic color, and time investment.
Using a Hobby Knife for Precision Cleanup
A hobby knife is the fastest way to remove visible nub marks immediately after cutting. This method works best when stress whitening is minimal and localized.
- Secure your part firmly using a hobby vise or clamp.
- Hold your hobby knife at a shallow angle, roughly 15-20 degrees, to the plastic surface.
- Make light, controlled strokes away from yourself, applying just enough pressure to remove the white-discolored layer.
- Work slowly and check progress frequently.
- Once white discoloration is gone, stop, you'll sand the rough surface smooth next.
This method requires a sharp blade and a steady hand. Replace your blade frequently; a fresh blade cuts cleanly with minimal pressure.
Chemical Solutions for Stubborn Marks
Plastic cement or model cement can work as a stress-mark treatment when applied carefully. The solvent softens the plastic surface, allowing stressed and unstressed areas to blend. Apply a tiny amount directly to the stress mark using a brush, then allow it to dry completely.
Isopropyl alcohol offers a gentler alternative. Dampen a cotton swab with isopropyl alcohol and gently rub the stressed area. The alcohol softens the plastic slightly without dissolving it. This method requires patience and multiple applications but is less risky for builders worried about damaging their parts. Always test any chemical solution on a spare plastic runner first.
Sanding Gunpla Parts for Beginners: Grit Progression and Technique
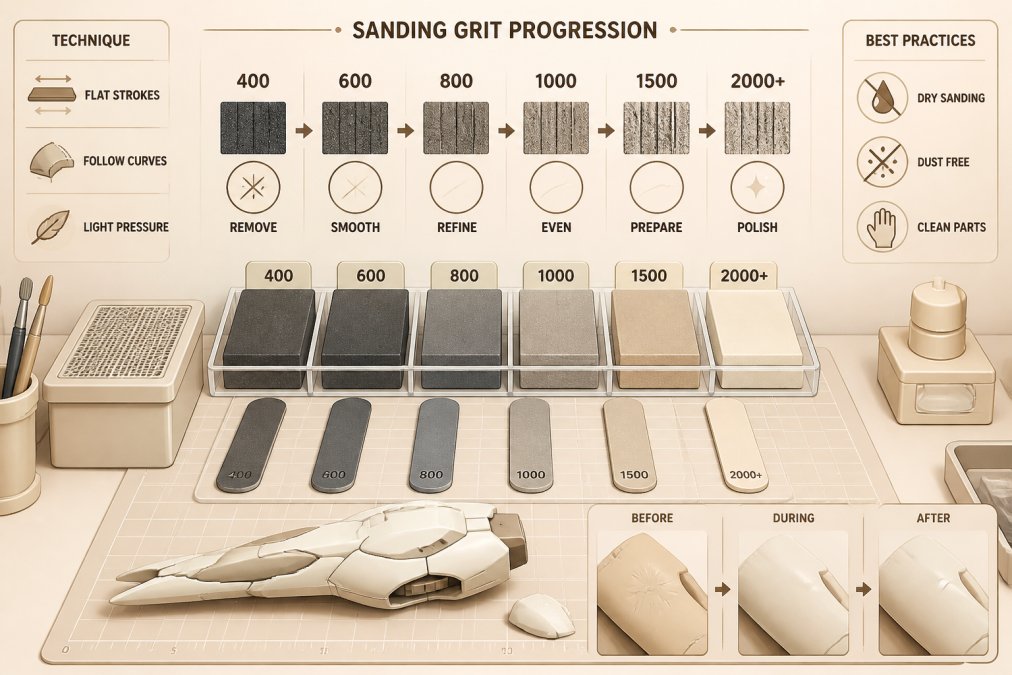
Sanding is the most thorough method for eliminating stress marks and achieving a professional surface finish. The key is using the correct grit progression.
Grit Selection and Progression
Sanding grit refers to the size of abrasive particles. Lower numbers (60, 80, 120) are coarse and remove material quickly (peer-reviewed research). Higher numbers (220, 400, 600, 1000) are progressively finer and smooth the surface without removing significant material. For stress mark removal, start at 120 or 150 grit and progress upward.
A typical progression: 120 grit to remove the worst of the mark, 220 grit to smooth the surface, 400 grit to refine further, and 600 grit or higher for final polish. Skipping steps leaves visible scratches that catch light.
Start with 120-grit sanding sponges to aggressively remove the stress-marked area. Sand in small circular motions with light to moderate pressure. Check progress every 10-15 seconds. Once white discoloration is gone, move to 220 grit and sand the entire local area around the nub to blend the repair. Continue through 400 and 600 grit until the surface feels smooth and stress marks are invisible under normal lighting.
Sanding Sponges vs. Sanding Sticks
Sanding sponges are flexible foam blocks with abrasive coating. They conform to curved surfaces, making them ideal for Gundam parts. The flexibility also prevents over-aggressive sanding. Sanding sticks are rigid blocks with abrasive paper glued to the surface, providing more control and precision for flat surfaces and final finishing.
For stress mark removal, start with a sanding sponge at 120-220 grit to remove the mark safely, then switch to a sanding stick at 400-600 grit for final finishing. Always sand in one direction or gentle circular motions, never in harsh back-and-forth scrubbing. Light pressure applied consistently works far better than heavy pressure applied sporadically.
Polishing and Finishing for a Professional Surface
Once sanding is complete, your stress marks are gone, but your plastic surface may still look slightly dull. Polishing brings back the original glossy finish.
Buffing Without Paint
Use a soft cloth, preferably microfiber, and apply a plastic polish designed for model kits. Rub the polished area gently in circular motions until the surface regains its original glossy appearance. A small amount of polish goes a long way.
For an even glossier finish, apply a clear gloss top coat to the entire part. This approach is particularly useful if you've repaired stress marks on dark-colored plastic, where the repair might otherwise look slightly different in tone.
Top Coat Application for Final Protection
A top coat protects your plastic from dust and minor scratches, and unifies the appearance of repaired areas. Apply top coat in thin, even layers using a spray can or airbrush. Multiple thin coats look better than one thick coat. Allow each coat to dry completely before applying the next. Two to three coats typically provide adequate protection.
Choose between gloss and matte based on your kit's original finish. Most Gundam kits have a slightly glossy finish from the factory, so a gloss top coat maintains authenticity.
Common Mistakes to Avoid When Removing Stress Marks
The most common mistake is attempting to remove stress marks with a single aggressive cut or sand. Stress marks require patience and multiple light applications. Work slowly and check progress frequently to prevent over-removal.
Another frequent error is skipping grit levels during sanding. Jumping from 120 grit directly to 600 grit leaves visible scratches. Each level removes the scratches from the previous one.
Using dull blades or worn sanding surfaces is another trap. A dull hobby knife blade will crush plastic instead of shaving it. Worn sanding sponges lose their cutting ability and require more pressure, which can damage your parts.
Many builders also fail to secure their parts properly during removal work. A part that's moving while you're removing stress marks is far more likely to be damaged. Use a hobby vise, clamp, or blu-tack to hold your part completely still.
Finally, avoid attempting to fix stress marks on parts you've already painted. Once paint is applied, most removal methods risk damaging the paint job. Prevention and removal should happen before painting.
At Utopia Toys and Models, we know that stress marks frustrate even experienced builders. By understanding why they form and mastering prevention techniques like the double-cut method, you'll notice far fewer marks on your finished kits. When stress marks do appear, the removal methods covered here work reliably at every skill level. Whether you choose the speed of a hobby knife, the precision of sanding, or the blending effect of chemical treatments, you have proven solutions. Quality nippers, sanding sponges, hobby knives, and top coats are all available through Utopia Toys and Models, where our team helps builders find exactly what they need to achieve professional results. Start with prevention, master your technique, and your Gundam models will look flawless.
Frequently Asked Questions
What causes stress marks when cutting Gunpla parts?
Stress marks appear when plastic deformation occurs during gate removal. Dull blades, excessive pressure, or cutting too close to the part create white stress whitening. Using sharp nippers and the double-cut method, cutting first at the gate itself, then again closer to the part, distributes stress evenly and prevents plastic from tearing or cracking. Material thickness matters too; thicker plastic requires sharper tools and more controlled cuts.
Can you fix stress marks without painting the model?
Yes. Sanding with progressive grits (starting at 400-600 grit and finishing at 1000+ grit) removes shallow stress whitening. For deeper marks, buffing with a polishing compound or using isopropyl alcohol on a soft cloth can restore clarity. A matte or gloss top coat seals the surface and hides minor imperfections. Chemical solutions like plastic cement applied carefully can also blend stress marks into the surrounding plastic without requiring paint.
Does isopropyl alcohol damage Gunpla plastic?
No, isopropyl alcohol is safe on Gundam model plastic when used correctly. It evaporates quickly and won't dissolve standard ABS or polystyrene plastic. Use it on a soft cloth to gently wipe stress marks and restore surface clarity. Avoid soaking parts or using it on decals or pre-painted surfaces. Test on a spare runner first if you're unsure about your specific kit's plastic type.
What grit should I start with to sand out stress marks on Gunpla?
Begin with 400-600 grit sanding sponges for initial stress mark removal. Progress through 800-1000 grit for smoothing, then finish with 1200+ grit for a polished surface. Finer grits reveal the true plastic color and eliminate visible scratches from coarser sanding. Work slowly and check your progress frequently, aggressive sanding removes material permanently. For very shallow marks, you may skip the coarser grits and start at 800.
This article was written using GrandRanker