

Table of Contents
- What Primer Does for Your Gunpla Model
- How Primer Improves Adhesion and Paint Durability
- Detecting Surface Imperfections Before You Paint
- Best Primer for Gunpla: Spray vs. Airbrush Options
- Acrylic vs. Lacquer Primer for Models: Which Type to Choose
- How to Sand Gunpla Parts Before Priming
- When You Can Skip Priming and Still Get Results
- Conclusion
Last Updated: August 29, 2026
What Primer Does for Your Gunpla Model
Primer is the critical foundation layer between bare plastic and your topcoat paint. It accomplishes three essential tasks: creating a surface that paint can grip, revealing imperfections before you commit to color, and establishing a uniform base for consistent final appearance.
The plastic on Gundam model kits, typically ABS or polystyrene, has a naturally slick surface that causes paint to bead up and slide off (nist.gov). Primer changes the surface tension, giving paint molecules something to anchor to. Without this mechanical grip, your paint will eventually flake away from handling, temperature changes, or assembly stress.
At Utopia Toys and Models, we've seen countless builders skip primer thinking they'll save time, then spend twice as long repainting when their finish fails. Primer also acts as a diagnostic tool, once sprayed on, every scratch, dust particle, and surface irregularity becomes visible under the flat finish, allowing you to catch problems before they're impossible to fix.
How Primer Improves Adhesion and Paint Durability
Paint adhesion is both physical and chemical. Primer creates a microscopically textured surface that gives paint something to grip while bonding to plastic substrates in ways standard topcoat paints cannot.
When paint sits directly on untreated plastic, it forms a weak boundary layer that stays on top rather than integrating with the surface. Any flexing of the plastic during handling, transport, or assembly causes the paint to crack and peel. Primer eliminates this weak boundary by creating an intermediate layer that bonds strongly to both the plastic below and the paint above.
Lacquer-based primers slightly soften the plastic surface, allowing the primer to flow into microscopic pores and cure with mechanical interlocking. Acrylic primers dry through water evaporation and create a physical bond through surface adhesion. Both approaches outperform painting directly onto plastic.
Primer needs time to fully harden before you apply topcoat, most spray primers cure in 24 hours (peer-reviewed research). Rushing this step traps solvents between layers, causing adhesion failure weeks later when those solvents evaporate. Primer also acts as a barrier that moderates moisture penetration, keeping your paint bond intact even in humid conditions where untreated plastic would absorb moisture and create adhesion failure.
Detecting Surface Imperfections Before You Paint
The flat, matte finish of primer makes every surface flaw instantly visible: scratches, dust particles, fingerprints, mold lines, and warping all show up clearly under primer's non-reflective surface.
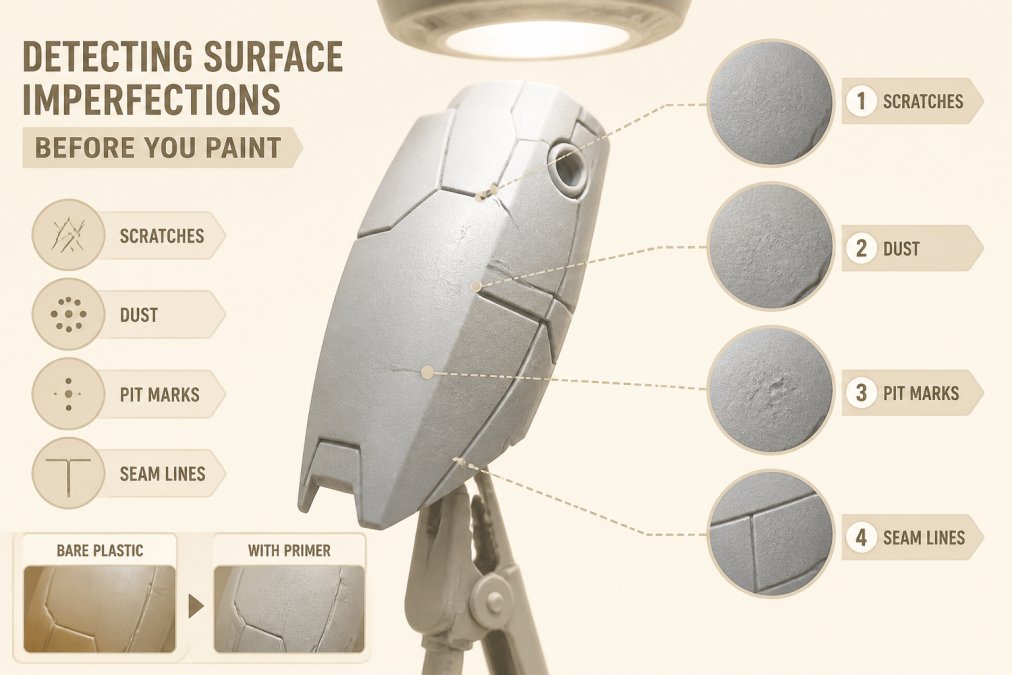
Bare plastic hides imperfections because of its glossy finish and translucency. Once primer goes on, that reflective quality disappears, revealing actual surface topology. A scratch invisible on bare plastic becomes obvious under primer.
This visibility is intentional, primer is your quality-control checkpoint. Before committing to expensive metallic or specialized topcoat paints, you have one last chance to fix problems. Sand out scratches, wipe away dust, or fill gaps with putty. All of this is faster and cheaper at the primer stage than fixing problems under premium paint.
Many builders apply a thin first coat of primer specifically for inspection, then sand lightly and apply a final primer coat once they've confirmed the surface is clean. This two-coat primer approach takes minimal extra time but catches problems that would otherwise ruin hours of detailed painting work.
Best Primer for Gunpla: Spray vs. Airbrush Options
Your choice between spray and airbrush primer depends on your model's size, workspace, and control needs.
Spray primers come in aerosol cans and offer speed and ease. You hold the can 6-8 inches from the part and trigger short bursts. Most hobby-grade spray primers are designed for this distance and spray pattern. You can prime a full HG-scale model in under five minutes.
The downside is overspray and waste. Spray cans atomize paint into a wide cone, so much spray misses small targets. You're also limited by the spray pattern, you can't adjust width or intensity without changing distance, which affects coverage consistency. post-processing 3D prints.
Airbrush primers use compressed air to atomize paint through a finer nozzle, giving you precise control over spray width, paint flow, and application intensity. They work exceptionally well for small, detailed parts and use paint more efficiently with less waste.
The trade-off is setup time and learning curve. An airbrush requires a compressor, hose, cleaning supplies, and practice to master consistent spray patterns. For most builders starting out, spray primer is the practical choice. If you're building multiple models per month or working on large-scale kits with many small parts, airbrush becomes worthwhile.
Utopia Toys and Models carries both spray and airbrush options from brands like Bandai and specialized hobby manufacturers.
Acrylic vs. Lacquer Primer for Models: Which Type to Choose
The chemistry of primer determines compatibility with your topcoat paint, drying time, and how it interacts with plastic.
Acrylic primers are water-based and dry through water evaporation, typically 2-4 hours for handling and 24 hours for full hardness. They're safer to use indoors with minimal volatile organic compounds (VOCs) and are easier to clean up with water and soap.
The catch is adhesion on bare plastic. Acrylic primers don't chemically bond to plastic the way lacquer primers do, they rely entirely on mechanical interlocking. This means surface preparation becomes more critical. Acrylic primers also tend to be less durable than lacquer primers when exposed to solvent-based topcoats, particularly lacquer-based paints.
Lacquer primers are solvent-based and cure through solvent evaporation, typically 30 minutes to 2 hours for handling. They chemically soften the plastic surface slightly, allowing the primer to flow into microscopic pores and create a much stronger bond than acrylic primers.
Lacquer primers are more resistant to solvent-based topcoats and dry harder and smoother, requiring less sanding before applying topcoat. The downside is safety and convenience, they emit strong solvent fumes requiring good ventilation or a respirator, and they're harder to clean up.
Which should you choose? If using acrylic topcoat paint, acrylic primer is fine. If using lacquer topcoat, use lacquer primer to avoid adhesion issues. If uncertain about your topcoat choice, lacquer primer is the safer universal option because it works with both acrylic and lacquer topcoats. Many experienced builders maintain both types on hand.
How to Sand Gunpla Parts Before Priming
Sanding before primer means preparing the surface so primer can grip effectively, not just removing visible blemishes.
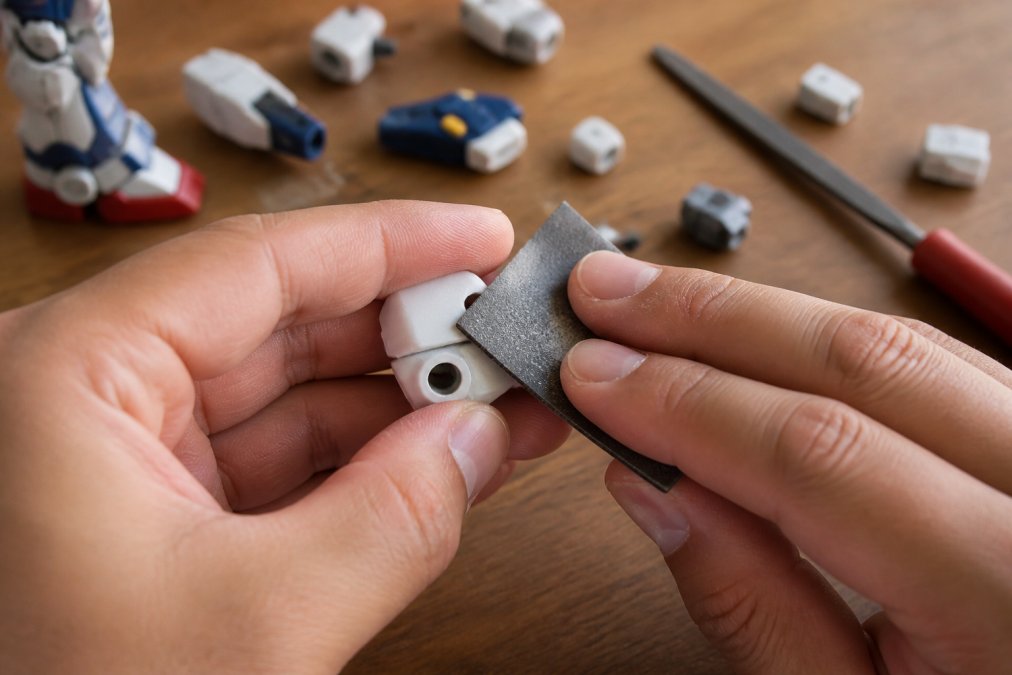
Start with 400-grit sandpaper to remove the glossy finish from bare plastic without creating visible scratches (astm.org). Use light pressure and circular motions, you're roughening the surface to create mechanical adhesion sites for primer, not sanding away material.
Sand all surfaces that will receive primer, including glued joints. Glued joints are stress points where primer and paint need to bridge without cracking. After 400-grit sanding, wipe parts with a lint-free cloth dry first, then use a slightly damp cloth to remove remaining particles. Let parts dry completely before priming.
For parts with visible scratches you want to minimize, use 600-grit sandpaper after the initial 400-grit pass. Don't obsess over perfection, primer will reveal remaining flaws, and you can address them then. The entire sanding process for an HG-scale model typically takes 20-30 minutes.
When You Can Skip Priming and Still Get Results
There are rare situations where primer is genuinely optional, though "optional" doesn't mean "recommended."
If you're using thick, heavily-pigmented acrylic paints designed specifically for plastic models and applying multiple coats, you might achieve acceptable adhesion without primer. These paints are formulated to bond better to plastic than generic acrylics. However, your paint will still be more fragile than paint over primer and will chip more easily when handled.
If you're building a display model that will never be handled after assembly and using high-quality model paints, skipping primer is technically viable. But even here, primer saves you paint and gives better color consistency.
In practice, primer is so inexpensive and quick that skipping it makes no sense. The adhesion and durability you gain far outweigh the minimal time and cost investment.
Conclusion
Primer is the foundation of a paint job that lasts. It gives paint something to grip, reveals surface flaws before you commit to expensive topcoat paints, and creates a barrier that protects your plastic model from moisture and environmental stress.
Whether you choose spray or airbrush application, acrylic or lacquer chemistry, the primer step is non-negotiable if you want results that survive assembly, handling, and time. At Utopia Toys and Models, we stock spray and airbrush primers from trusted brands like Bandai, along with all the sanding supplies and supporting materials you'll need to prepare your Gunpla parts properly. Start with quality primer, and your finished model will reward that investment with durability and visual impact that shows the care you put into the build.
Frequently Asked Questions
Q: Can I paint Gunpla without primer?
A: You can paint without primer, but you risk poor adhesion and reduced paint durability. Primer creates a bonded undercoat that helps topcoat paint grip the plastic surface. Without it, paint may chip, peel, or scratch easily during handling. Primer also reveals surface imperfections you'd otherwise miss, allowing you to correct them before final painting.
Q: What's the best primer for Gunpla models?
A: The best primer for Gunpla depends on your application method and paint system. Lacquer-based spray primers offer fast curing and excellent adhesion but require ventilation. Acrylic-based primers are safer indoors and work well with acrylic topcoats. Airbrush primers provide fine atomization for detailed control. Solvent-based options cure harder but need careful handling. Choose based on your planned topcoat type and workspace.
Q: How does primer help reveal surface imperfections?
A: Primer's opaque pigment coating creates a uniform base layer that makes scratches, dust particles, and mold lines visible. The contrast between the primer and underlying plastic highlights defects you'd miss on bare plastic. This lets you sand, fill, or polish imperfections before applying expensive topcoats, resulting in a cleaner final finish.
Q: Should I prime every part of my Gunpla kit?
A: Most builders prime all visible parts, but you can skip internal components, joints, and areas hidden by assembly. Focus primer on parts that will receive paint or be handled frequently. Parts that stay assembled inside the model or remain unpainted don't require primer. This saves time and primer while protecting the parts that matter most for durability and appearance.
This article was written using GrandRanker