

Table of Contents
- Essential vs. Optional Tools: What You Really Need
- Best Nippers for Gunpla: Single-Blade vs. Double-Blade Options
- How to Remove Nub Marks from Gunpla: Tools and Techniques
- Gunpla Sanding Guide for Beginners: Grits and Surface Preparation
- How to Panel Line Gunpla: Markers and Enamel Washes
- Beginner Tool Kits vs. Individual Purchases: Finding Your Path
- Tool Maintenance, Ergonomics, and Safe Storage Practices
- Best Tools for Gunpla by Kit Grade: Matching Tools to Your Build
Best Tools for Gunpla Model Building: A Complete Guide
Last Updated: July 10, 2026
Building Gundam model kits requires precision, patience, and the right equipment. Finding the best tools for gunpla model building can transform your workflow from frustrating to enjoyable, whether you're assembling your first High Grade kit or tackling a complex Perfect Grade build. This guide breaks down exactly which tools matter most, which ones you can skip, and how to build your toolkit strategically without overspending.
Essential vs. Optional Tools: What You Really Need
A small set of core tools handles 95% of your work. Everything else is optimization.
Must-Have Tools for Every Builder
A quality nipper is your most critical investment. When you cut a part from the sprue, a dull nipper crushes plastic instead of slicing it cleanly, leaving a stress mark called a nub that requires aggressive sanding to remove. A sharp nipper cuts so close to the plastic that minimal sanding is needed afterward.
A hobby knife handles detail cleanup and precision trimming that nippers can't reach. The Tamiya Modeling Knife (74040) costs between $10-15.
Sanding supplies are non-negotiable for surface preparation. A basic set of sanding sponges in grits from 400 to 1000 handles most finishing work. The GodHand Kamiyasu Sanding Sponges offer flexibility that flat sandpaper can't match, conforming to curved armor pieces without leaving flat spots.
A cutting mat protects your work surface and prevents blade dulling. A self-healing cutting mat sized at least 12x18 inches gives you enough workspace.
Tools Worth Adding as You Progress
Panel line markers or enamel washes create definition and depth. The Tamiya Panel Line Accent Color ($6-8) is pre-thinned and flows into panel lines automatically.
Tweezers become essential for Real Grade and Master Grade kits. The Excel Blades Precision Tweezer Set ($10-15) uses anti-static material that prevents small stickers from sticking to the tool.
Decal application chemicals eliminate silvering and prevent air bubbles. The Mr. Hobby Mr. Mark Setter & Softer set ($5-7 per bottle) is essential insurance against ruined decals.
A specialized glass file like the Gunprimer Raser The Black Gate Remover ($25-30) accelerates nub removal without aggressive scratching.
| Tool Category | Essential | Optional | Best For |
|---|---|---|---|
| Nipper | Yes | , | Gate removal, sprue cutting |
| Hobby Knife | Yes | , | Detail cleanup, precision work |
| Sanding Supplies | Yes | , | Surface preparation, nub removal |
| Cutting Mat | Yes | , | Workspace protection |
| Panel Line Markers | , | Yes | Visual depth, definition |
| Tweezers | , | Yes | Decal placement, detail work |
| Decal Chemicals | , | Yes | Water-slide decal application |
| Glass File | , | Yes | Fast nub removal |
Best Nippers for Gunpla: Single-Blade vs. Double-Blade Options
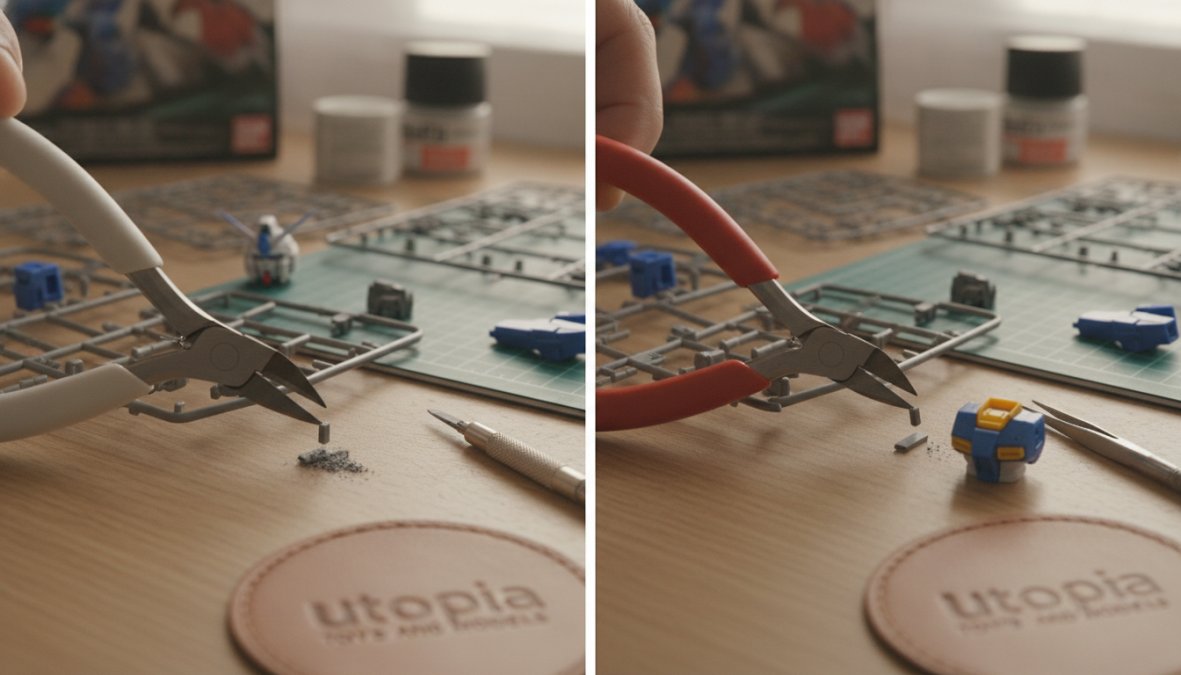
Single-blade nippers cut with one sharp edge against a flat surface, producing the cleanest possible cuts and reaching into tight spaces. This minimizes plastic stress and nub marks. The tradeoff is fragility, the thin blade can break if you apply sideways pressure.
Double-blade nippers use two blades that meet in the middle, similar to scissors. This design is more forgiving and handles thicker plastic gates without breaking. The cut is slightly less flush, leaving a small nub that requires light sanding.
Premium Single-Blade Nippers
The GodHand SPN-120 Ultimate Nipper 5.0 ($50-60) is the gold standard. The ultra-sharp blade cuts so cleanly that many parts need zero sanding after removal from the sprue. The thin profile fits into tight spaces where other nippers jam.
The DSPIAE ST-A 3.0 Single-Blade Nipper ($30-40) offers professional-grade performance at a lower price point. The single-blade design delivers clean cuts comparable to the GodHand, and it includes an adjustable limit screw that prevents blade over-travel.
Reliable Double-Blade Side Cutters
The Tamiya Sharp Pointed Side Cutter (74035) is the workhorse of budget-conscious builders. At $20-25, it's affordable enough to replace if damaged. The sharp-pointed tip reaches into tight spaces better than standard side cutters. For beginners or casual builders, this tradeoff is acceptable.
How to Remove Nub Marks from Gunpla: Tools and Techniques
Nub marks are the small stress marks left where parts connect to the sprue. Removing them cleanly separates amateur builds from polished ones.
Hobby Knives for Precision Cleanup
The Tamiya Modeling Knife (74040) handles initial nub removal on small or detail parts. Hold the knife at a shallow angle and scrape away excess plastic carefully. This removes the bulk of the nub without aggressive sanding. Replace blades frequently, most builders replace them after every 3-5 builds.
Specialized Glass Files and Gate Removal Tools
The Gunprimer Raser The Black Gate Remover ($25-30) uses glass etching technology instead of traditional abrasives. Glass files don't leave deep scratches like sandpaper does, producing noticeably smoother surfaces. Hold the file at a shallow angle and make light, even strokes across the nub area.
Gunpla Sanding Guide for Beginners: Grits and Surface Preparation
The correct grit progression transforms a rough surface into a smooth, paint-ready finish.
Choosing the Right Sanding Grits
Start with 400-grit sanding sponges for initial nub removal. Progress to 600-grit for intermediate smoothing, which removes scratches from 400-grit while still cutting efficiently. Finish with 1000-grit or higher for final polishing. The progression matters, skipping grits leaves visible scratching.
Flexible Sanding Sponges for Curved Parts
The GodHand Kamiyasu Sanding Sponges ($8-10 per sponge) are superior to flat sandpaper because they flex to match curved armor pieces. Use light pressure and make circular motions on curved surfaces. On flat surfaces, use straight strokes with slightly more pressure.
How to Panel Line Gunpla: Markers and Enamel Washes
Panel lining adds depth and definition to your model. A plain gray Gundam looks flat; the same kit with panel lines looks detailed and professional.
Panel Line Markers and Enamel Washes
The Tamiya Panel Line Accent Color ($6-8) is the easiest entry point. The enamel-based formula is pre-thinned and flows into panel lines automatically. Once dry, excess color on raised surfaces can be cleaned with a cotton swab dampened with enamel thinner.
Enamel washes offer more control by mixing enamel paint with thinner to create a thin wash. For beginners, markers are simpler. For detailed work, washes offer better results.
Decal Application Tools and Accessories
Water-slide decals add detail and realism. The Mr. Hobby Mr. Mark Setter & Softer set ($5-7 per bottle) is essential for professional results. Mark Setter helps the decal adhere, while Mark Softer softens the decal to conform to curved surfaces without silvering.
Tweezers are critical for precise placement. The Excel Blades Precision Tweezer Set ($10-15) uses anti-static material that prevents decals from sticking to the tool.
Beginner Tool Kits vs. Individual Purchases: Finding Your Path
Starter kits bundle essential tools at a lower total cost but often include lower-quality tools you'll replace within a few builds. The smarter approach is purchasing essential tools individually from established brands. Spend $50-70 on a quality nipper, $10-15 on a hobby knife, and $20 on sanding supplies.
Building Your Toolkit Strategically
Start with the four essential tools: nipper, hobby knife, cutting mat, and sanding supplies. A $50 nipper versus a $15 nipper represents a difference in cut quality, hand comfort, and time investment that compounds across dozens of builds.
Add optional tools based on what frustrates you. If you hate sanding nubs, invest in a glass file. If panel lining appeals to you, buy panel line markers.
Tool Maintenance, Ergonomics, and Safe Storage Practices
Your tools are investments that need care. Proper maintenance keeps them sharp and functional for years.
Keeping Your Tools Sharp and Functional
Nippers dull through use and can't be sharpened at home, replace them when they dull, typically after 50-100 builds. Hobby knives dull quickly; replace blades every 3-5 builds. A dull blade tears plastic instead of slicing it. Sanding sponges wear out gradually and should be replaced when they stop cutting efficiently. Glass files are durable and last for years; rinse them with water after use to remove plastic dust.
Ergonomic Handling and Hand Health
Hold your nipper with a relaxed grip. Tension in your hand causes fatigue faster than the actual work. Take breaks every 30-45 minutes and stretch your hands and wrists.
Organizing and Storing Your Gunpla Tools
Create a dedicated space for your tools and supplies. A small toolbox or storage drawer keeps everything accessible and protected. Store nippers with blade guards and hobby knives with blade caps. Organize sanding supplies by grit and label them. Store decal chemicals and enamel washes upright in a cool, dry place away from direct sunlight.
Best Tools for Gunpla by Kit Grade: Matching Tools to Your Build
Different Gundam kit grades have different demands.
High Grade (HG) and Real Grade (RG) Kits
High Grade kits are beginner-friendly with larger parts and less visible nubs. A basic nipper and hobby knife handle all gate removal. Real Grade kits are smaller and more detailed, requiring a quality nipper and sanding on visible surfaces. Tweezers become useful for placing tiny decals.
Your tool investment for HG/RG builds: quality nipper ($30-40), hobby knife ($10-15), basic sanding supplies ($20), cutting mat ($15). Total: roughly $75-90.
Master Grade (MG) and Perfect Grade (PG) Kits
Master Grade and Perfect Grade kits are complex and expensive, often costing $80-150 and taking 20-40 hours to build. These kits demand precision tools because mistakes are costly and time-consuming to fix.
Invest in a premium nipper ($40-60) for MG/PG builds. A glass file ($25-30) accelerates nub removal without aggressive scratching visible on large armor pieces. Panel lining becomes important on MG/PG kits because the larger scale makes panel lines more visible.
Your tool investment for MG/PG builds: premium nipper ($50), hobby knife ($10), specialized glass file ($25), high-grit sanding supplies ($30), panel line markers ($8), decal chemicals ($12), tweezers ($12). Total: roughly $150-200.
Building Gundam models should be enjoyable, not frustrating. The right tools make the difference between a rewarding hobby and a chore. Start with essential tools that deliver genuine value, then add specialized tools as your skills develop. With proper tool maintenance and smart purchasing decisions, you'll develop a collection that serves you well through dozens of builds.
Frequently Asked Questions
What are the most essential tools I need to start building Gunpla?
Every Gunpla builder needs nippers (side cutters) to remove parts from the sprue, a hobby knife for cleanup, and sandpaper or sanding sponges for surface preparation. These three tool categories handle the core tasks of gate removal, nub mark reduction, and finishing. Additional tools like tweezers, panel line markers, and enamel cement enhance the final result but aren't required to complete a basic build.
Are expensive single-blade nippers worth the investment for Gunpla?
Premium single-blade nippers like the GodHand SPN-120 deliver significantly cleaner cuts with minimal plastic stress, reducing the need for extensive sanding afterward. However, they're delicate and require careful handling. For beginners, reliable double-blade options like the Tamiya Sharp Pointed Side Cutter offer excellent durability and value. Upgrade to premium nippers once you're comfortable with basic techniques and want to minimize post-cut cleanup.
What's the best way to remove nub marks from Gunpla without damaging the plastic?
Start by cutting as close to the part as possible with your nippers, then use a hobby knife for fine cleanup. Follow up with sanding using progressively finer grits, begin with 400-600 grit, then move to 1000+ for smoothing. Specialized glass files like the Gunprimer Raser remove nubs quickly without deep scratches. Always sand in one direction and test on spare sprues first to avoid over-sanding visible surfaces.
How do I choose between different sanding grits for Gunpla surface preparation?
Start with 400-600 grit sanding sponges to remove major nub marks and gate stress marks. Progress to 1000-2000 grit for smoothing and blending. Use 4000+ grit for final polishing before painting or panel lining. Flexible sanding sponges like GodHand Kamiyasu conform to curved surfaces better than rigid sandpaper, making them ideal for Gundam model kits with contoured armor plating.
What tools do I need to panel line my Gunpla model?
Panel lining requires either panel line markers or enamel washes like Tamiya Panel Line Accent Color. Enamel washes flow into recessed lines and provide professional results, but need enamel thinner for cleanup. You'll also need tweezers for applying water-slide decals and Mr. Mark Setter/Softer solutions to ensure decals adhere properly without silvering. A cutting mat and precision knife help trim decal edges cleanly.
This article was written using GrandRanker