

Table of Contents
- What You'll Need Before You Start
- Why High Humidity Damages Displayed Model Kits
- Signs of Humidity Damage on Model Kits
- Best Dehumidifiers for Hobby Rooms and Display Areas
- Using Silica Gel for Model Storage and Display Cases
- How to Seal Display Cases and Cabinets Against Moisture
- Monitoring and Maintaining a Stable Display Environment
- Common Mistakes to Avoid When Displaying Model Kits in Humid Rooms
- Frequently Asked Questions
Last Updated: September 12, 2026
What You'll Need Before You Start
High humidity is the quiet enemy of every collection of display model kits. For collectors learning how to safely display model kits in high humidity areas, the fix starts with a simple toolkit.
Before you change a single shelf, gather these items:
- A digital hygrometer to measure relative humidity
- A dehumidifier sized for the room
- Silica gel desiccant packs
- Weatherstripping tape or foam seal
- Airtight storage bins with gaskets
- A small fan for air circulation
Total setup time runs about an hour for a single cabinet. The payoff lasts for years.
Why High Humidity Damages Displayed Model Kits
Moisture attacks models in ways most collectors do not notice until the damage is permanent. Relative humidity above roughly 60% lets mold and mildew take hold on paint, paper decals, and cardboard packaging (the EPA). Metal parts, especially diecast, oxidize and corrode. Resin and plastic absorb ambient moisture, and the resulting thermal expansion and contraction cracks paint, bubbles finishes, and degrades decals.
The American Society of Heating, Refrigerating and Air-Conditioning Engineers guidance on indoor humidity notes that stable indoor conditions matter as much as the humidity level itself. A stable environment beats a fluctuating one every time.
Material-Specific Humidity Sensitivity: Diecast vs Resin vs Plastic
Diecast models are the most vulnerable to corrosion. Bare or thinly painted metal oxidizes quickly, and zinc pest, a form of intergranular corrosion, can crumble a diecast body from the inside. Keep diecast in the driest part of your display.
Resin kits absorb moisture and swell slightly, warping thin parts and weakening glue joints over months. Resin holds moisture longer than plastic, so it needs more airflow.
Plastic model kits, including most Gunpla, tolerate humidity better but are not immune. Decals lift, clear coats cloud, and moisture trapped in panel lines encourages mildew.
Signs of Humidity Damage on Model Kits
Catching humidity damage early saves a build. The signs of humidity damage on model kits show up in a predictable order, so you can act before a display piece becomes a restoration project.
Watch for these warning signs:
- Decals lifting at the edges or turning milky
- Paint bubbling or blistering on metal and resin
- White powdery residue on diecast surfaces
- A musty smell inside the display case
- Warped or bowed thin parts
- Cloudy clear coats and windows
- Rust-colored spotting on screws and hinges
Best Dehumidifiers for Hobby Rooms and Display Areas
Choosing among the best dehumidifiers for hobby rooms comes down to three variables most guides ignore: the technology type, the actual water removal rate at your room's temperature, and whether the unit can hold a setpoint without short-cycling.
Compressor vs Desiccant: Pick by Temperature, Not Just Size
Compressor dehumidifiers work like a refrigerator: a cold coil condenses moisture, which drips into a tank or drains through a hose. They are the most efficient choice in warm, humid conditions and what most collectors should buy for a conditioned hobby room. Their weakness is cold air: below roughly 65°F, the coil ices up, the unit defrosts on a cycle, and water removal drops sharply (energy.gov).
Desiccant dehumidifiers pass air over a moisture-absorbing wheel and regenerate it with a heater. They keep working in cool spaces and are lighter and quieter, which matters if the unit sits in the same room as your display. The trade-off is higher energy use per pint removed and slight warming of the room air. For an unheated basement or cool garage, a desiccant unit is often the only type that performs.
Sizing by Pint Capacity and Room Volume
Pint ratings are measured at a standard test condition, so treat them as a comparison tool rather than a promise. Use these ranges as a starting point, then size up if the space is open to a larger area:
- Small rooms under 300 sq ft: compact compressor unit, 20 to 30 pint capacity
- Medium rooms 300 to 700 sq ft: 30 to 50 pint capacity
- Basements and garages: 50 pint or higher, or a desiccant type for cooler temperatures
- Display cases: mini dehumidifiers or rechargeable desiccant canisters
A unit that is too large for a small, well-sealed room cycles rapidly, wearing the compressor and making humidity bounce; one that is too small runs continuously and never reaches setpoint. Match the unit to the space, then seal the space so it has less work to do.
Setpoints, Drainage, and Placement
Run the dehumidifier continuously during humid months and set it to hold the room near 45% relative humidity. Do not chase 30%; over-drying stresses wood, paper, and decal adhesives. Use the continuous drain option if available, an unattended tank that fills and shuts the unit off is the most common reason a hobby room drifts back to 65% overnight.
Placement matters as much as capacity. Keep the unit at least a foot from walls, and do not park it directly under a display case where its exhaust dries one shelf and leaves another damp. Pair it with gentle air circulation so moisture never settles in one corner.
Smart Home Integration: Automate the Setpoint
A dehumidifier with a built-in humidistat is convenient, but its sensor sits at the unit, not inside your display case. A common pattern among collectors is to place a Wi-Fi hygrometer inside the case and a smart plug on the dehumidifier, then automate the unit to turn on when case humidity crosses a threshold and off when it drops. This keeps the case in range without running the unit around the clock and alerts your phone if humidity climbs while you are away. Check that your dehumidifier resumes its previous setting after a power cut, since some units default to off.
Using Silica Gel for Model Storage and Display Cases
Using silica gel for model storage is the cheapest insurance you can buy. Silica gel is a desiccant that pulls moisture from the air, and in a sealed display case or storage bin it holds humidity low without any power.
Here is how to use it well:
- Choose indicator silica gel that changes color when saturated.
- Place packs in corners and near the base, where damp air settles.
- Use more packs in larger cases, roughly one small pack per cubic foot.
- Seal the case so the desiccant is not fighting the whole room.
- Check the indicator every few weeks during humid season.
How to Recharge and Replace Desiccant Packs
Most silica gel packs can be recharged rather than thrown away. Oven-safe packs recharge at low temperature for a few hours until the indicator returns to its dry color; check the manufacturer's instructions, because some packs are not oven-safe and should be replaced. Keep a spare set on rotation so your case never sits unprotected.
How to Seal Display Cases and Cabinets Against Moisture
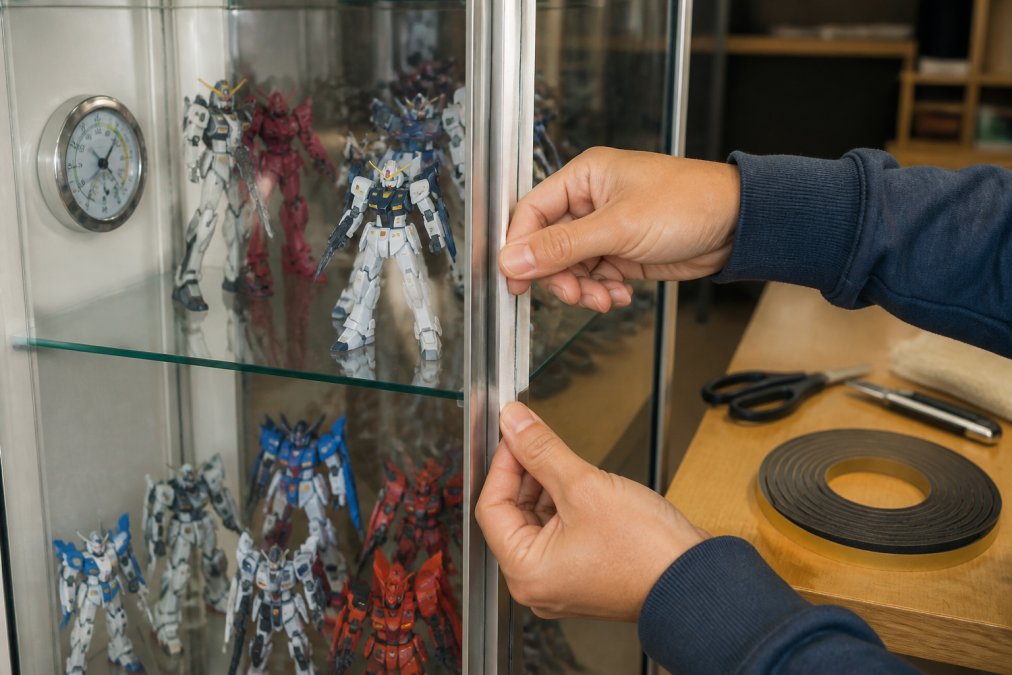
Sealing a curio cabinet or display case is the single highest-impact step for long-term preservation. A sealed case turns your desiccant and dehumidifier into a controlled microclimate instead of a losing battle against the whole room. Here is the actual sequence, with the materials and checks that make it work. Maintaining this internal environment remains difficult if the exterior glass faces extreme temperature shifts, necessitating a broader strategy for controlling room condensation that stabilizes the ambient air surrounding your collection.
Materials That Actually Seal
- Closed-cell foam weatherstripping tape for door frames and uneven gaps. It compresses well and does not absorb water the way open-cell foam does.
- Silicone or EPDM bulb seal for doors that close against a flat stop. It lasts longer than foam and rebounds after repeated opening.
- Removable putty or rope caulk for cable holes, shelf peg openings, and any gap you may need to reopen later.
- Clear polyethylene sheeting and magnetic tape for open shelving that has no door at all.
- A cheap digital hygrometer to verify the result. Without it you are guessing.
Step-by-Step Sealing
- Clean and dry all case edges before applying any seal. Dust and old adhesive defeat new tape.
- Apply weatherstripping tape or foam seal along door frames and gaps, pressing it into the corner where the door meets the frame rather than across the face.
- Seal cable holes and shelf peg openings with removable putty. If you run a hygrometer probe or light cord into the case, seal around the cord, not over it.
- Add a moisture barrier liner to the back panel if the case sits against an exterior wall; closed-cell foam or plastic sheeting blocks the wall's moisture.
- Check the seal by closing the door on a strip of paper; if it pulls free easily, the gap needs more tape. Test the top, bottom, and both sides, because doors rarely seal evenly.
DIY Airtight Display Modifications on a Budget
You do not need a custom cabinet to get airtight results. The most reliable low-cost conversion is a gasketed storage tote used as a display case: clear bins with a rubber gasket in the lid seal far better than a glass cabinet with a loose door, at a fraction of the cost. Add a removable desiccant holder made from a small plastic container with holes punched in the lid, and you have a sealed microclimate for a single model or a small group.
For an existing bookcase or open shelving, clear polyethylene sheeting over the front, held with magnetic tape or hook-and-loop strips, works as a lightweight moisture barrier for short-term setups. It is not airtight, but it cuts air exchange enough to make desiccant last longer. For a glass curio, the highest-value upgrade is a bulb seal on the door stop plus putty in the shelf peg holes.
A Wi-Fi hygrometer inside the case alerts your phone when humidity climbs, so you can switch on a dehumidifier or swap desiccant before damage starts. Pair it with a smart plug on the dehumidifier and the case largely manages itself.
Monitoring and Maintaining a Stable Display Environment
Environmental monitoring turns guesswork into data. A digital hygrometer costs little and tells you exactly what your models experience. Place one inside each display case and one in the room, then compare.
Aim for these targets:
| Factor | Target Range | Why It Matters |
|---|---|---|
| Relative humidity | 40-50% | Prevents mold, corrosion, decal lift |
| Ambient temperature | 65-72°F, stable | Limits thermal expansion |
| Air circulation | Gentle, continuous | Stops moisture settling |
| Light exposure | Indirect only | UV protection for paint, decals |
| Desiccant check | Every 2-4 weeks | Catches saturation early |
Keep models away from direct sunlight and exterior walls. Rotate desiccant on schedule, and log readings so you spot trends before damage starts.
Common Mistakes to Avoid When Displaying Model Kits in Humid Rooms
The biggest errors are consistent across collections. Avoid these and you sidestep most humidity damage.
- Storing models in closed cardboard boxes, which trap moisture against the finish
- Placing display cases against uninsulated exterior walls
- Relying on a single desiccant pack for a large case
- Skipping the hygrometer and guessing at humidity
- Displaying in direct sunlight, which accelerates paint and decal degradation
- Sealing a case while the interior is already damp
Whether you are protecting a resin figure or a diecast centerpiece, the principles hold: measure, seal, dry the air, and monitor. Utopia Toys and Models carries a wide variety of collectible toys and Gundam models from top brands like Bandai, Funko, and Kotobukiya, with most items in stock and ready to ship and transparent availability for upcoming releases.
Humidity does not have to end your display plans. With a hygrometer, a dehumidifier, silica gel, and a properly sealed case, you can protect every build for the long term. Utopia Toys and Models carries a wide variety of collectible toys and Gundam models from top brands like Bandai, Funko, and Kotobukiya, with most items in stock and ready to ship and transparent availability for upcoming releases. Get started with Utopia Toys and Models and display your collection with confidence, season after season.
Frequently Asked Questions
What is the ideal humidity level for storing plastic model kits?
Aim for 40% to 50% relative humidity in your display area. Below 40% risks drying out decals and causing them to crack, while above 60% creates prime conditions for mold growth, corrosion on metal parts, and decal lifting. A calibrated hygrometer placed inside or near your display case gives you real-time readings so you can adjust a dehumidifier or swap desiccant packs before damage starts.
Can high humidity cause decals to peel on model kits?
Yes. Moisture absorption softens the adhesive layer under waterslide decals, causing edges to lift and curl over time. Once a decal peels, dust and moisture get underneath, making it nearly impossible to re-seat cleanly. In humid rooms, seal finished decals with a clear topcoat and keep the display case below 50% relative humidity to prevent this.
How do silica gel packets help protect model collections?
Silica gel absorbs moisture from the air inside a sealed display case or storage bin, keeping relative humidity low around your kits. For a typical curio cabinet, use 50 to 100 grams of desiccant and check it monthly. When the indicator beads change color, recharge the packs in an oven at 250 degrees Fahrenheit for two to three hours or replace them.
How can I tell if my model kits are suffering from moisture damage?
Watch for white powdery spots on diecast metal, a musty smell inside the case, decals lifting at the edges, paint bubbling or flaking, and a dull cloudy film on clear plastic parts. Mold growth often appears as dark speckles in crevices. Catching these signs early lets you dry the kit, replace desiccant, and lower humidity before permanent damage sets in.