

Last Updated: October 28, 2026
Quick Summary
The best beginner Gundam kits are High Grade (HG) models, which are the most common entry point into Gunpla. Strong first picks include the HG RX-78-2 Gundam, the HG Zaku II, and the Entry Grade RX-78-2, which is the simplest and cheapest option. Pick a design you already recognize to stay motivated through the build.
- High Grade (HG) is the most common beginner grade, usually around 1/144 scale.
- The HG RX-78-2 Gundam (Revive version) is the classic first kit recommendation.
- Entry Grade RX-78-2 has fewer parts and takes well under an hour to build.
- Good nippers matter most, because they cut parts cleanly and reduce cleanup work.
- Trim parts in two stages to avoid white stress marks and visible nub bumps.
Table of Contents
- Understanding Gunpla Grades: HG, RG, MG and More
- Best HG Gundam Kits for Beginners
- Gundam Kits Under $30: Budget-Friendly Starters
- Essential Gunpla Tools for Beginners
- Assembly Tips and Common Beginner Mistakes
- Painting, Panel Lining and Caring for Your Finished Build
- Choosing Your First Kit and Where to Buy It
- Frequently Asked Questions
Gundam kits are the most approachable entry point into the hobby of building Gunpla, the plastic model kits based on the anime franchise. For a beginner, a High Grade (HG) model is one option to consider. This guide from Utopia Toys and Models walks through the grades, the kits we would recommend, the tools you actually need, and how to avoid the mistakes most new builders make.
Understanding Gunpla Grades: HG, RG, MG and More
Gunpla comes in several grades, and the grade mostly tells you how complicated the build will be. The grade names describe detail and structure, not how good the model looks.
- Entry Grade (EG): The simplest and cheapest option, with few parts and snap-fit assembly.
- High Grade (HG): The most common beginner grade, usually around 1/144 scale, with clean proportions and moderate part counts.
- Real Grade (RG): Finer detail and more internal frame work, aimed at builders with some experience.
- Master Grade (MG): Larger, more articulated kits with inner frames, often around 1/100 scale.
Best HG Gundam Kits for Beginners
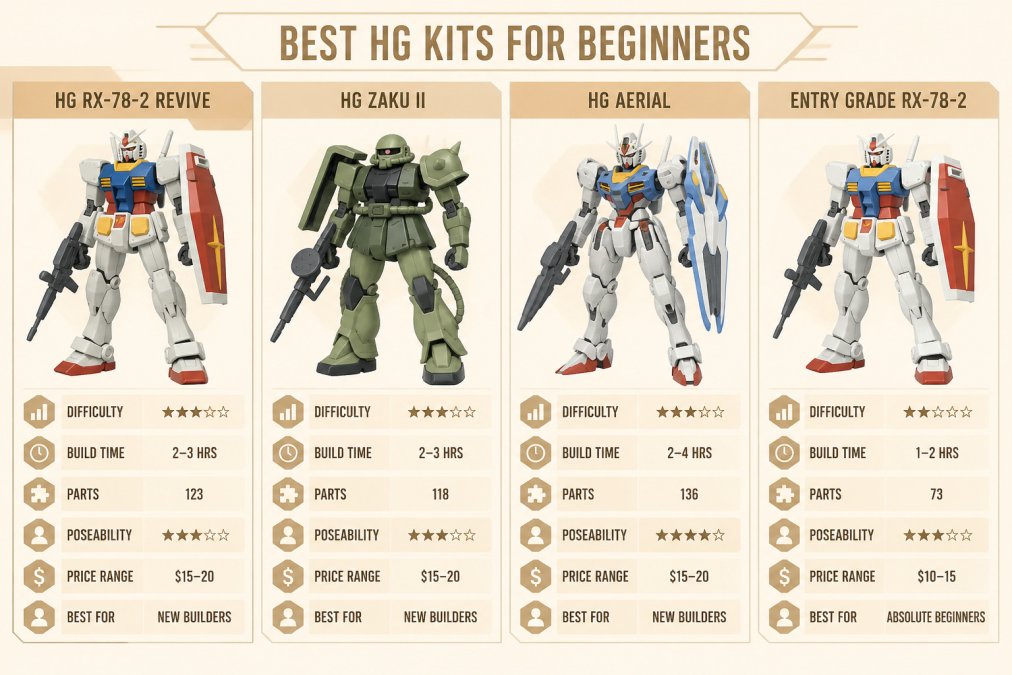
- HG RX-78-2 Gundam (Revive version): The classic original-series mobile suit and the most common "first kit" recommendation. It is a 1/144 scale snap-fit build with a modest parts count, solid color separation, and enough articulation to pose. If you want the iconic Gundam look with no surprises, start here.
- HG Zaku II: The other half of the original-series rivalry. Slightly more involved than the RX-78-2 because of the mono-eye and tubing details, but still a clean beginner build. A good second kit once you have one build under your belt.
- HG Aerial (from The Witch from Mercury): A recent-release HG with modern engineering, clean proportions, and a straightforward build. A strong pick if you want a current design rather than a classic one.
- Entry Grade RX-78-2: The cheapest and simplest option. Fewer parts than an HG, no polycaps to fuss with, and a build that takes well under an hour. Ideal if you are unsure whether you will enjoy the hobby.
Gundam Kits Under $30: Budget-Friendly Starters
Budget kits are a good way to test whether you enjoy the hobby. If you do, you can invest in better tools and larger kits later.
Essential Gunpla Tools for Beginners
You can build a basic HG kit with very little. Most builders start with:
- Nippers: For cutting parts cleanly from the plastic runners.
- A hobby knife: For trimming nub marks left by the nippers.
- Sanding sticks or files: For smoothing the cut spots.
- A cutting mat: To protect your work surface.
Good nippers make the biggest difference. Cheap tools can crush or whiten plastic, so a single quality pair is worth the spend. Browse our best Gunpla customization supplies and tools guide to find the right fit for your budget. The Gunpla tool market is large, so the best option is the one that fits your budget and the kits you plan to build.
Assembly Tips and Common Beginner Mistakes
Most early problems come from rushing, but the specific failures beginners hit are predictable, and each has a cause and a fix. This section covers the mechanisms behind the three most common problems so you can troubleshoot instead of guessing.
Nub marks. When you cut a part from the runner, a small stub of plastic (the nub) is left behind. If you cut flush against the part, the nippers crush the plastic and leave a whitish stress mark. The fix is a two-cut method: first cut the part free with a gap of plastic left on the nub, then trim the remaining nub close with a second, lighter cut, and finish with a hobby knife or sanding stick. Cutting in stages spreads the stress and reduces whitening.
Stress marks. These are the white, cloudy patches that appear where plastic was bent or crushed. They happen when a joint is forced or a part is twisted out of alignment. Prevention: test-fit each part before pressing it home, check the orientation against the manual, and never force a snap-fit joint, if it resists, the part is usually reversed or misaligned. Stress marks on a visible surface can sometimes be reduced by gently rubbing with a fingernail, but the real fix is avoiding them.
Broken parts. The most common break is a peg snapped off inside a socket, usually from forcing a joint or from trimming a nub too aggressively. Trim slowly, check each piece before assembly, and keep the runner until the build is finished so you can identify any part you missed.
Common mistakes to avoid:
- Cutting parts with the wrong tool and leaving white stress marks.
- Skipping nub removal, which leaves visible bumps on the finished model.
- Pressing parts together without checking the joint first.
- Discarding a runner before checking that every part has been removed.
The three most common beginner problems each have a cause and a fix, as summarised below.
| Problem | Cause | Fix |
|---|---|---|
| Nub marks | Cutting flush against the part | Cut in two stages, then trim with a hobby knife or sanding stick |
| Stress marks | Forcing a joint or bending a part | Test-fit each part and never force a snap-fit |
| Broken parts | Forcing a joint or trimming too aggressively | Trim slowly and keep the runner until the build is finished |
Painting, Panel Lining and Caring for Your Finished Build
Once the model is assembled, you can add detail with stickers, decals and panel lining. Panel lining is a dark wash that settles into recessed seams and makes the model stand out. Many builders start with stickers before attempting paint, since paint takes practice and the right equipment. To understand how the paint you choose affects the finished model, read why paint quality matters in model kits.
After the build is complete, keep the model out of direct sunlight to prevent fading and dust it regularly. A display stand protects the figure and makes it easier to pose. Clean, careful handling extends the life of your model for years.
Choosing Your First Kit and Where to Buy It
Utopia Toys and Models carries a wide selection of Gundam and other model kits from brands such as Bandai. Most items are in stock and ready to ship, and the site shows clear status for arriving-soon and pre-order items, so you know exactly what to expect before you order. Check the product page for current pricing and availability, since prices and stock change frequently.
Frequently Asked Questions
What is the easiest Gundam kit for a beginner? A High Grade (HG) kit is one option to consider for a first build.
Do I need glue to build Gunpla? Most HG and Entry Grade kits are designed to snap together without glue. Higher grades may recommend glue or specific cement for certain joints, so check the instruction manual for each kit.
What tools do I need for my first Gunpla build? Nippers, a hobby knife, sanding sticks and a cutting mat cover most beginner builds. Good nippers matter most, because they cut parts cleanly and reduce cleanup work.
Frequently Asked Questions
Which Gundam kit is best for a complete beginner?
An HG (High Grade) kit is one option to consider for a first build. Pick a mobile suit you already like.
Do I need tools to build a Gundam kit?
You can build most HG kits with only a pair of nippers to remove parts from the runners, plus a hobby knife to clean up nub marks. Sandpaper and a fine-tip panel line pen are useful for better results. Glue is usually optional for snap-fit kits, though some builders add it for durability. Start minimal and add tools as your skills and interest grow.
How much should a beginner spend on a Gundam kit?
Many HG kits sell for under $30, which makes them a reasonable first purchase. Larger grades such as RG or MG cost more and are better saved for after you have built a few kits. Prices vary by retailer, release date and availability, so check current listings before buying. Budget for basic tools as well, since nippers and a hobby knife are worth having from the start.
What is the difference between HG, RG and MG Gundam kits?
HG (High Grade) kits are the simplest and most affordable, typically at 1/144 scale with fewer parts. RG (Real Grade) kits are more detailed, with more internal frame and articulation, and are often built at 1/144 scale. MG (Master Grade) kits are larger, usually at 1/100 scale, and have the most complex internal structure and articulation. Beginners generally progress from HG to RG to MG as their skills improve.

