

Table of Contents
- The Verdict: Is a Magnifying Lamp Worth It for Miniature Painting?
- Magnification Strength for Painting Miniatures: What the Numbers Mean
- Magnifying Headset vs Lamp for Painting: Which Fits Your Workflow?
- Key Features That Decide Between a Good Lamp and a Bad One
- Eye Strain Prevention for Hobbyists: Lighting, Posture, and Focal Length
- Common Magnifying Lamp Mistakes and How to Avoid Them
- Final Thoughts: Matching the Tool to Your Painting Style
- Frequently Asked Questions
Last Updated: September 6, 2026
The Verdict: Is a Magnifying Lamp Worth It for Miniature Painting?
If you paint miniatures for more than an hour at a time, a magnifying lamp is worth it for the eye strain relief alone. This guide breaks down whether a magnifying lamp for miniature painting is worth it for your specific workflow, covering magnification strength, lighting quality, and the ergonomic trade-offs that most hobbyists overlook. The honest answer is that it depends heavily on your eyesight, your painting style, and the size of the details you typically tackle.
A magnifying lamp is a desk-mounted tool that combines an illuminated lens with an adjustable arm, letting you see fine details while keeping both hands free. Many hobbyists report that the real benefit is not just seeing better, but sitting in a healthier position instead of hunched over the workbench squinting at a 1/144 scale kit. The tool pays for itself in comfort during long panel-lining or decal sessions.
Magnification Strength for Painting Miniatures: What the Numbers Mean
Magnification strength for painting miniatures is measured in diopters, and understanding this scale is the first step to choosing correctly. A 3-diopter lens provides 1.75x magnification, which is the sweet spot for most miniature work because it offers a generous field of view without heavy distortion (aoa.org). Lower-powered lenses like 1.5x and 2x are better for assembly and larger parts, while 5x and above narrows your field of view so much that you lose spatial awareness of the model.
The working distance, or the space between the lens and your miniature, also shifts with magnification. Higher diopter lenses require you to work closer to the glass, which can interfere with brush placement and make you crowd the work area. For painting eyes, freehand details, and tiny decals, most hobbyists find that a 2.5x to 3x lens balances clarity with enough room to maneuver a brush.
Beyond the raw numbers, the optical design determines how usable that magnification actually is. A 3-diopter acrylic lens with a 5-inch diameter gives you a comfortable viewing window, but the edges will show chromatic aberration, color fringing that makes dark outlines look purple or green. Optical glass lenses, like those used in the Donegan OptiVISOR or higher-end Brightech models, correct for this distortion, keeping edges crisp across the entire field. If you are matching paint shades or doing fine wet blending, that edge clarity matters more than the magnification figure on the box.
Depth of field is another factor hobbyists overlook. At 3x magnification, the in-focus zone is roughly 1 to 2 inches deep. That means the front of a Space Marine's shoulder pad can be tack-sharp while the back edge falls slightly soft. You compensate by moving the model, not your head, which is why a lamp with a smooth, adjustable arm is essential. Cheaper lamps with stiff joints force you to reposition the entire base, breaking your concentration mid-stroke.
For most miniature painters, the practical sweet spot is a 2.5x to 3x lens with a working distance of 10 to 14 inches. This range lets you keep your elbows on the desk, your brush hand steady, and the model close enough to see panel lines without losing the overall silhouette. If you primarily paint 28mm heroic-scale figures, a 3x lens is the default recommendation. If you work on larger scale busts or vehicles, a 1.75x to 2x lens gives you a wider field of view and more room to maneuver a larger brush.
Magnifying Headset vs Lamp for Painting: Which Fits Your Workflow?
The magnifying headset vs lamp for painting decision comes down to one question: does the magnification need to move with your head, or stay fixed over your work? A head-mounted magnifier like the YOCTOSUN Head Mount Magnifier offers interchangeable lens plates from 1.5x to 5x and a rechargeable LED system, making it portable and highly affordable. The tradeoff is that wearing extra weight on your head for hours can cause neck fatigue, and the focal point stays locked to your face rather than the model.
A desk-mounted magnifying lamp like the Brightech LightView Pro Flex keeps the lens and light fixed over your work, which means you move the model into focus rather than chasing it with your head. The flexible gooseneck lets you position the 3-diopter lens exactly where you need it, and the integrated LED ring provides shadow-free illumination directly on the paint surface. For painters who sit at a dedicated desk for extended sessions, the stability of a lamp usually wins over the mobility of a headset.
| Feature | Head-Mounted Magnifier | Desk-Mounted Magnifying Lamp |
|---|---|---|
| Best For | Moving around, quick checks | Long, stationary painting sessions |
| Neck Strain | Moderate to high | Minimal |
| Lighting | Built-in, moves with head | Fixed, shadow-free over work area |
| Field of View | Limited by lens plate | Larger lens options available |
| Price Range | Lower entry cost | Higher, varies by features |
Key Features That Decide Between a Good Lamp and a Bad One
A quality magnifying lamp for miniature painting is defined by its lens optics, lighting quality, and base stability, not just its magnification power. Optical glass lenses, like those on the Donegan OptiVISOR, deliver superior clarity without the distortion common in cheaper acrylic lenses. Plastic lenses work for basic tasks, but they can introduce color fringing and blur at the edges, which becomes obvious when you are trying to match paint shades precisely.
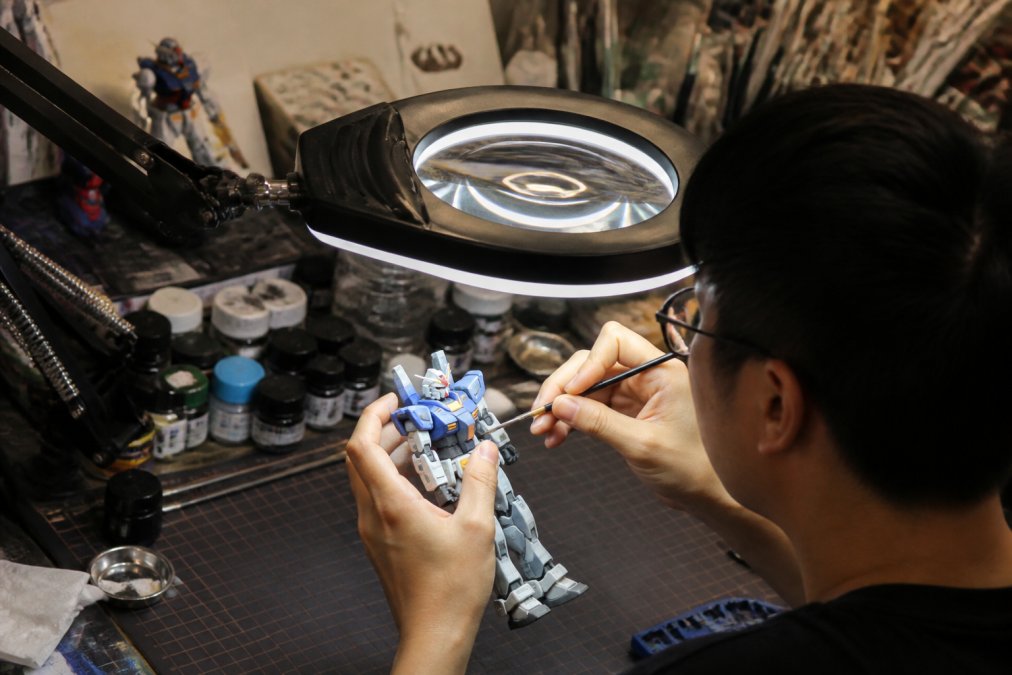
LED lighting quality matters more than most buyers realize. Look for a lamp with a high Color Rendering Index (CRI) and adjustable color temperature, since warm light can shift how you perceive paint colors. The ArtDot Magnifying Lamp offers adjustable brightness and color temperature control, which helps you see true color while painting. A stable weighted base or a sturdy desk clamp is also critical, because a lamp that wobbles when you move your brush is worse than no lamp at all.
Eye Strain Prevention for Hobbyists: Lighting, Posture, and Focal Length
Eye strain prevention for hobbyists starts with understanding that your eyes are doing two jobs at once: focusing through a lens and compensating for poor lighting. When a lamp provides bright, shadow-free illumination, your pupils stay smaller and your focusing muscles work less. Flicker-free LEDs are essential here, since invisible flicker at certain frequencies can cause headaches and fatigue during long painting sessions (the CDC).
Your posture also changes when you use a magnifying lamp correctly. Because the lamp brings the work closer and provides light, you can sit upright with the miniature at a comfortable height rather than leaning forward. Ergonomics experts recommend keeping your forearms supported and your neck in a neutral position, which is difficult to achieve without a stable, adjustable light source (osha.gov). The combination of proper focal length and good task lighting reduces the squinting that leads to eye fatigue and tension headaches.
Common Magnifying Lamp Mistakes and How to Avoid Them
The most common mistake hobbyists make is buying a lamp with too much magnification, then discovering the narrow field of view makes it impossible to paint larger surfaces or see the whole model at once. A lamp that forces you to constantly reposition the arm interrupts your painting flow and defeats the purpose of hands-free viewing. Start with a 2.5x or 3x lens and only move up if you consistently need more detail for specific tasks like eyes or tiny insignias.
Another frequent error is ignoring the lamp's footprint and mounting requirements until it arrives. Desk clamp models need a sturdy edge at least an inch thick, while weighted base models consume significant workbench real estate. Measure your workspace before purchasing, and remember that a swing arm with a long reach gives you more flexibility to position the light exactly where you need it without crowding your paint station.
What most buying guides miss is how a magnifying lamp interacts with the rest of your hobby setup. A wet palette, for instance, needs to sit within your natural reach while you paint. If your lamp's base occupies the spot where your palette normally rests, you will constantly shift the palette in and out of the light, disrupting your paint's moisture level. Look for a lamp with a compact weighted base or a clamp that mounts to the rear edge of your desk, leaving the front 12 inches of your workspace clear for your palette, brush holder, and model.
Airbrush users face a different problem. A magnifying lamp positioned over the spray booth can cast shadows from the booth's exhaust hood, and the lamp's lens can accumulate overspray residue that is difficult to clean. If you airbrush with magnification, mount the lamp to the side of the booth at a 45-degree angle rather than directly overhead. This keeps the lens out of the overspray path while still illuminating the model surface. You will also want to cover the lens with a clear plastic film or a dedicated lens cap when switching from brush painting to airbrushing.
For painters using a spray booth for priming and varnishing, the lamp's light can create glare on the booth's transparent shield, making it hard to see the model's actual surface. Position the lamp so the light hits the model from the side, not through the shield. Many hobbyists find that a separate, non-magnifying task light works better for airbrush sessions, reserving the magnifying lamp for fine brushwork.
Small workspace setups present their own challenges. If you paint on a folding table or a desk that doubles as a computer station, a floor-stand magnifying lamp with a narrow footprint is often a better choice than a desk clamp. The Brightech LightView Pro Flex floor model takes up about 1 square foot of floor space and can be rolled aside when not in use. Alternatively, a lamp with a C-clamp mount can attach to a shelf edge or a utility cart, keeping your primary work surface completely clear.
| Mistake | Why It Happens | Better Approach |
|---|---|---|
| Buying too much magnification | Assuming more power equals better vision | Start at 2.5x-3x for balanced field of view |
| Ignoring lens material | Focusing only on price | Choose optical glass for clarity |
| Skipping CRI and color temp checks | Not knowing LED quality varies | Look for high CRI and adjustable warmth |
| Forgetting mounting requirements | Not measuring the workspace | Verify clamp thickness or base footprint first |
| Blocking wet palette access | Lamp base occupies prime workspace | Mount lamp to rear edge or use floor stand |
| Exposing lens to airbrush overspray | Positioning lamp over spray booth | Angle lamp from side and cover lens when spraying |
Final Thoughts: Matching the Tool to Your Painting Style
A magnifying lamp is worth it if you paint regularly, but it is not a universal upgrade for every hobbyist. If you primarily build and detail larger scale kits or work under strong natural light with good posture, you might not need one. However, if you find yourself squinting at 1/144 scale details, holding kits up to a desk light, or feeling eye fatigue after an hour of panel lining, a quality magnifying lamp will change how comfortably you paint.
For painters who want to improve their setup, the decision between a lamp and a headset should follow your workflow, not a trend. The team knows that every builder works differently, which is why we stock tools that support precision work at any scale. Check our current selection of hobby tools and model kits to pair your new lighting setup with the next project on your bench.
Frequently Asked Questions
What magnification is best for painting miniatures?
For most miniature painting, a 2x to 3x diopter strength (roughly 1.5x to 2.25x actual magnification) is the practical sweet spot. This range offers enough enlargement to see details like eyes and edge highlights without creating a shallow depth of field that forces you to hold your head perfectly still. Higher strengths like 5x are useful for extremely fine work but often require moving the miniature out from under the lens to see the whole model. Start with a 3-diopter lamp, which balances detail visibility with a workable focal range.
Are magnifying glasses better than magnifying lamps for painting?
Neither is universally better, but they solve different problems. A magnifying lamp combines hands-free magnification with direct, shadow-free task lighting, which is ideal for long painting sessions at a desk. A head-mounted magnifier, often called a visor, moves with your head so the focal point stays centered even as you lean in, but it adds weight and can cause neck fatigue. If your main issue is inconsistent lighting and eye strain, a lamp is the stronger choice. If you need to switch between magnified and normal vision frequently, a flip-up visor may be more convenient.
Do professional miniature painters use magnifying lamps?
Most professional and competition-level painters use some form of magnification, whether a desk lamp, a headset, or both. The reason is practical: consistent detail work at 28mm to 75mm scale demands seeing brush placement clearly. However, many pros also emphasize that a high-quality, high-CRI light source matters as much as the lens. They use magnification to reduce eye strain and improve precision, not as a crutch. A lamp with adjustable brightness and a stable arm is a common staple in professional studios because it keeps both hands free for the model.
How does a magnifying lamp help with eye strain prevention for hobbyists?
A magnifying lamp helps prevent eye strain by combining two factors: reduced squinting and consistent lighting. When you strain to see small details, you tend to lean forward and tense your neck and shoulders, which accelerates fatigue. A lamp brings the detail closer, letting you maintain a more natural posture. The built-in LED light also ensures your eyes aren't fighting shadows or inconsistent room lighting. For best results, choose a lamp with a high Color Rendering Index (CRI) and adjustable brightness so you can match the light level to your environment.
Choosing the right magnifying lamp comes down to matching magnification, lighting quality, and ergonomics to your specific painting habits. Start with a 3-diopter optical glass lens, verify the LED has a high CRI with adjustable brightness, and confirm the mounting works in your space. Get started with Utopia Toys and Models and find the tools that keep your eyes fresh and your brush steady for every build.