

Table of Contents
- Why Gundam Model Kit Display Ideas Matter for Your Collection
- 1. Dynamic Posing With Action Bases and Stands
- 2. Protective Display Cases for Long-Term Preservation
- 3. Bringing Models to Life With LED Lighting
- 4. Building Immersive Dioramas and Custom Environments
- 5. Space-Saving Display Solutions for Small Spaces
- 6. Displaying Modified and Customized Kits
- 7. Protection and Maintenance: Keeping Your Display Pristine
Last Updated: July 26, 2026
Why Gundam Model Kit Display Ideas Matter for Your Collection
Displaying Gundam model kits properly transforms them from boxed investments into showpieces that justify every penny spent. A displayed collection isn't just visually superior, you engage with your models more, notice details you missed during assembly, and feel genuine satisfaction from ownership.
The real challenge isn't finding a way to display Gundam models, it's finding the right way for your space, budget, and collection type. A High Grade kit needs different support than a Perfect Grade. This guide covers eight proven display approaches, from dynamic action base posing to immersive dioramas, with specific tactics for protecting your investment and maximizing visual impact.
1. Dynamic Posing With Action Bases and Stands
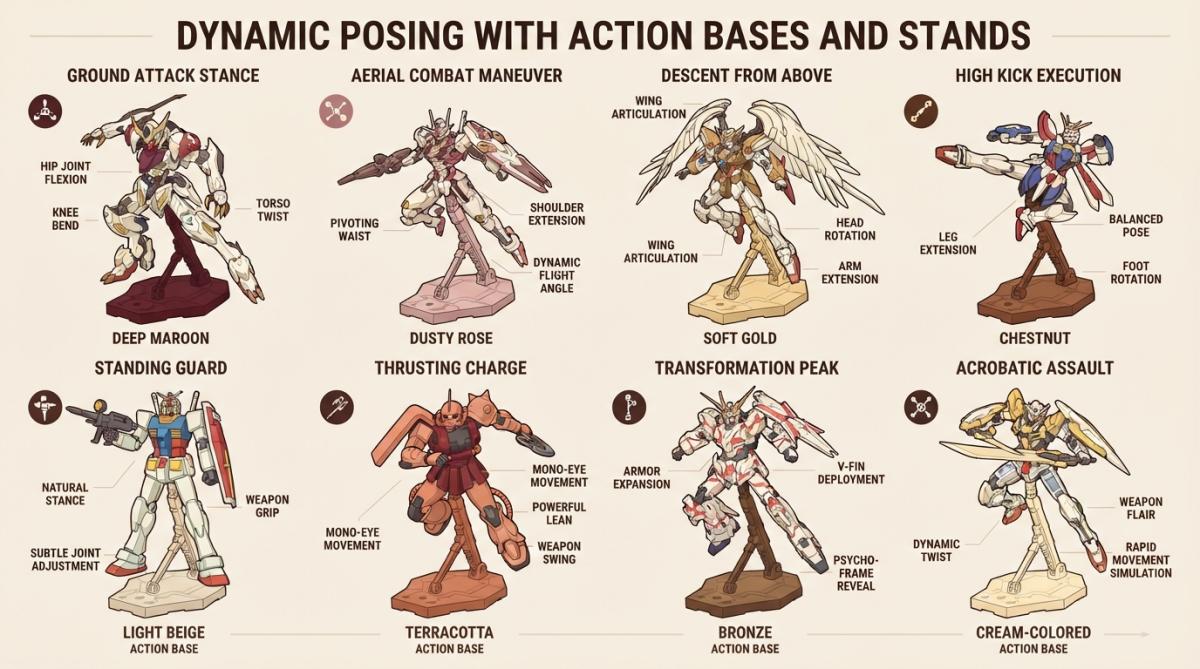
The foundation of any striking display is a model that looks alive in its stance. Action bases aren't afterthoughts, they're the difference between a static model and one that commands attention.
Choosing the Right Action Base for Your Grade
High Grade kits typically use 7mm peg connectors, while Master Grade models require stronger support due to their weight and articulation. Perfect Grade kits, the heaviest and most detailed, demand industrial-grade stands that can handle 500+ grams without sagging. Bandai action bases designed for specific kit lines offer the best compatibility and stability.
Creating Stable, Natural Poses
Stability comes first. Start with a wide base stance, feet apart, weight distributed across both legs. The most visually striking poses follow one rule: asymmetry. Shift the weight to one leg, rotate the hips slightly, and angle the upper body. This creates visual tension that draws the eye. Test poses before committing, keeping a model on its stand for a week before permanently securing joints.
2. Protective Display Cases for Long-Term Preservation
Once you've nailed the pose, protection becomes the priority. Dust accumulation is the silent enemy of Gundam collections. Panel lines fill with dust, metallic paint dulls, and decals gather grime. A proper display case is essential maintenance.
Acrylic Cases vs. Glass Cabinets: Which Works Best
Acrylic cases offer superior clarity and are lighter than glass, making them ideal for wall-mounted displays. They're also more affordable but scratch easily and lower-quality acrylic yellows over time.
Glass cabinets like the IKEA Detolf provide exceptional visibility and don't yellow. The Detolf is the industry standard for budget-conscious collectors at $129.00, offering four glass sides for 360-degree visibility and three adjustable shelves. For serious collectors protecting high-value kits, acrylic display cases with magnetic closures and built-in LED options (ranging from $40.90 to $93.99+) offer better long-term protection and more effective sealing.
The IKEA Detolf Alternative and Customization Options
The Detolf dominates because it's accessible and highly moddable. Collectors add magnetic strips to the door seal, install LED strip lighting inside, and line shelves with foam risers to create multi-level displays. You can customize it for roughly $150-200 total investment, turning a basic cabinet into a professional-looking display unit.
3. Bringing Models to Life With LED Lighting
Lighting transforms a display from "nice" to "wow." A well-lit Gundam model reveals panel line detail, accentuates paint gradients, and creates depth that flat lighting misses.
LED Placement Strategies for Maximum Impact
Top-down lighting is the foundation. Position LED strips along the top of your display case or shelf, angling slightly downward. Add side lighting at 45 degrees to create shadows that emphasize mechanical detail.
For kits with light-up features, internal LEDs are ideal. Pre-wired kits from Evan Designs' Gundam LED lighting collection offer chip and nano LEDs specifically designed for popular models like the MG Barbatos, ranging from $3.00 for individual LEDs to $30.00+ for complete wired setups. Backlighting adds drama, place an LED strip behind your model, pointing away from the viewer, creating a glowing halo that separates the model from the background.
Budget-Friendly Lighting Solutions Beyond Premium Kits
USB-powered LED strip lights cost $10-20 and plug directly into a power bank or wall outlet. Adjust color temperature (warm white vs. cool white) based on your model's paint scheme. Warm white suits earth-tone and metallic finishes; cool white enhances blues and silvers.
4. Building Immersive Dioramas and Custom Environments
A Gundam model in isolation is impressive. A Gundam in a destroyed cityscape or battlefield is unforgettable. Dioramas elevate your display from a shelf of models to a narrative experience.
Thematic Diorama Concepts: Beyond Series Grouping
Build thematic dioramas that tell a story: a ruined urban environment, desert wasteland, hangar bay, or space dock. A 1/100 scale diorama works perfectly for Master Grade kits. Brutal Cities' laser-cut MDF buildings are specifically designed for Gundam displays, offering modular structures starting around $9.50 USD. For natural environments, Woodland Scenics' diorama supplies provide realistic terrain materials, grass, foliage, and rocks, ranging from $7.99 to $19.99+.
DIY Diorama Materials and Building Techniques
Foam board from craft stores costs $2-5 per sheet and carves easily with a hobby knife. XPS foam is even better, durable, accepts paint and weathering effects, and can be sculpted into rocky terrain or urban rubble.
Start with a base: a wooden board, foam sheet, or large picture frame. Build up terrain using foam chunks glued with construction adhesive. Paint the base coat, then layer weathering effects, dry brushing, washes, and texture paste to add realism. The key is scale consistency, if your diorama is 1/100 scale, every element must be 1/100 scale.
5. Space-Saving Display Solutions for Small Spaces
Not every collector has a dedicated display room. Apartment living and modest shelving demand creative solutions that maximize visual impact while minimizing footprint.
Wall-Mounted Floating Arms and Risers
Wall-mounted floating arms create the illusion that your Gundam is airborne, freeing up precious shelf space. A 3D-printed floating display arm from Etsy costs around $13.00+ and can support HG and lightweight MG kits. Installation requires drilling into walls and using proper anchors. Risers elevate models vertically, turning a single shelf into a multi-level display. Pre-made risers or 3D-printed versions typically cost $5-15 to produce.
Vertical Shelving and Multi-Tier Arrangements
Tall, narrow shelving units maximize vertical space. A 5-tier shelf with 12-inch depth holds 15-20 HG kits or 8-10 MG kits without consuming much floor space. Arrange models at staggered heights using risers and action bases of different heights to create visual rhythm.
6. Displaying Modified and Customized Kits
If you've invested time in panel lining, custom painting, weathering, or 3D-printed modifications, your display needs to showcase that craftsmanship.
Showcasing Weathered, Panel-Lined, and Custom-Painted Models
Detail work demands close viewing. Position custom builds at eye level, where viewers can appreciate the brushwork and effects. Side lighting at 45 degrees highlights texture and weathering effects. Backlighting creates separation from the background. Avoid direct overhead lighting, which flattens detail and washes out subtle color variations.
If your custom kit is exceptional, give it solo display space. A single heavily modified MG on a dedicated shelf with custom lighting commands more respect than grouped with stock builds and protects your work from accidental damage.
Highlighting Effect Parts and Custom Bases
Effect parts, beam sabers, energy effects, and custom weapons deserve prominence. Position the model so effects are clearly visible and well-lit. Custom bases tell the story of your build and should be visible.
7. Protection and Maintenance: Keeping Your Display Pristine
A display is only as good as its preservation. Dust, UV light, and temperature fluctuations are the enemies of long-term collection health.
Dust Control and UV Protection Strategies
Enclosed cases (glass or acrylic) are your first defense against dust. If using open shelving, consider acrylic sheet covers that rest on the shelf but don't permanently seal it. These cost $20-40 and dramatically reduce dust accumulation.
UV fading is invisible until it's too late. Position your display away from direct sunlight. If that's impossible, use UV-filtering glass or acrylic, or apply UV-protective film to nearby windows. Temperature stability matters more than most collectors realize. Keep your display in a climate-controlled room. Basements and attics are terrible for collections due to humidity and temperature extremes.
Routine Cleaning Without Damaging Your Models
Use a soft brush (natural bristles, not synthetic) to gently brush dust away from crevices and panel lines. For stubborn dust, compressed air works on the lowest setting, kept 6+ inches away. Never use liquid cleaners on decals and painted surfaces. A barely-damp microfiber cloth works for light cleaning, but air-drying is safest. Inspect your display monthly for dust accumulation, warping signs, and loose joints or decals.
| Maintenance Task | Frequency | What to Check |
|---|---|---|
| Dust removal | Monthly | Panel lines, joints, decals for accumulated dust |
| UV exposure assessment | Quarterly | Fading on white/light armor, metallic dulling |
| Structural inspection | Monthly | Loose joints, sagging action bases, warped cases |
| Temperature/humidity check | Monthly | Signs of plastic warping, decal lifting |
| Case seal inspection | Quarterly | Detolf door seal tightness, acrylic case gaps |
8. Budget-Friendly Display Solutions for Every Collection Size
Premium display setups can cost thousands, but exceptional displays don't require unlimited budgets. Strategic choices and DIY approaches let you create professional-looking displays for $100-300.
Start with a foundation: a basic shelving unit ($50-100), LED strips ($15-30), and risers (free if 3D printed, $20-40 if purchased). From there, add protective elements incrementally, a Detolf case ($129), acrylic covers, or weatherstripping for dust control.
For dioramas, begin small. A 12x12-inch foam board base with minimal terrain costs under $20 and teaches fundamentals. Prioritize what you display. Reserve premium cases and custom lighting for your favorite or most valuable models. Display the rest on simple shelving with basic LED strips. This tiered approach maximizes impact while controlling costs.
The difference between a collection gathering dust and one that brings genuine enjoyment comes down to intentional display choices. Whether you're showcasing a single prized Master Grade or managing a hundred-kit collection, the principles remain the same: stable posing, protective enclosure, strategic lighting, and regular maintenance. At Utopia Toys and Models, we stock everything you need, action bases, display cases, LED kits, and the latest Bandai, Funko, and Kotobukiya releases, all ready to ship. Start with one display idea that excites you, build it out, and watch your collection transform from hidden investment to visible pride.
Frequently Asked Questions
What are the best gundam display cases for protecting models from dust and UV damage?
Acrylic display cases and glass cabinets like the IKEA Detolf both offer dust protection, but acrylic provides clearer visibility while glass offers better UV filtering. For maximum protection, choose cases with UV-blocking properties and ensure proper ventilation to prevent moisture buildup. Sealed acrylic cases work well for valuable or heavily customized models, while open shelving with LED lighting works best for frequently rotated collections. Consider your display environment, areas with direct sunlight benefit most from UV-protective cases.
How do I create dynamic poses for gundam model kits using action bases?
Action bases provide peg connectors that fit most Gundam grades (HG, MG, RG, PG). Start by understanding your kit's articulation points and weight distribution. Position the model's center of gravity over the base's support points to ensure stability. Use multiple peg connections for heavier Master Grade or Perfect Grade kits. Experiment with angled poses by adjusting the base's arm or using risers to create depth. Test stability before finalizing, a well-posed model should hold position without toppling during slight vibrations.
What are affordable gundam model lighting solutions beyond premium LED kits?
Budget-friendly options include standard LED strip lights from electronics retailers, battery-powered fairy lights, and small clip-on desk lamps positioned behind or above displays. For DIY installations, use basic nano or chip LEDs with simple battery holders and switches, much cheaper than pre-wired kits. Ambient shelf lighting works well for creating atmosphere without modifying models. Position lights to avoid glare on acrylic cases and experiment with warm or cool tones to match your display theme. Many collectors achieve excellent results with $15-30 in basic LED components.
How can I display customized or weathered gundam kits to highlight their details?
Customized models benefit from elevated positioning, focused lighting, and minimal visual competition. Use risers or floating arms to make them the focal point. Directional LED lighting emphasizes panel lining, weathering effects, and paint work, angle lights to create shadows that highlight texture. Thematic dioramas with complementary scenery enhance weathered or battle-damaged aesthetics. Isolate heavily modified kits from stock models to let the craftsmanship stand out. Consider dedicated display shelves or cases for premium custom builds to protect the work and draw viewer attention.
This article was written using GrandRanker