

Table of Contents
- Choose Your First Model Kit Wisely
- Gather Essential Model Kit Tools for Beginners
- How to Remove Parts from Model Kit Sprues Cleanly
- Prepare and Dry-Fit Your Parts Before Assembly
- Best Glue for Plastic Model Kits and Assembly
- Painting Model Kits for Beginners: Primer to Finish
- Master Model Building Techniques Through Practice
- Frequently Asked Questions
Last Updated: October 20, 2026
Choose Your First Model Kit Wisely
Learning model building techniques beginners need starts with the right model kit, which makes all the difference.
Look for kits labeled "beginner" or "snap-fit." These typically cost less and feature larger parts that are easier to handle.
The best first kits come from established brands. Bandai's entry-level Gundam models are excellent starting points.
Consider the time commitment. A beginner model takes 2-4 hours to complete.
Gather Essential Model Kit Tools for Beginners
You don't need a full hobby bench to start.
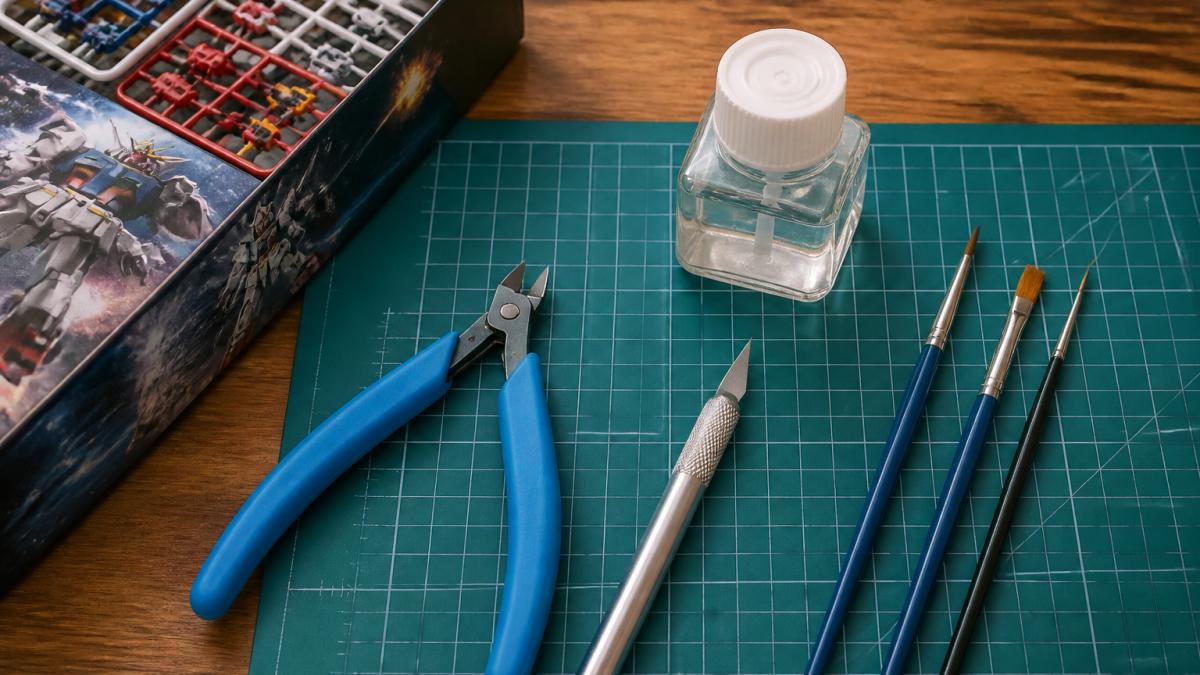
Tier 1, buy these before your first build (roughly $25-$40 total):
- Sprue cutter (side cutter / nipper): $8-$15. Look for a flush-cut jaw that meets at the tip. Hobby-shop nippers beat hardware-store wire cutters because the jaws are thinner and reach between the part and the frame.
- Hobby knife with replaceable blades: $5-$10. A standard handle that takes snap-off or fixed blades is fine. Buy a pack of spare blades, a dull blade is the most common cause of slips.
- Cutting mat: $8-$12 for an A3 or 12x18-inch self-healing mat. It protects the table and gives you a clean, non-slip surface.
- Sandpaper or sanding sticks: $5-$8. A pack with 400, 600, and 1000 grit covers nub removal and surface smoothing. Nail files from a drugstore work as a low-cost substitute.
- Plastic cement with a fine applicator: $5-$8. A bottle with a brush cap or a needle applicator gives you control; a thick tube squeezes out too much.
- One or two paintbrushes: $4-$8. A size 0 or 2 round brush and a wider flat brush handle most beginner detail work.
Tier 2, add when a project calls for it (roughly $15-$30 each):
- Pin vise with micro drill bits for opening locating holes or cleaning out cement.
- Decal setting solution if your kit uses waterslide decals rather than stickers.
- Sanding sponges and polishing cloths for curved surfaces and clear parts.
- A small parts tray or egg carton to keep subassemblies from rolling away.
Low-cost substitutes that actually work:
- A clean, flat ceramic tile or a thick magazine under a cutting mat protects the table just as well as a dedicated hobby mat.
- A cheap emery board replaces a sanding stick for nub cleanup.
- A toothpick dipped in cement reaches tight joints when you don't have a needle applicator.
- A desk lamp with a daylight bulb gives better color accuracy than most inexpensive hobby lamps.
Safety basics for these tools:
- Cut away from your body and keep your non-cutting hand behind the blade, never in front of it.
- Store knives with the blade retracted or capped, and dispose of spent blades in a rigid container, not loose in a trash bag.
- Work in a well-ventilated room when using cement or solvent-based paints; open a window or run a fan moving air away from you.
- Wear safety glasses when clipping or sanding, especially with brittle or clear plastic that can send fragments.
Start with basic versions of each tool. Premium versions cost more but deliver the same results for beginners.
A good work surface matters more than expensive tools. Use a flat table with adequate lighting.
How to Remove Parts from Model Kit Sprues Cleanly
Parts arrive attached to plastic frames called sprues. Removing them cleanly prevents damage and extra cleanup work. This is one of the most important model building techniques beginners must learn.
Steps to remove parts from model kit sprues:
-
Identify the sprue attachment points, Look for the thin plastic connecting each part to the frame. These are called gates or nubs.
-
Use your sprue cutter correctly, Position the cutter so the blade cuts closest to the part, not the sprue. This leaves minimal plastic on your part.
-
Cut with a smooth motion, Don't force the cutter. A clean, steady cut prevents cracking the plastic.
-
Leave a small nub, Don't cut flush to the part. Leave 1-2mm of plastic attached. You'll trim this later.
-
Never pull parts off by hand, Pulling stresses the plastic and causes breaks. Always use a cutter.
-
Check for damage, Inspect each part after removal. Look for cracks or stress marks.
-
File down remaining nubs, Use sandpaper or a file to smooth the spot where the part was attached.
Most beginner mistakes happen during this step. Take your time. Rushing leads to broken parts and frustration. A sprue cutter costs less than replacing a damaged part.
Prepare and Dry-Fit Your Parts Before Assembly
Dry-fitting means assembling your model without glue first. This catches problems before they become permanent.
Dry-fitting teaches you how parts fit together. You'll discover misalignments, gaps, or parts that don't align properly.
Why dry-fitting matters:
- Catches assembly errors early
- Shows you the correct part orientation
- Reveals gaps or alignment issues
- Builds confidence before committing to glue
- Helps you plan your painting sequence
Lay out all parts in assembly order. Follow your kit instructions and test-fit each connection.
Common dry-fit problems include warped parts or misaligned connection points.
Once dry-fitting is complete, you're ready to glue. You've confirmed everything works. Assembly becomes straightforward.
Best Glue for Plastic Model Kits and Assembly
Choosing the right adhesive matters. Wrong glue creates weak bonds, discolors plastic, or dissolves parts. Plastic cement is the standard for plastic model building, but the right choice changes with the material and the subject you're building.
Plastic cement vs. other adhesives:
| Adhesive Type | Best For | Dries | Strength |
|---|---|---|---|
| Plastic cement (solvent) | Polystyrene plastic models | 24 hours for full cure; tack in minutes | Very strong, fuses the plastic |
| Super glue (cyanoacrylate) | Small parts, resin, metal, painted joints | Seconds to minutes | Strong but brittle; can fog clear parts |
| Epoxy (two-part) | Mixed materials, load-bearing joints | Hours | Very strong; fills gaps |
| White glue (PVA) | Wood, paper, clear canopies | 1-24 hours | Moderate; removable with water |
| Hot glue | Temporary holds, jigs | Seconds | Weak for permanent models |
Plastic cement works by slightly melting the plastic surfaces, fusing them together. This creates the strongest bond for polystyrene models. Apply it sparingly, a thin line along the joint is enough.
Match the adhesive to the material:
- Polystyrene plastic (most car, aircraft, armor, and figure kits): solvent plastic cement. Thin liquid cement in a bottle with a brush cap is best for long seams; thicker gel cement gives you working time on parts that need repositioning.
- ABS and other engineering plastics (many snap-fit robot and mecha kits): solvent cement formulated for ABS, or super glue on joints you don't plan to disassemble. Snap-fit kits often need no cement at all, the pegs and sockets hold the part.
- Resin (garage kits and aftermarket figures): super glue or two-part epoxy. Resin doesn't melt with plastic cement, so solvent cement won't bond it. Wash resin parts in warm soapy water first to remove mold release, or the glue will fail.
- Wood and paper (railway buildings, dioramas): white glue or wood glue. These allow repositioning before they set and sand cleanly.
- Metal (photo-etch details, white-metal figures): super glue for small details, two-part epoxy for anything that bears weight.
- Clear parts (canopies, windows, lenses): white glue or a clear-part cement. Super glue can fog clear plastic permanently; keep it away from canopies unless you seal the part first.
Match the adhesive to the subject:
- Aircraft: solvent cement on fuselage halves, white glue on the canopy, super glue on photo-etch cockpit details.
- Cars: solvent cement on the body and chassis; super glue or epoxy on chrome and metal parts that solvent cement won't touch.
- Figures: solvent cement on plastic figure joints; super glue or epoxy on resin figures and on any pinned joints.
- Railway buildings: white glue or wood glue for walls and roofs; super glue for small detail parts that need to hold immediately.
Working tips that prevent most glue problems:
- Test the adhesive on a hidden surface first, especially on clear or painted parts.
- Apply cement to both mating surfaces, not just one, for a stronger joint.
- Hold the part in place for the tack time listed on the bottle before letting go.
- Clean up excess cement immediately with a plastic-safe solvent; dried cement is harder to remove.
- Ventilate the room when using solvent cement, super glue, or epoxy, all release fumes.
Painting Model Kits for Beginners: Primer to Finish
Painting transforms your model from plastic to finished artwork. Many beginners skip painting, but it's simpler than you think.
The painting process:
-
Prime your model, Primer seals the plastic and helps paint stick. Use gray or white primer. Let it dry completely.
-
Apply base colors, Use thin coats. Multiple thin coats look better than one thick coat. Thin coats prevent paint from obscuring details.
-
Add details, Use smaller brushes for panel lines and small areas. Detail work defines your model's character.
-
Apply decals, Stickers or waterslide decals add authenticity. Follow kit instructions for placement.
-
Finish with topcoat, Matte or gloss topcoat protects your work and gives it a professional appearance.
For beginners, brush painting works fine. Airbrushes are faster but require more equipment and practice.
Paint in thin layers. This is the most important rule. Thick paint obscures details and looks amateur.
Work in a well-ventilated space. Open windows or use a fan. Paint fumes can cause headaches.
Practice your painting technique on a spare plastic sprue before painting your actual model. This builds confidence and prevents mistakes on your finished work.
Master Model Building Techniques Through Practice
Your first model won't be perfect. That's normal and expected. Each build teaches you something new.
Keep your first model. Look back at it after building five more models.
Join online communities. Share your builds and ask questions. Experienced builders offer advice freely.
Invest time in learning, not just buying.
Document your progress. Take photos of each build. Before-and-after shots show improvement clearly.
Frequently Asked Questions
What tools do beginners absolutely need to start model building?
Start with a sprue cutter to remove parts safely, a hobby knife for cleanup, a cutting mat to protect your work surface, and plastic cement or model glue. A paintbrush set, primer, and paint are essential for finishing. You don't need an airbrush or advanced equipment, basic hand tools and patience will carry you through your first several kits. Utopia Toys and Models stocks all these beginner essentials from trusted brands.
What is the best glue for building plastic model kits?
Plastic cement (also called plastic model glue) is the standard choice for plastic model kits because it bonds the plastic chemically rather than just sticking surfaces together. Look for brands like Tamiya or Testors. Apply a thin bead along the joint, press parts together for 30 seconds, and let cure fully before handling. Avoid super glue on plastic, it can cloud the finish and create weak bonds. Always work in ventilation and follow the cement's instructions.
How do I remove parts from a model kit sprue without damaging them?
Use a sprue cutter to cut parts as close to the sprue as possible, leaving a small plastic nub. Then use a hobby knife or sanding stick to carefully trim and smooth that nub flush with the part. Work slowly and at a shallow angle to avoid gouging the plastic. For delicate parts, cut further from the piece and sand more gradually. Always cut away from your body and fingers.
Should I paint my model kit before or after assembly?
Most beginners should assemble first, then paint. This approach is simpler because you avoid masking and protecting joints. Build the model, clean up seams, apply primer, then paint. If you're painting multiple colors on complex models, you may paint subassemblies before final assembly, but save this technique for after your first few kits. Always apply primer before paint to ensure even coverage and color accuracy.
Model building is an accessible hobby that rewards patience and practice. Start simple, focus on learning proper techniques, and enjoy the process. At Utopia Toys and Models, we stock everything you need to begin this rewarding hobby. Our team understands what beginners need because we started exactly where you are. Visit us to find your first kit, gather your tools, and join thousands of builders creating amazing models. We're here to support your journey from beginner to experienced builder.
