

Table of Contents
- Assess the Damage: A Diagnostic Decision Tree
- Choosing the Best Glue for Plastic Model Kits
- How to Pin Broken Model Kit Parts for a Stronger Bond
- How to Repair Clear Plastic Model Parts
- How Long Model Glue Takes to Dry (and How to Hold Alignment)
- Repairing Articulated and Load-Bearing Joints
- Finishing Repairs Invisibly: Sanding, Putty, and Paint
- Conclusion
- Frequently Asked Questions
Last Updated: October 19, 2026
Assess the Damage: A Diagnostic Decision Tree
Knowing how to repair broken model kits means a snapped part is not a death sentence. Most breaks fall into one of four groups, and the right fix depends on where the break sits and what the piece is made of.
Start by answering three questions.
- Is the piece structural? Load-bearing joints, peg connectors, and arm sockets need reinforcement, not just glue.
- Is it clear or colored? Clear parts need a different adhesive than opaque plastic.
- Do you have both halves? A clean two-piece break is easy. A missing chunk is a different job.
Identify the Break Type and Material
Most model kits use polystyrene, which is the same plastic that plastic cement is designed to melt and fuse. Resin kits and some imported figures use polyurethane or PVC, and those need cyanoacrylate (super glue) instead. Check the kit manual or the runner sprue for a material code before you pick up any adhesive.
A clean snap with matching edges is the best case. A stress crack with whitening around it is weaker and needs bracing. A shattered joint or a missing chunk means replacement or scratch-building.
Decide: Repair, Replace, or Scratch-Build
Repair when both halves fit back together cleanly and the part carries little load. Replace when the part is a common connector or armor plate and the manufacturer still stocks spares. Scratch-build when the part is gone and no replacement exists.
Many builders skip step two entirely. That is a mistake. Bandai and other major manufacturers often list replacement runners through official support channels, and a fresh part beats a patched one for anything structural. Check the official kit documentation before you commit to a repair.
| Break Type | Best Fix | Why |
|---|---|---|
| Clean snap, both halves | Plastic cement | Fuses the plastic back into one piece |
| Stress crack with whitening | Cement plus bracing | The surrounding plastic is already weak |
| Broken peg or socket | Pin and reinforce | Joints take load and need strength |
| Missing chunk | Scratch-build or replace | No material left to bond |
| Clear canopy or lens | Clear cement or super glue | Standard cement clouds clear parts |
Choosing the Best Glue for Plastic Model Kits
The best adhesive for a model kit depends on the plastic, not the brand. Most kits are polystyrene, but resin figures, vinyl parts, and clear canopies each need a different approach. Match the adhesive to the material before you open a bottle.
Identify the Material First
Check the kit manual, the runner sprue, or the part itself for a material code. Common codes include PS for polystyrene, ABS for acrylonitrile butadiene styrene, PE for polyethylene, PVC for polyvinyl chloride, and PUR or PU for polyurethane resin. If no code is printed, test a hidden area: polystyrene and ABS soften and bond with solvent cement, while resin and vinyl do not.
| Material | Best Adhesive | Avoid | Why |
|---|---|---|---|
| Polystyrene (PS) | Plastic cement (solvent) | Super glue for structural joints | Solvent welds the plastic into one piece |
| ABS | ABS-specific cement or plastic cement | Wood glue | Solvent softens ABS for a fused bond |
| Resin (PUR/PU) | Cyanoacrylate (super glue) | Plastic cement | Solvent cement does not melt resin |
| Soft vinyl / PVC | Cyanoacrylate or vinyl-specific adhesive | Standard plastic cement | Vinyl flexes and resists solvent welding |
| Clear styrene | Clear parts cement | Standard plastic cement | Standard cement clouds clear plastic |
| Wood | Wood glue or cyanoacrylate | Plastic cement | Plastic cement has no effect on wood |
Plastic Cement: A Solvent, Not a Glue
Plastic cement softens the plastic on both surfaces so they weld together. The bond is as strong as the surrounding plastic when applied to bare polystyrene or ABS. It only works on styrene-based plastics. Apply it with a fine brush along the inside seam and let capillary action pull the solvent into the joint.
Cyanoacrylate: Fast but Brittle
Super glue bonds almost any surface, including resin, metal, and painted parts. The joint is brittle, though, and it can fog clear parts. Use it where cement will not work, and apply it sparingly with a toothpick or fine applicator to avoid excess.
Safety and Ventilation
Solvent cements and cyanoacrylate both release vapors. Work in a ventilated area, keep bottles capped, and avoid skin contact. Cyanoacrylate bonds skin instantly; keep debonder on hand. Wear eye protection when working with solvents near the face, and keep adhesives away from children and pets.
How to Pin Broken Model Kit Parts for a Stronger Bond
Pinning is the fix that separates a lasting repair broken model kits can rely on from one that snaps again. The idea is simple: drill a small hole in each half, insert a metal pin, and glue the halves back together around it. The pin carries the load so the adhesive does not have to.
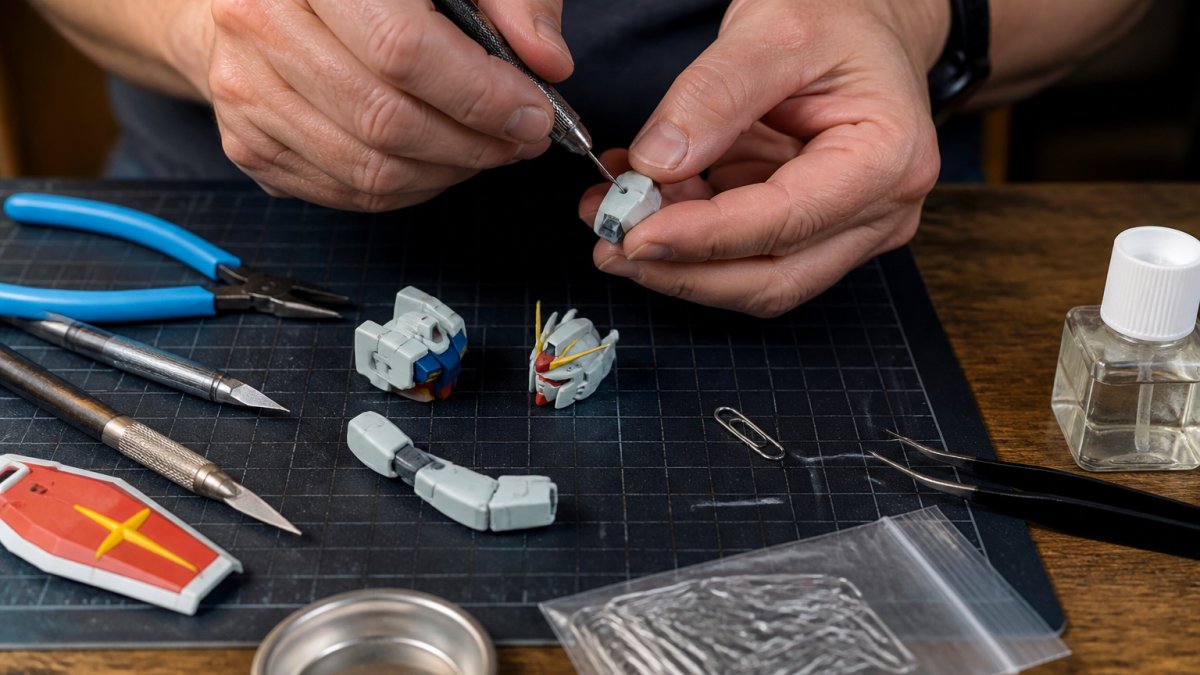
Here is the process we recommend.
- Line up the halves and mark matching points on both sides with a fine marker.
- Drill a hole in each half with a pin vise and a bit slightly wider than your pin.
- Cut a pin from a paperclip, brass rod, or styrene rod. Leave it long enough to span both holes.
- Dry-fit the pin and both halves before any glue touches the part.
- Apply cement to the seam and the pin, then press the halves together.
- Hold or clamp until the joint sets.
The pin does the heavy lifting. Keep the holes shallow enough that the drill does not break through the visible surface.
How to Repair Clear Plastic Model Parts
Clear plastic is the one material where standard plastic cement will ruin the part. Cement clouds clear canopies and lenses, and that fog never comes out. Use clear parts cement, which dries transparent, or a tiny amount of super glue applied with a toothpick.
Work slowly. A clear canopy shows every smudge and every drop of excess adhesive. Apply the adhesive to the inside edge where possible, hold the part steady, and let it cure fully before handling.
If a clear part is deeply cracked, consider replacing it rather than repairing it. A visible repair on a canopy is far more noticeable than on an armor plate, and some kits include spare clear runners.
How Long Model Glue Takes to Dry (and How to Hold Alignment)
Model glue takes anywhere from a few seconds to 24 hours to dry, depending on the type. Super glue grabs in seconds but reaches full strength in about a day. Plastic cement sets in minutes but needs several hours to fully cure. Plan your build around the cure time, not the grab time.
Holding alignment is the hard part. A part that shifts while the adhesive cures will sit crooked forever. Here is what works.
- Tape holds flat panels and long seams in place.
- Clamps and clothespins apply steady pressure on bulky parts.
- Rubber bands wrap around round sections like fuselage or barrels.
- Modeling stands or foam blocks support a part at the right angle while it sets.
Repairing Articulated and Load-Bearing Joints
Articulated joints are the toughest repair on any model kit. A shoulder, elbow, or hip socket takes constant load every time the model is posed, so a simple glue joint will fail. These joints need pinning plus reinforcement.
Drill and pin the joint as you would any other break, then add a thin band of styrene or a small brace across the seam for extra strength. Let the joint cure completely before you move it. If the socket itself is shattered, a replacement joint from a spare runner is the better answer.
For ball joints and peg connectors, check whether the manufacturer sells a replacement runner before you attempt a rebuild. A factory part will always outlast a patched one under load.
Finishing Repairs Invisibly: Sanding, Putty, and Paint
A repair is only finished when you cannot see it. The steps below turn a visible seam into a surface that disappears under paint. Work slowly and check your progress under raking light.
Sanding: Work From Coarse to Fine
Start with a fine grit, around 400 to 600, to level the seam without gouging the surrounding plastic. Move to 800, then 1000, then 1500 to remove scratches. Wet-sand the finer grits to keep dust down and prevent clogging. Wrap the paper around a sanding stick or sponge for flat panels, and use a needle file for tight areas.
Filling: Putty and Seam Fillers
Modeling putty fills gaps, pits, and low spots. Apply it with a toothpick or spatula, let it harden fully, then sand flush. For fine seams, use a thin liquid filler applied with a brush; it flows into the gap and sands smooth. Avoid overfilling; a thin layer is easier to sand back than a thick blob.
Restoring Panel Lines and Detail
A repair can erase panel lines and rivets. After sanding, re-scribe panel lines with a scribing tool or a pin in a pin vise, using light passes. Replace raised detail with thin styrene strip or stretched sprue. Check the restored lines against the surrounding surface so depth and spacing match.
Priming and Paint Matching
Prime the repaired area before painting. Primer shows exactly where the surface is still uneven and helps the topcoat bond evenly. Match the paint to the original color; if you cannot find an exact match, blend the edges so the repair disappears under normal light. Apply thin coats and let each dry before the next.
Conclusion
A broken model kit is a setback, not a loss. Assess the break, match the adhesive to the material, pin anything structural, and finish the repair until the seam disappears. That is the whole method, and it works on everything from a snapped Gunpla arm to a cracked canopy.
When a part is truly gone, replacement is the smarter move. Utopia Toys and Models stocks many Bandai Gundam and other model kits, with clear status indicators for in-stock and pre-order items so you know what is ready to ship. Browse the collection and get back to building.
Frequently Asked Questions
What is the best glue for repairing a broken plastic model kit?
For polystyrene kits like most Gunpla and scale models, plastic cement is the best choice because it melts the plastic together for a true weld. For resin, metal, or painted surfaces, use a cyanoacrylate (super glue) instead. Wood glue only works on porous materials and will not hold on model plastic. Always test on a hidden sprue first to confirm compatibility.
How do you fix a snapped piece on a model kit?
First, clean the break and dry-fit the pieces to check alignment. Apply a thin layer of plastic cement to both surfaces, press together firmly, and hold for 30 to 60 seconds. For load-bearing parts, reinforce with a metal pin drilled into both halves. Let the joint cure fully before handling, then sand and paint to hide the repair.
How long should model kit glue dry before handling?
Plastic cement typically sets in 15 to 30 minutes but needs 24 hours for a full cure. Super glue bonds in seconds but reaches maximum strength after 24 hours. Avoid stressing the joint during the first hour, and wait a full day before sanding, painting, or posing the model to prevent the repair from failing.
Can you repair a broken Gunpla part without glue?
Yes, in some cases. Pinning with a metal rod and epoxy can hold a part without traditional glue, and 3D printing or scratch-building a replacement is another option. For snap-fit joints, you can sometimes reshape the peg with gentle heat. However, glue or cement remains the most reliable method for most clean breaks.
