

Table of Contents
- What You'll Need: Essential Tools and Materials
- Preparation and Surface Cleaning for Gundam Models
- How to Prime Gunpla Before Painting
- Choosing the Right Paint Type: Acrylic, Lacquer, and Enamel
- Best Paint for Gunpla: Brands and Ratios
- Hand Painting Gundam Models: Techniques and Tips
- Airbrushing Techniques for How to Paint Gundam Model Kits
- Applying Top Coat for Gundam Models: Finish and Protection
Last Updated: July 6, 2026
Painting Gundam model kits requires precision, patience, and the right materials to achieve professional results. Whether you're working with a high-grade, real grade, or master grade kit, how to paint gundam model kits involves mastering core techniques that separate novice painters from experienced hobbyists. This guide covers everything from basic hand-painting to advanced airbrushing, helping you transform your Gunpla from bare plastic to a stunning finished model.
What You'll Need: Essential Tools and Materials
Success depends on having the right tools. You don't need to spend thousands of dollars, but skipping quality in critical areas like surface preparation will show immediately in your final paint job.
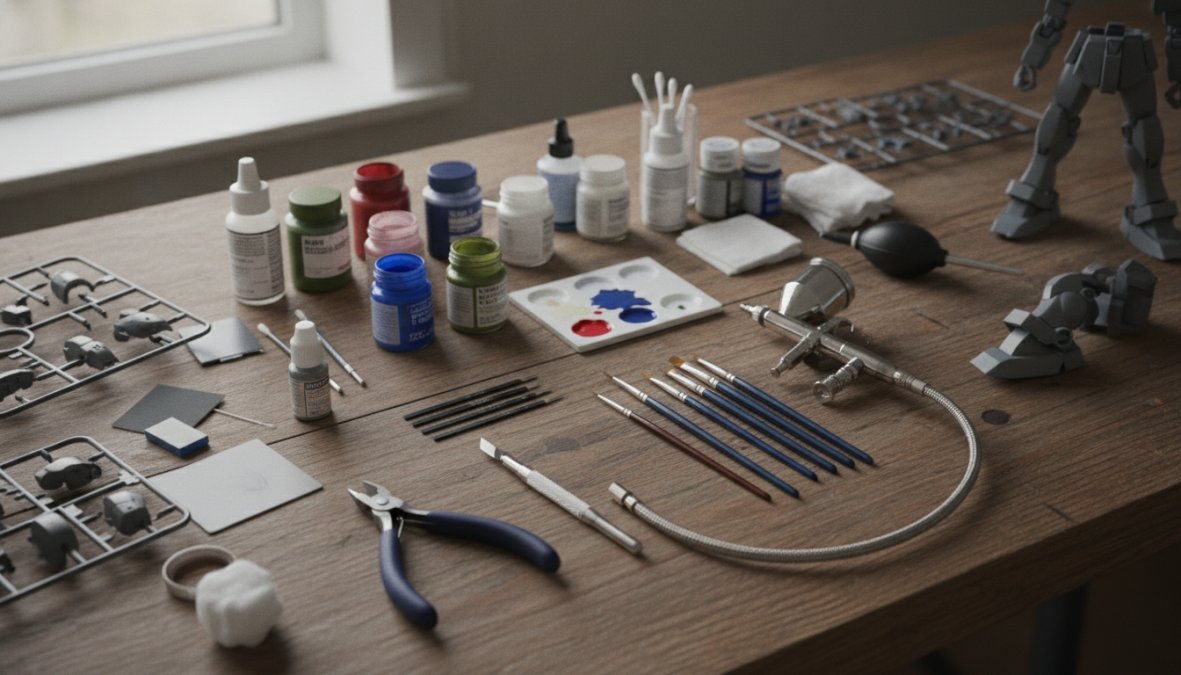
At minimum, you'll need nippers to separate parts from the sprue, sandpaper or sanding sponges, primer, paint, a brush or airbrush, masking tape, and a clear coat. For hand-painters, quality brushes in sizes 0, 1, and 2 work well for most Gundam kits. For airbrushing, you'll need an airbrush, compressor, air hose, and ideally a spray booth with ventilation.
Additional useful tools include alligator clips for holding parts while painting, appropriate paint thinner, a palette or mixing surface, and cotton swabs for cleanup.
Budget-Friendly vs. Pro-Tier Equipment Comparison
Budget setups cost $50-150 and work well for learning fundamentals. Professional setups run $300-800+ but offer precision and speed that justify the investment for serious hobbyists.
| Equipment Type | Budget Option | Pro-Tier Option | Key Difference |
|---|---|---|---|
| Airbrush | Single-action, $30-50 | Dual-action gravity feed, $100-200 | Dual-action allows better paint control and thinner lines |
| Compressor | Small oil-free, $40-80 | Tank-style with regulator, $150-300 | Tank maintains consistent PSI; regulators prevent pressure spikes |
| Spray Booth | DIY cardboard box | Commercial booth with filters, $200-400 | Proper ventilation protects your health and prevents overspray |
| Brushes | Synthetic bristles, $15-30 set | Natural hair (sable/kolinsky), $80-150 | Natural hair holds paint better and creates smoother strokes |
| Paint | Basic acrylics, $3-8 per bottle | Specialized hobby paints (Tamiya, Vallejo), $6-12 per bottle | Hobby paints formulated for plastic models; better coverage and adhesion |
Budget painters often start with hand-painting and spray cans, then upgrade to airbrushing once they understand their preferences. Many experienced painters use a hybrid approach: budget airbrush for base coats and primer, pro-tier brush set for detail work.
Preparation and Surface Cleaning for Gundam Models
This crucial step is where paint failures originate. Gundam plastic straight from the box has a mold release agent coating that prevents paint adhesion. If you paint over this coating, your paint will chip and peel.
Remove all parts from the sprue using nippers, leaving a small nub on each part. Use a hobby knife or sanding sponge to remove nubs completely. Next, wash all parts in warm soapy water using a soft brush or cloth. This removes the mold release agent and dust. Rinse thoroughly and dry completely with a lint-free cloth.
For seam lines where two parts meet, glue them with plastic cement, then sand smooth before painting. This creates a seamless appearance.
How to Prime Gunpla Before Painting
Priming is the foundation of a quality paint job. Primer fills micro-imperfections in the plastic, provides a uniform surface for paint adhesion, and prevents paint from soaking unevenly into the plastic.
Choose a primer designed for plastic models. Spray primer like Tamiya Surface Primer or Mr. Hobby Primer delivers even coverage quickly. Apply primer in light, even coats rather than one thick coat, which can obscure fine details. Hold the spray can 6-8 inches from the part and use smooth, overlapping passes. Allow 15-20 minutes drying time between coats. Two light coats provide better coverage than one heavy coat.
Check coverage by looking at the part from different angles. You should see uniform color with no bare plastic showing through. Sand any rough spots on the primer coat lightly (220-400 grit sandpaper) before applying paint.
Choosing the Right Paint Type: Acrylic, Lacquer, and Enamel
Paint type fundamentally changes your painting experience. Each formulation has different drying times, thinning ratios, cleanup requirements, and plastic compatibility.
Acrylic paints are water-based, fast-drying, and easy to clean up with water. They're popular for hand-painting because mistakes can be corrected quickly. Acrylics thin with water and dry in 15-30 minutes. They don't bond as strongly to plastic as lacquer or enamel. Brands like Vallejo Model Color and Citadel are acrylic-based.
Lacquer paints are solvent-based and create a hard, durable finish that bonds strongly to plastic. They thin with lacquer thinner and dry quickly (5-10 minutes). Lacquers produce a glossy finish naturally and are ideal for airbrushing. They require proper ventilation and lacquer thinner for cleanup. Tamiya spray cans and airbrush paints are typically lacquer-based.
Enamel paints are oil-based and create a smooth, glossy finish. They thin with enamel thinner and dry slowly (24-48 hours), giving you time to blend and correct mistakes. They're less common for Gundam painting because the slow drying time makes multi-layer painting tedious.
Most Gundam painters use lacquer for base coats and airbrushing, then acrylic for detail work and hand-painting.
Paint Compatibility Matrix for Gundam Kits
Paint compatibility matters because layering incompatible paints causes adhesion failure.
| Base Layer | Compatible Second Layer | Incompatible | Notes |
|---|---|---|---|
| Acrylic Primer | Acrylic paint, Lacquer | Enamel | Lacquer sticks to acrylic if acrylic is fully cured |
| Lacquer Primer | Lacquer, Enamel, Acrylic | None | Lacquer primer accepts all paint types; most versatile choice |
| Enamel Primer | Enamel, Acrylic | Lacquer | Lacquer thinner can lift enamel primer |
| Acrylic Paint | Acrylic, Lacquer (if cured) | Enamel over acrylic | Allow full cure (2+ hours) before applying lacquer |
| Lacquer Paint | Lacquer, Enamel | Acrylic (risky) | Acrylic may not adhere to glossy lacquer finish; sand first |
| Enamel Paint | Enamel, Acrylic | Lacquer | Lacquer thinner dissolves enamel |
The safest approach: use lacquer primer, then paint with your chosen medium. Lacquer primer accepts everything.
Best Paint for Gunpla: Brands and Ratios
Industry-leading paint brands dominate Gundam painting because they're formulated specifically for plastic models. Tamiya, Vallejo, Mr. Hobby, and SMS are the standard choices.
Tamiya paints are lacquer-based and come in spray cans or airbrush bottles. Tamiya spray cans (TS series) are excellent for base coats. Tamiya airbrush paints thin at a 1:1 ratio with Tamiya thinner.
Vallejo Model Color is acrylic and excellent for hand-painting detail work. Vallejo paints require more thinning for airbrushing (typically 1:2 paint to thinner ratio). They produce vibrant colors and excellent coverage.
Mr. Hobby (GSI Creos) offers both acrylic and lacquer options. Their aqueous hobby paints are specifically formulated for plastic models. Their lacquer-based Mr. Color line produces professional results.
SMS paints are acrylic-based and formulated for airbrush application. They thin at approximately 1:1 ratio and produce smooth, even coverage.
For airbrushing, the standard thinning ratio is 1:1 (paint to thinner) as a starting point. Thinner paint flows better through the airbrush but may require more coats. Thicker paint covers better but may clog the airbrush. Test your consistency by spraying a thin line on a test surface.
Hand Painting Gundam Models: Techniques and Tips
Hand-painting is the most accessible method for beginners and works well for detail work and small models. It requires patience but no expensive equipment beyond brushes and paint.
Start with quality brushes. Synthetic brushes work for acrylics, but natural hair brushes (sable or kolinsky) produce smoother strokes with less visible brushmarks. Sizes 0, 1, and 2 handle most Gundam detail work. Keep brushes clean by rinsing immediately after use.
Load your brush lightly by dipping it into the paint pot, then touch the brush tip to a palette to remove excess. A fully loaded brush creates thick, uneven strokes. Multiple thin coats look better than one thick coat.
Paint in smooth, deliberate strokes following the contours of the part. For straight lines, brace your hand against the model to prevent shaking. For curved details, move the brush in one smooth motion.
For panel lining, use a fine brush (size 0 or smaller) and paint specifically formulated for panel lining, like Tamiya Panel Line Accent Color. Apply the paint carefully into recessed lines, then use a cotton swab lightly dampened with thinner to remove excess paint from raised surfaces.
Airbrushing Techniques for How to Paint Gundam Model Kits
Airbrushing delivers professional results faster than hand-painting and produces smoother, more even coverage. Understanding airbrush mechanics and technique separates successful painters from frustrated beginners.
An airbrush works by atomizing paint with compressed air, creating a fine mist that deposits evenly on the surface. Three factors control paint output: air pressure (measured in PSI), paint flow (controlled by a needle valve), and distance from the surface (typically 6-8 inches).
Start with 20-25 PSI for most acrylic and lacquer paints. Higher pressure (30+ PSI) atomizes paint finer but increases overspray. Lower pressure (15-20 PSI) requires thinner paint consistency but reduces overspray. Stay within the 15-30 PSI range for model painting.
Paint consistency is critical. The target consistency is similar to skim milk, thin enough to flow smoothly through the airbrush, thick enough to provide coverage in 2-3 coats. Thin your paint in small increments, testing consistency by spraying a test line on scrap plastic.
Hold the airbrush perpendicular to the surface (90 degrees) and maintain consistent distance of 6-8 inches. Move the airbrush in smooth, overlapping passes. Overlap each pass by about 50% to ensure even coverage. Pull the trigger back in one smooth motion to control both air and paint flow on dual-action airbrushes.
Common airbrushing problems include orange peel texture (paint too thick or applied too wet), sputtering (paint too thick or air pressure too low), and overspray (paint too thin or air pressure too high).
Applying Top Coat for Gundam Models: Finish and Protection
The top coat protects your paint job from scratches, dust, and UV damage while controlling the final finish appearance. Matte top coats create a flat, realistic finish; gloss top coats create a shiny appearance; satin top coats fall between the two.
Most Gundam painters use matte top coat for a realistic, non-reflective finish. Gloss top coat is used selectively under decals and on specific parts like cockpit windows.
Apply top coat in light, even coats using the same technique as painting: smooth, overlapping passes with consistent distance from the surface. Top coat dries quickly (15-30 minutes), so you can apply multiple coats in a single session. Two light coats provide better protection than one heavy coat.
Allow top coat to cure fully (24 hours minimum) before handling the model. Once cured, the finish hardens and protects the paint layers underneath.
Thinning Paints and Achieving the Right Consistency
Paint consistency determines success in airbrushing and significantly impacts hand-painting results. Too-thick paint clogs airbrushes and creates uneven coverage. Too-thin paint lacks coverage and produces weak color saturation.
For hand-painting, paint should be slightly thinner than it comes from the bottle. For airbrushing, paint should be the consistency of skim milk or light cream.
Always thin paint gradually in small increments. Add a few drops of thinner to your paint, stir thoroughly, and test the consistency. This approach prevents over-thinning.
Use the thinner specifically formulated for your paint type. Lacquer paint requires lacquer thinner; acrylic paint requires water or acrylic thinner; enamel paint requires enamel thinner. Using the wrong thinner causes paint failure.
Standard thinning ratios serve as starting points:
- Acrylic paint for hand-painting: 10-20% water or acrylic thinner
- Acrylic paint for airbrushing: 50% water or acrylic thinner (1:1 ratio)
- Lacquer paint for airbrushing: 50% lacquer thinner (1:1 ratio)
- Enamel paint for hand-painting: 10-15% enamel thinner
- Enamel paint for airbrushing: 50% enamel thinner (1:1 ratio)
These ratios vary by paint brand and viscosity. Temperature and humidity also affect paint flow; warm, dry conditions require slightly thinner paint; cool, humid conditions may require slightly thicker paint.
Painting Gundam model kits transforms a raw plastic kit into a stunning display piece. The process requires attention to detail, proper technique, and quality materials, but the results justify the effort. Whether you're hand-painting intricate details or airbrushing smooth base coats, the fundamentals remain consistent: proper preparation, appropriate paint selection, and controlled application. With the right approach and materials, your Gunpla will display the professional finish that makes these models truly remarkable.
Frequently Asked Questions
Do I need to prime my Gundam model before painting?
Yes, priming is essential when learning how to paint Gundam model kits. A primer creates a smooth base coat, improves paint adhesion, and helps achieve even color coverage. Use a gray or white primer depending on your final paint color. Apply thin, even coats with an airbrush or spray can, allowing proper curing time between applications before applying your topcoat.
What is the best paint for Gunpla?
Popular brands for Gunpla include Tamiya, Mr. Hobby, SMS paints, and Vallejo. Tamiya acrylics are beginner-friendly and thin easily with water, while lacquers offer superior durability and finish quality. Choose based on your equipment, acrylic for hand painting, lacquer for airbrush work. Always thin paint to the correct ratio (typically 1:1 or 2:1 with thinner) for optimal application and surface tension control.
Can I paint Gundam models without an airbrush?
Absolutely. You can hand paint Gundam models using brushes or spray cans (rattle cans). Hand painting requires patience and thin coats to avoid brush marks. Spray cans offer faster coverage but less precision. Combine techniques: spray cans for base coats and large areas, hand painting for details and panel lining. Both methods work well when you follow proper preparation, thinning, and curing protocols.
How long should Gundam paint dry between coats?
Drying time varies by paint type. Acrylic paints typically cure in 30 minutes to 1 hour between coats, while lacquers may need 2-4 hours. Always check manufacturer instructions for your specific paint brand. Full hardening, essential before applying decals or topcoat, takes 24 hours or more. Temperature and humidity affect drying; warmer, drier conditions speed curing. Plan your painting sessions accordingly to avoid dust contamination during the drying process.
This article was written using GrandRanker