

Table of Contents
- Quick Comparison: Metallic Markers for Gunpla Detailing
- 1. Gundam Marker EX Heavy Gun Metallic: Best for Inner Frame Details
- 2. Tamiya Panel Line Accent Color: Best for Sharp Panel Definition
- 3. POSCA PC-5M Metallic Set: Best for Versatile Coverage
- 4. Sharpie Metallic Fine Point: Best Budget Option
- 5. Mr. Hobby Weathering Liner: Best for Realistic Metallic Weathering
- 6. Kuretake ZIG Fudebiyori Metallic Brush Markers: Best for Broad Accents
- How to Use Gundam Markers for Panel Lining
Last Updated: August 20, 2026
Quick Comparison: Metallic Markers for Gunpla Detailing
When detailing a Gundam model kit, the right metallic markers transform flat plastic into mechanical masterpieces. The difference between a mediocre finish and a competition-grade result often comes down to marker selection, application technique, and understanding which tools work best for specific tasks.
This guide breaks down the best metallic markers for gunpla detailing, covering everything from inner frame work to weathering effects. Whether you're a beginner tackling your first High Grade kit or an experienced builder refining a Master Grade, you'll find markers that match your skill level and budget.
| Marker | Best For | Type | Key Strength |
|---|---|---|---|
| Gundam Marker EX Heavy Gun Metallic | Inner frame details | Alcohol-based | Dark gunmetal opacity |
| Tamiya Panel Line Accent Color | Panel definition | Enamel | Precise line flow |
| POSCA PC-5M Metallic Set | Versatile coverage | Water-based | Color range and cleanup |
| Sharpie Metallic Fine Point | Budget detailing | Permanent ink | Affordability and availability |
| Mr. Hobby Weathering Liner | Realistic weathering | Pigment pencil | Subtle metallic effects |
| Kuretake ZIG Fudebiyori | Broad accents | Water-based brush | Smooth application |
1. Gundam Marker EX Heavy Gun Metallic: Best for Inner Frame Details
The Gundam Marker EX Heavy Gun Metallic delivers dark gunmetal shade that makes inner frames pop. This alcohol-based paint marker offers exceptional opacity in a single pass, ideal for mechanical details, hydraulic lines, frame joints, and weapon mechanisms.
The felt tip applies smoothly without dragging, and the pigment density means you're not layering multiple coats. The enhanced metallic effect reads as genuine metal rather than painted plastic.
What works: The marker's viscosity prevents pooling in tight spaces. Application is forgiving on curved surfaces. The dark gunmetal tone complements most Gundam color schemes.
What doesn't: You're limited to a single color. The alcohol base can damage underlying paint if your base coat isn't fully cured. Cleanup requires alcohol or lacquer thinner, not water.
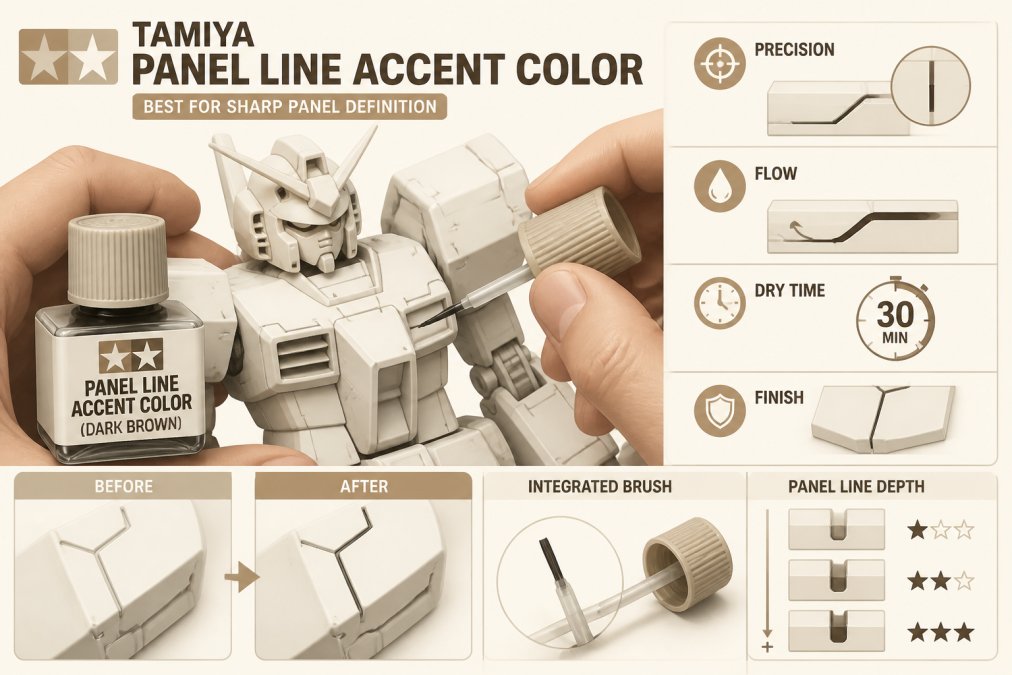
2. Tamiya Panel Line Accent Color: Best for Sharp Panel Definition
Tamiya Panel Line Accent Color is purpose-built for flowing into recessed panel lines and creating crisp definition. The pre-diluted enamel flows with the right viscosity, following gravity and capillary action into grooves without requiring additional thinning.
The integrated fine brush applicator gives you precision that felt-tip markers can't match. Available in black, brown, gray, dark brown, and light grey, you can match the accent color to your base coat for subtle realism or contrast for dramatic definition.
What works: The brush application prevents overflow onto flat surfaces. The enamel finish is durable once cured. Color options let you match different base coats.
What doesn't: Enamel paint can make plastic brittle if applied to moving joints without a protective base coat. It may damage underlying acrylic or lacquer finishes. The brush needs immediate rinsing or it hardens.
3. POSCA PC-5M Metallic Set: Best for Versatile Coverage
The POSCA PC-5M Metallic Set gives you eight metallic colors in a single package. Water-based pigment paint means cleanup is as simple as rinsing the tip under water, making these markers ideal for hobbyists who don't want to deal with solvents.
The medium reversible tip handles both broad strokes and moderately fine detail work. The paint dries quickly, is lightfast and weather-resistant, and provides opaque coverage in one pass on most surfaces.
What works: The color range lets you create metallic accents for different color schemes. Water-based cleanup eliminates solvent exposure. Quick drying time means you can apply multiple colors without long waits.
What doesn't: The metallic effect may be less refined than hobby-specific markers. Fine detail work is possible but not as precise as brush applicators. The paint requires a clear acrylic topcoat for outdoor permanence.
4. Sharpie Metallic Fine Point: Best Budget Option
Sharpie Metallic Fine Point markers are the budget entry point for metallic detailing. Gold, silver, bronze, emerald, sapphire, and ruby finishes come in packs of six and are available at any office supply store. The fine-point tip is sharp enough for edge weathering and small detail work.
The permanent ink dries quickly and is fade- and water-resistant once set. For hobbyists on a tight budget or those experimenting with metallic effects before investing in specialty markers, Sharpies deliver acceptable results at a fraction of hobby-grade marker costs.
What works: Affordability and availability make these accessible to beginners. The fine point is genuinely fine, suitable for edge highlighting. Quick drying prevents smudging.
What doesn't: The metallic effect is less refined than hobby markers. The marker can overflow on plastic with tight tolerances. Durability on plastic models is lower without a protective topcoat.
5. Mr. Hobby Weathering Liner: Best for Realistic Metallic Weathering
The Mr. Hobby Weathering Liner applies subtle pigment for weathering effects, streaks, and metallic wear patterns that suggest age and use. The pencil-sense application gives you control that prevents heavy-handed mistakes.
This marker works on both matte and gloss paint surfaces without requiring a base coat. For builders focused on realism, this tool creates the worn, battle-damaged aesthetic that competition judges reward.
What works: Subtle application prevents over-weathering. The pencil-sense control is superior to felt-tip markers for fine weathering lines. Works on multiple paint finishes without compatibility issues.
What doesn't: It's primarily for weathering effects, not solid metallic coloring. The metallic options are limited. Application requires practice.
6. Kuretake ZIG Fudebiyori Metallic Brush Markers: Best for Broad Accents
Kuretake ZIG Fudebiyori markers feature a flexible fude-style brush tip ideal for broader metallic accents. The set includes six metallic colors with water-based pigment ink that's odorless and acid-free.
The brush tip allows smooth, juicy ink flow without the scratching you sometimes get with felt-tip markers. Water-based formula means cleanup is simple and solvent-free.
What works: The flexible brush tip creates smooth, flowing lines without harsh edges. Juicy ink flow prevents streaking. Water-based cleanup is beginner-friendly.
What doesn't: The metallic effect may be less pronounced once dry. The flexible brush tip makes super-thin lines difficult. Durability on plastic models without a topcoat is questionable.
How to Use Gundam Markers for Panel Lining
Panel lining with Gundam markers adds depth and realism to your model. Proper surface preparation, controlled application, and strategic cleanup separate professional results from amateur work.
Surface Preparation and Primer Application
Before applying any metallic marker, your plastic surface must be clean and properly prepared. Dust, oils from handling, and residue prevent markers from adhering evenly.
Wash the assembled model with warm soapy water and a soft brush. Dry completely with a lint-free cloth, moisture trapped in panel lines causes markers to bleed unpredictably. If you've handled the model extensively, use a slightly damp cloth with isopropyl alcohol to remove skin oils, then dry again.
For best adhesion, apply a primer or base coat before panel lining. A light gray or white primer creates a neutral surface that accepts metallic markers evenly. A matte primer is preferable to gloss, as gloss surfaces can cause markers to bead up and pool.
Application Techniques for Fine Detail Work
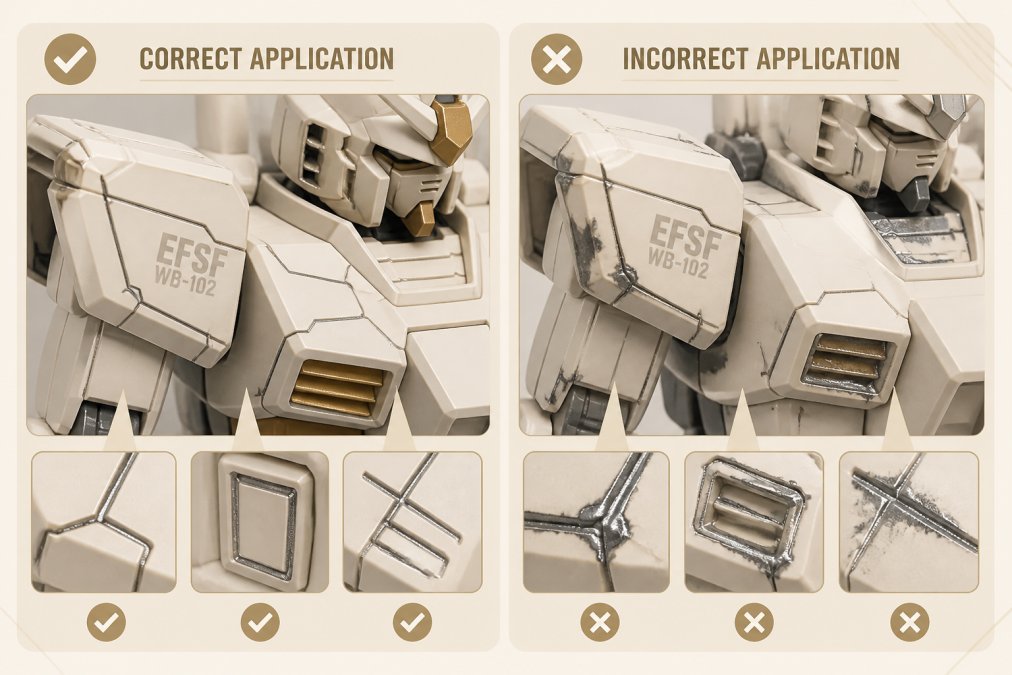
Hold the marker at a 45-degree angle to the surface, allowing gravity and capillary action to guide the pigment into the recess. Don't press hard, the marker's own weight provides sufficient pressure.
For thin panel lines, use light, controlled strokes in one continuous motion rather than dabbing repeatedly. For longer lines, you can lift and reposition the marker while maintaining consistent pressure. For wider recesses or inner frame details, multiple passes build color density without overflow risk.
Cleanup and Mistake Removal
For water-based markers like POSCA or Kuretake, use a damp cotton swab to wipe away excess pigment before it dries. The paint is removable for several minutes after application.
For alcohol-based markers like Gundam Marker EX, use a cotton swab slightly dampened with isopropyl alcohol. Work quickly, the alcohol dissolves the marker pigment but can damage underlying paint if you scrub too hard.
For enamel-based markers like Tamiya Panel Line Accent Color, use a cotton swab with enamel thinner. If the mistake has dried, light sanding with fine-grit sandpaper (1000 grit or higher) removes dried marker pigment without damaging the underlying plastic.
Common Mistakes to Avoid When Detailing with Metallic Markers
Applying markers to uncured base coats is the most common error. Enamel and alcohol-based markers can soften or damage acrylic paint that hasn't fully cured, which takes 24-48 hours. Wait the full cure time before panel lining.
Using too much pressure causes pigment to pool in corners and overflow onto flat surfaces. The marker's own weight is sufficient for proper flow.
Applying markers to non-primed plastic results in uneven adhesion and unpredictable color. A primer coat ensures even marker coverage.
Mixing incompatible products causes adhesion failure or paint damage. Always test combinations on scrap plastic first.
Skipping cleanup on dried mistakes makes removal exponentially harder. Fresh marker pigment wipes away easily. Dried pigment requires sanding or aggressive solvent treatment, both of which risk damaging surrounding areas.
Top-Coat Compatibility and Finishing
Once your panel lining is complete and dry, a protective top coat seals the metallic details and protects them from handling damage.
Gloss top coats enhance metallic shimmer and create a polished look. Matte top coats subdue the metallic effect but create a more realistic, worn appearance. Satin finishes split the difference.
Water-based acrylic top coats are safest for most marker types. Spray application is preferable to brush application to avoid disturbing the panel lining beneath. Test your top coat on a marked practice piece before applying it to your finished model.
Refillability and Marker Longevity
Most hobby-specific markers like Gundam Marker EX and Tamiya Panel Line Accent Color are designed for single use and aren't refillable. A single Gundam Marker EX typically covers 5-10 models depending on detail work. If you're detailing one model per month, you'll replace markers every 2-3 months.
Choosing the Right Marker for Your Skill Level
Beginners should start with POSCA or Sharpie markers. Water-based or permanent ink is forgiving, mistakes wipe away easily, and cleanup doesn't require solvents.
Intermediate builders benefit from Gundam Marker EX or Tamiya Panel Line Accent Color. These specialty markers deliver professional results but require more careful application and solvent cleanup.
Advanced builders often use a combination approach: Gundam Marker EX for inner frame work, Tamiya for sharp panel definition, and Mr. Hobby Weathering Liner for realistic aging effects. This layered approach creates depth that single-marker approaches can't match.
At Utopia Toys and Models, we stock all these marker types and can help you select the right combination for your skill level and project.
Choosing the best metallic markers for gunpla detailing comes down to understanding what each marker does best and matching that to your specific project needs. Whether you're adding subtle inner frame definition or dramatic weathering effects, the right marker makes the difference between a good build and a competition-grade masterpiece. Visit Utopia Toys and Models to explore our full selection of metallic markers, primers, and top coats. We stock industry-leading brands like Gundam Marker, Tamiya, and POSCA, and our team can help you build a detailing kit that matches your skill level and budget.
Frequently Asked Questions
What are the best metallic markers for Gundam?
Gundam Marker EX Heavy Gun Metallic excels for inner frame and mechanical details, while Tamiya Panel Line Accent Color works best for sharp panel definition. For versatile coverage across multiple colors, POSCA PC-5M Metallic Set offers water-based options. Choose based on your detailing style: alcohol-based markers provide darker, more opaque finishes, while water-based alternatives offer easier cleanup. Budget-conscious builders favor Sharpie Metallic Fine Point markers for quick accents.
How long does it take for Gundam marker drying time?
Alcohol-based Gundam markers like the Marker EX Heavy Gun Metallic typically dry in 5-15 minutes on plastic surfaces, though full curing can take 24 hours before applying a top coat. Water-based markers such as POSCA dry faster, usually within 2-5 minutes, but require longer curing for permanent adhesion. Tamiya Panel Line Accent Color dries within 10-20 minutes. Always wait at least 24 hours before handling or applying protective coatings to ensure proper pigment adhesion and prevent smudging.
How to use Gundam markers for panel lining effectively?
Apply a primer or base coat first to ensure proper adhesion and prevent plastic brittleness. Use light, controlled strokes along panel lines, letting capillary action draw the marker into recessed areas. For fine detail work, use the marker's tip at a shallow angle rather than pressing straight down. Remove excess paint immediately with enamel thinner on a cotton swab before it dries. Practice on spare plastic parts first, and always test compatibility between your marker type and any planned top coat.
Can you use regular permanent markers on plastic model kits?
Yes, but with caution. Sharpie Metallic Permanent Markers work on Gunpla for small details and edge weathering, though the metallic effect may be less refined than hobby-specific markers. Regular permanent markers can sometimes overflow or bleed if applied without a steady hand. For better results and durability, hobby-grade markers like Gundam Marker or POSCA are recommended, as they're formulated specifically for plastic model compatibility and adhesion. Always apply a protective clear top coat over permanent marker finishes.
What's the difference between soft tip and hard tip metallic markers for detailing?
Soft-tip markers like POSCA PC-5M and Kuretake ZIG Fudebiyori offer flexible application and smooth paint flow, making them ideal for broader metallic accents and blending. Hard-tip markers like Gundam Marker EX provide precise control for fine details and panel lining, with less paint bleed. Felt-tipped markers fall between these extremes, offering good control with moderate flexibility. Choose soft tips for large areas and weathering effects; hard tips for sharp panel lines and mechanical detail work.
This article was written using GrandRanker