

Table of Contents
- What Is a Master Grade Kit and Why Start Here?
- Gunpla Grades Explained: Where Master Grade Fits
- Best Master Grade Kits for Beginners: Recommendations and Pricing
- Essential Gunpla Tools You'll Actually Need
- How to Build Master Grade Gunpla: Step-by-Step Process
- Troubleshooting Common Beginner Issues with Master Grade Kits
- Long-Term Care and Display Tips for Your Master Grade Collection
- Conclusion: Starting Your Master Grade Journey
Last Updated: July 21, 2026
What Is a Master Grade Kit and Why Start Here?
A Master Grade kit is a 1/100 scale Gundam plastic model that balances complexity and accessibility for hobbyists. The defining feature is the inner frame, a detailed mechanical skeleton that provides articulation and structural integrity. Unlike simpler grades, you're building something with moving parts and mechanical detail that mirrors how the fictional Mobile Suit would theoretically function.
Understanding the 1/100 Scale and Inner Frame
At 1/100 scale, a typical Master Grade Gundam stands around 8 inches tall, large enough to display prominently but compact enough to fit most spaces. The inner frame is an articulated skeleton of plastic joints and frame pieces that allows the completed model to hold dynamic poses. You assemble the frame first, then attach armor panels over it. This teaches fundamental principles: understanding how parts connect, managing joint stress, and appreciating mechanical systems.
Gunpla Grades Explained: Where Master Grade Fits
The grade system exists because Bandai produces kits at different complexity levels, price points, and scales for different skill levels and collecting goals.
Master Grade vs. High Grade, Real Grade, and Other Scales
High Grade (HG) kits use 1/144 scale and represent the entry point for most new builders. They're smaller, cheaper, and require fewer tools. An HG typically takes 2-4 hours to complete with minimal paint or panel lining.
Real Grade (RG) kits exist at 1/144 scale but pack Master Grade-level detail into a smaller package. They feature inner frames similar to MG kits but in miniature form. RG kits are notoriously difficult because parts are tiny and fragile, best suited for experienced builders.
Perfect Grade (PG) kits are 1/60 scale behemoths exceeding 18 inches tall. They represent the ultimate expression of detail and articulation, often including LED lighting and motorized parts. PG kits demand 40+ hours of build time and significant investment.
Entry Grade (EG) and Super Deformed (SD) kits are simple, fast, and affordable. EG kits assemble in under an hour with minimal tools.
Master Grade sits at the sweet spot: more detailed than HG, more manageable than RG or PG, and priced between entry-level and premium. A typical MG takes 6-12 hours to build.
| Grade | Scale | Build Time | Complexity | Best For | Price Range |
|---|---|---|---|---|---|
| Entry Grade (EG) | 1/144 | 1-2 hours | Very Easy | First-time builders | Budget |
| High Grade (HG) | 1/144 | 2-4 hours | Easy | Casual builders | Low |
| Super Deformed (SD) | Varies | 1-3 hours | Very Easy | Collectors, younger builders | Low |
| Real Grade (RG) | 1/144 | 4-8 hours | Very Hard | Experienced builders | Medium |
| Master Grade (MG) | 1/100 | 6-12 hours | Medium | Beginner guide to master grade kits enthusiasts | Medium-High |
| Perfect Grade (PG) | 1/60 | 40+ hours | Very Hard | Dedicated collectors | Premium |
Best Master Grade Kits for Beginners: Recommendations and Pricing
Not all Master Grade kits are equally beginner-friendly. The kits listed here balance detail, build experience, and manageable difficulty.
Beginner-Friendly Options with Manageable Complexity
The RX-78-2 Gundam Ver. 3.0 is widely considered the gold standard entry Master Grade kit. This classic white, blue, and red Gundam features an intuitive inner frame, parts that fit well without excessive glue, and secure armor panel attachment. Build time is approximately 8-10 hours and teaches fundamental Master Grade techniques without overwhelming gimmicks.
The Gundam Mk-II (Titans colors) is another excellent beginner choice. It features a simpler inner frame and excellent color separation, meaning fewer parts need painting. Build time runs 7-9 hours, and abundant online tutorials exist if you get stuck.
The RX-0 Unicorn Gundam is more complex but features the transformation gimmick that defines the character. The Unicorn transforms between Unicorn Mode and Destroy Mode, adding 2-3 hours to build time but teaching how mechanical systems function.
The MGEX RX-0 Unicorn Gundam represents the newest generation of Master Grade design. MGEX kits feature enhanced detail, better articulation, and sometimes motorized gimmicks. The MGEX Unicorn includes LED lighting and motorized transformation, making it better suited for builders with one or two MG kits under their belt rather than absolute beginners.
Budget-Friendly Master Grade Kits and Where to Buy
Master Grade kits typically range in price based on release date, complexity, and included accessories. Older MG kits (released 5+ years ago) often cost less because inventory is higher and demand is lower. The RX-78-2 Gundam Ver. 3.0, released in 2012, remains affordable because Bandai has reprinted it multiple times.
Utopia Toys and Models maintains a curated inventory of Master Grade kits with transparent stock indicators showing immediate availability. Research the specific version before buying, newer versions typically have better plastic quality and improved joint engineering.
Essential Gunpla Tools You'll Actually Need
A common misconception is that you need dozens of specialized tools. In reality, three or four quality tools handle 95% of Master Grade building. Cheap tools lead to frustration, a dull hobby knife tears plastic instead of cutting cleanly.
Nippers, Hobby Knives, and Panel Lining Supplies
Nippers are precision cutting pliers designed specifically for plastic model parts. Quality nippers cost more upfront but last years and produce superior results. Look for nippers with a fine, sharp cutting edge that cut through plastic with minimal pressure.
The hobby knife (X-Acto knife or equivalent) cleans nub marks, scrapes mold lines, and performs detail work. A sharp blade is critical, dull blades require excessive pressure and slip unpredictably. Replace blades frequently.
Panel lining involves applying thin lines of paint or ink into recesses between armor panels. This technique adds tremendous visual depth. Many builders use a fine-tipped marker designed for panel lining or apply thin paint with a detail brush.
Sandpaper or sanding sponges smooth nub marks and rough edges. Start with medium grit (400-600) to remove large nubs, then progress to fine grit (1000+) for a smooth finish.
How to Build Master Grade Gunpla: Step-by-Step Process
The Master Grade building process follows a logical sequence: prepare your workspace, assemble the inner frame, attach armor panels, and apply finishing techniques.
Preparing Your Workspace and Assembly Basics
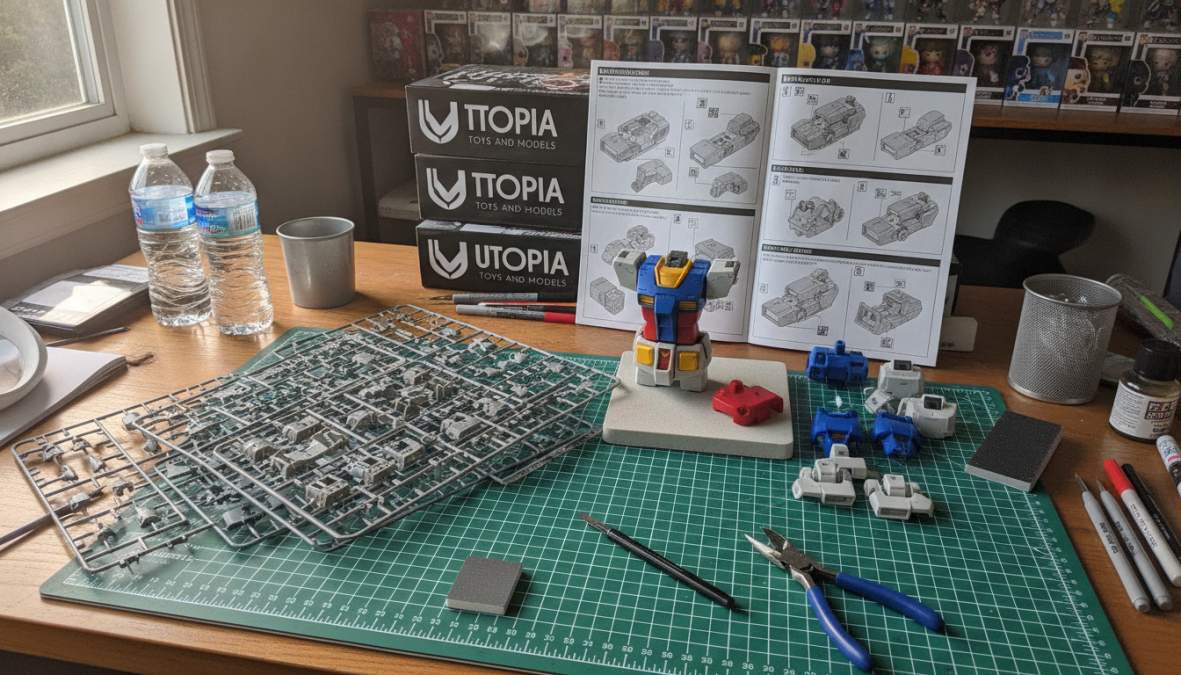
Before opening the box, prepare a clean, well-lit workspace with enough room to spread out runners, parts, and tools. Natural light is ideal, but a desk lamp works well. Many builders use a small parts organizer to keep screws, small frame pieces, and decals organized.
Read the instruction booklet completely before starting. Master Grade manuals are detailed and logical, guiding you step-by-step through assembly. Cut parts carefully from the runner using nippers. Hold the nipper so cutting edges are perpendicular to the plastic for a cleaner cut. Leave a small amount of plastic attached initially, then use your hobby knife to clean it up.
Building the Inner Frame and Main Body
Start with the inner frame legs. Master Grade legs typically consist of multiple frame pieces that articulate at the knee and ankle. Assemble each leg completely before moving to the next section. Test joints as you build, the knee should bend smoothly and the ankle should rotate without excessive resistance.
The frame torso comes next, including the central spine, waist frame, and shoulder frame. Master Grade torsos feature pistons, hydraulic cylinders, and mechanical detail that mirrors real engineering. Some Master Grade kits use plastic cement to bond certain frame pieces permanently. Apply cement sparingly, a tiny amount is sufficient.
Attach the frame arms, which typically feature articulated hands and wrist joints. Once the complete inner frame is assembled, test full articulation. The model should move at the hips, knees, ankles, shoulders, elbows, wrists, and neck.
Now attach the armor panels. The model transforms from a mechanical skeleton into a recognizable Gundam. Armor panels clip or snap onto the frame. If a panel doesn't fit smoothly, remove it and check for plastic flashing or misalignment.
Finishing Techniques: Decals, Panel Lining, and Paint
Panel lining is the most impactful finishing technique. Using a fine-tipped marker or thin paint, apply lines into recesses between armor panels. This creates shadow and visual depth, making the model look more three-dimensional.
Decals (water-slide stickers) add detail that plastic molding can't achieve. Water-slide decals conform to curved surfaces and look painted-on rather than applied. Soak decals in water, position them carefully, and use a decal setting solution to help them conform to panel curves.
Painting is optional for beginners but transforms a model. Many Master Grade kits have excellent color separation, meaning parts are molded in correct colors. However, painting details like eyes, cockpit windows, and panel details elevates the final result. Acrylic paint designed for plastic models works well and cleans up with water.
A matte topcoat seals decals and paint while reducing the glossy plastic appearance.
Troubleshooting Common Beginner Issues with Master Grade Kits
Even experienced builders encounter problems. Knowing how to diagnose and fix common issues prevents frustration.
Stress Marks, Nub Marks, and Assembly Problems
Stress marks are small cracks or white stress lines that appear when plastic is bent excessively. Prevent stress marks by moving joints gently and repeatedly rather than forcing them to their limit immediately.
Nub marks are the most visible beginner mistake. Clean nubs by using a hobby knife to shave them flush with the part surface, then sand with fine-grit sandpaper until smooth.
Loose joints occur when parts don't fit snugly. Tighten loose joints by wrapping a single layer of plastic tape around the male joint. The tape adds thickness, creating a tighter fit.
Broken or cracked parts occasionally happen. Small cracks can be bonded with plastic cement and reinforced with a plastic strip glued behind the crack.
Misaligned armor panels usually result from plastic flashing or bent parts. Inspect mating surfaces carefully. If you see excess plastic, carefully shave it away with a hobby knife.
Long-Term Care and Display Tips for Your Master Grade Collection
Master Grade kits represent significant time investment. Protecting them extends their lifespan and keeps them looking fresh.
Display your models in a glass cabinet or enclosed shelf to minimize dust accumulation. Use a soft brush or compressed air to remove dust rather than wiping, which can damage decals and paint.
Avoid direct sunlight, which fades plastic colors over time. Store spare parts, runners, and instruction manuals in a dry place. The instruction manual is valuable if you ever need to disassemble the model for repairs.
Handle your models carefully when moving or repositioning them. Support the model under the torso rather than grabbing arms or legs. Periodically check joints for loosening. If a model starts sagging, the joints have fatigued.
Master Grade kits for beginners represent an achievable entry point into serious model building. You'll develop real skills, understanding mechanical systems, practicing precision assembly, and appreciating craftsmanship while creating something tangible and beautiful.
Utopia Toys and Models stocks a carefully selected range of beginner-friendly Master Grade kits with transparent inventory showing exactly what's in stock and ready to ship. Start with the RX-78-2 Gundam Ver. 3.0, gather your basic tools, and begin your Master Grade journey with confidence.
Frequently Asked Questions
What is a Master Grade kit and is it good for beginners?
A Master Grade (MG) kit is a 1/100 scale Gunpla model featuring a detailed inner frame, high articulation, and complex assembly. While more challenging than High Grade kits, many Master Grade models are beginner-friendly if you start with simpler designs. The complexity varies significantly, some MG kits have manageable build times and straightforward instructions, making them accessible to newcomers willing to invest time and learn proper techniques.
What tools do I need to build a Master Grade Gunpla kit?
Essential tools include hobby nippers for cleanly removing parts from runners, a hobby knife for removing nub marks, sandpaper or a nub file for smoothing edges, and panel lining pens or paint for detailing. You'll also benefit from a cutting mat, ruler, and glue (though most Master Grade kits use snap-fit assembly). Optional but recommended: decals (water-slide or dry-transfer), paint, and a display stand for your finished model.
How does Master Grade compare to High Grade and Real Grade?
Master Grade (1/100 scale) kits are larger and more detailed than High Grade (1/144 scale) but smaller than Perfect Grade (1/60 scale). Real Grade (1/144 scale) offers articulation similar to MG but in a smaller package. Master Grade's defining feature is its inner frame, a detailed skeleton that provides superior poseability and realism. Choose MG for display and building depth, HG for quick builds, and RG for compact articulation.
What are some easy Master Grade kits for beginners?
Beginner-friendly Master Grade options typically feature simpler color separation, fewer small parts, and clearer instructions. Look for standard Gundam designs rather than complex variants. Ver. Ka (Katoki Hajime designed) versions often have excellent detail but can be challenging. Start with a kit that has positive community feedback for beginner builds, manageable part count, and reasonable build time (8-15 hours). Check community forums and reviews before purchasing.
Do Master Grade kits require glue or paint?
Most Master Grade kits use snap-fit assembly and don't require glue for basic assembly. However, painting and decals significantly enhance the final appearance, Master Grade kits benefit from panel lining (outlining panel details with markers or paint) and water-slide decals for authenticity. Paint is optional but recommended for serious builders. Glue may be needed only for specific gimmicks or if you want permanent assembly of certain parts.
How long does it take to build a Master Grade kit?
Build time varies widely based on complexity and your experience. A beginner-friendly Master Grade kit typically takes 8-20 hours of active building. More complex models or those with painting and detailed finishing can take 30+ hours. Breaking the build into multiple sessions over several days is recommended. Your first Master Grade will take longer as you learn techniques, but subsequent builds become faster as you develop skills.
What should I do about nub marks and stress marks on my Master Grade kit?
Nub marks are small plastic remnants left when you cut parts from runners. Remove them carefully using hobby nippers, then sand smooth with fine-grit sandpaper or a nub file. Stress marks (white lines from cutting) can be minimized by cutting carefully and sanding. For visible stress marks on colored plastic, touch-up paint or markers matching the plastic color work well. Proper technique prevents most marks, cut away from the part, then sand toward it gently.
This article was written using GrandRanker