

Table of Contents
- Why Nub Marks Remain After You Cut a Part From the Runner
- The Best Tools for Gunpla Nub Removal (and What Each One Is For)
- Step-by-Step: The Staged Cut Method for Clean Nub Removal
- How to Remove Nub Stress Marks on Gunpla
- Gunpla Sanding and Polishing for a Flush, Smooth Finish
- How to Fix White Marks on Gunpla (and Dents, Gouges, and Accidental Cuts)
- Tricky Spots, Different Plastics, and Tool Care
- Conclusion
- Frequently Asked Questions
Last Updated: October 18, 2026
Why Nub Marks Remain After You Cut a Part From the Runner
A nub mark is the small bump of plastic left when you snap or clip a part off its runner.
The core problem: the gate, the tiny channel feeding plastic into the mold, is thicker than the part itself. Cutting through it sends stress into the part, so a single snip leaves a mark even when you cut close.
The fix isn't better nippers alone, it's a sequence.
How the Gate and Nub Actually Form
Plastic enters the mold through a gate during injection. When it cools, the gate hardens into a stub attached to your part; where they meet is the nub.
That junction is fragile. Cut carelessly and the plastic tears instead of slicing cleanly, turning white, your first stress mark.
Why a Single Flush Cut Usually Fails
A flush cut means clipping right at the surface of the part. It sounds ideal but rarely works for beginners.
Flush cutters squeeze the plastic before they slice it, denting the surface and pushing stress into the part, leaving a flat but discolored nub area.
The Bandai Hobby building guide recommends staged cutting for exactly this reason. Cut away from the part first, then work closer.
The Best Tools for Gunpla Nub Removal (and What Each One Is For)
The best tools for Gunpla nub removal are single-blade nippers, a hobby knife, sanding sticks in multiple grits, and a glass file or nail buffer. Each handles a different stage, and skipping one shows in the finish.
Here's what each tool actually does:
- Single-blade nippers: slice cleanly with one cutting edge. Best for the first and second cuts.
- Hobby knife: shaves thin layers off a remaining nub. Use light pressure and a fresh blade.
- Sanding sticks: level the surface after cutting. Start coarse, finish fine.
A common mistake is buying expensive nippers and skipping sanding supplies. Nippers get you close. Sanding and polishing get you invisible.
A Beginner's Decision Guide: Matching Tool, Cost, Skill, and Risk
Most guides list tools but never say which to buy first. Match the tool to your budget, experience level, and the finish you actually want.
| Tool | Typical U.S. Price Range | Skill Level | Finish Quality | Main Risk | Best For |
|---|---|---|---|---|---|
| Standard side cutters | $8-$15 | Beginner | Rough | Stress marks, dents | First cut off the runner |
| Single-blade nippers | $25-$60 | Beginner to intermediate | Close, clean | Dents if twisted | Second and flush cuts |
| Hobby knife | $5-$12 plus blades | Beginner | Very close | Slipping, gouges, cuts | Thin remaining nubs, tight spots |
| Sanding sticks | $6-$15 per set | Beginner | Smooth | Thinning detail | Leveling and smoothing |
| Glass file | $10-$25 | Beginner | Smooth, fast | Scratching if angled wrong | Hard-to-reach nubs, fast removal |
| Nail buffer or buffer block | $3-$8 | Beginner | Polished | Over-polishing shine | Final sheen match |
Prices vary by brand and retailer, but the pattern holds: a complete beginner kit costs roughly the same as one premium pair of nippers. Experienced builders spend first on a sharp single-blade nipper and sanding sticks, then upgrade later.
A Practical Grit Progression
Grit numbers tell you how coarse a sanding stick is. Lower numbers remove more material; higher numbers smooth. Skipping grits leaves scratches that show through polish.
- 400 grit: level a stubborn nub or flatten a slight bump. Use light pressure, this grit removes plastic fast.
- 600 grit: erase the 400-grit scratches and most light stress whitening.
- 800 grit: refine the surface before polishing; this is where the finish starts to look even.
For most beginners, a 400/600/800 set plus a nail buffer covers nearly every nub. Add 1000 grit only if you plan to leave parts unpainted and want a near-invisible repair.
Step-by-Step: The Staged Cut Method for Clean Nub Removal
The staged cut method removes a part in three passes instead of one. Each pass reduces the nub further, so the final cut carries almost no stress into the plastic.
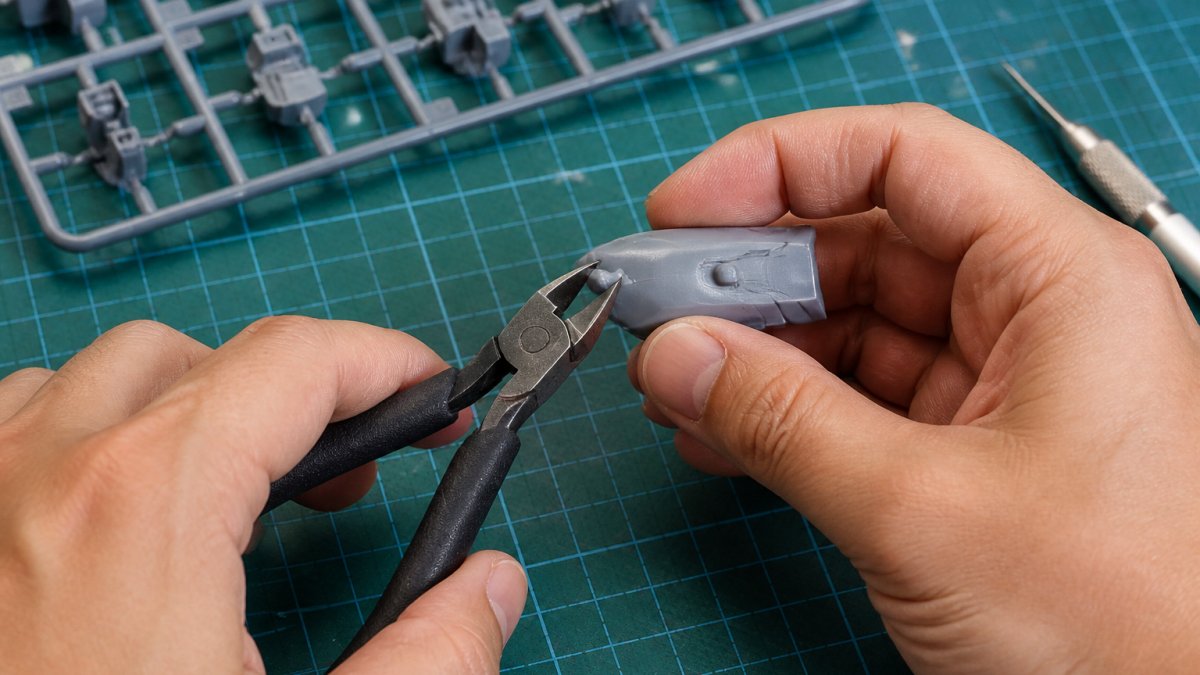
Step 1: Make the First Cut Away From the Part
Leave a few millimeters of gate attached and cut on the runner side, well away from the part surface.
This first cut absorbs the stress: the plastic tears at the gate, not your part. You should see a stub sticking out, not a flush surface.
Step 2: Trim the Remaining Nub Closer
Switch to single-blade nippers and trim the remaining nub to roughly a millimeter above the surface.
Support the part with your free hand. Tool control matters more than force; light, deliberate pressure keeps the blade from twisting.
Step 3: Flush Cut With Control
Make the final cut level with the surface, flat side of the nipper against the part, squeezing slowly.
You should see a nearly flat nub area with little or no whitening. If a thin bump remains, that's normal. Sanding handles the rest.
How to Remove Nub Stress Marks on Gunpla
Stress marks are whitened areas where the plastic stretched before it cut, caused by a dull blade, cutting too close too soon, or squeezing instead of slicing.
Most light stress marks fade with sanding: work the area with a 600-grit stick, then step up through finer grits.
For deeper marks, a tiny drop of thin plastic cement softens the whitened area.
On colored parts, aggressive sanding can thin the color layer. Go slow and check progress often.
Gunpla Sanding and Polishing for a Flush, Smooth Finish
Sanding and polishing turn a nearly flat nub into an invisible one. The goal is to match the surrounding surface texture, not just flatten the bump.
Working Through the Grits
Work through grits in order and don't skip steps:
- Start with 400-600 grit to level the nub.
- Move to 800 grit to remove the coarse scratches.
- Finish with 1000 grit or higher for a smooth surface.
- Wipe the dust away between grits so you can see your progress.
Sanding sticks work well on flat armor panels. For curved surfaces, wrap sandpaper around a soft backing so it follows the shape.
Polishing With a Nail Buffer or Buffer Block
A nail buffer is the quiet hero of nub mark removal. The fine polishing side restores the plastic's sheen after sanding.
Buff in small circles with light pressure. Stop when the surface matches the surrounding plastic. Over-polishing can make one spot shinier than the rest, which looks just as odd as a nub.
The finish quality comes from the last step, not the first. A careful polish with a cheap nail buffer beats a rushed job with premium tools.
How to Fix White Marks on Gunpla (and Dents, Gouges, and Accidental Cuts)
White marks on Gunpla are stress whitening, and most light cases sand out cleanly. Deeper damage needs a different approach.
Here's how to handle each problem:
- Light white marks: sand with 600 grit, then polish. Usually disappears.
- Dents: sand the area level, then polish. A dent that removed material may need filler putty.
- Gouges: fill with putty, let it cure, sand level, then polish.
For putty repairs, apply thin layers and let each one cure. Thick layers shrink and crack.
A common mistake is sanding a dent harder instead of filling it. Sanding removes more material. It makes the dent wider, not flatter.
Tricky Spots, Different Plastics, and Tool Care
Some nubs sit in spots that punish careless tools. Others sit on plastics that behave differently from standard polystyrene. And a few habits keep your tools sharp and your fingers intact. This section covers all three, because the nub that ruins a build is usually the one in an awkward place on an unfamiliar plastic.
Material-Specific Techniques for Different Plastics
Most Gunpla parts are polystyrene (PS), which cuts and sands predictably. Other kits use different plastics that need gentler handling. The plastic type is usually molded into the runner frame, so check there before you cut.
- Polystyrene (PS): the standard staged cut, sand, and polish works well. It responds to thin plastic cement, which briefly reflows the surface and helps blend light stress marks.
- ABS: harder and more prone to stress whitening. Use sharp nippers and light pressure, and avoid squeezing. ABS also reacts poorly to some solvents, test any cement on a hidden runner piece first, because the wrong solvent can craze or crack the part.
- Polycaps and soft plastics: rubbery and easy to deform. Trim with a sharp knife using light shaving strokes; never squeeze with nippers, which stretch and tear the material.
Test on a hidden surface first when you're unsure. A spare runner piece is perfect practice material, and it costs nothing to ruin.
Techniques for Difficult Locations and Part Shapes
Standard flush trimming assumes a flat surface and open access. Many nubs sit on curved armor, inside recesses, on thin parts, or on visible surfaces where a slip is expensive. Adjust the method, not just the pressure.
- Recessed nubs: reach in with a glass file or the tip of a hobby knife rather than full nippers, which are too wide for the opening. Work in small shaving passes and check clearance before each stroke.
- Curved surfaces: wrap sandpaper around a soft backing so it follows the curve instead of flattening it. A flat sanding stick on a curved panel creates a visible flat spot.
- Thin parts: support the part from behind with your free hand or a finger, and cut with light pressure. Thin plastic flexes and cracks when unsupported.
A common pattern is to practice each difficult shape on a spare runner before touching the model. The muscle memory transfers quickly.
Safety and Tool Maintenance
A few habits keep your tools working and your fingers intact:
- Cut away from your body, never toward your hand, and wear eye protection when clipping, small plastic fragments fly.
- Keep blades fresh. A dull knife slips and gouges; replace blades rather than forcing a dull edge.
- Wipe nippers clean and store them dry to prevent rust, and avoid cutting anything harder than plastic, which dulls or chips the edge.
Conclusion
Nub mark removal rewards patience over power. Cut away from the part, trim closer, flush cut with control, then sand and polish through the grits.
The right tools make each step easier. At Utopia Toys and Models, we stock Bandai Gundam kits alongside the tools that pair with them, with most items in stock and ready to ship.
Get started with Utopia Toys and Models and build cleaner kits from your very next snap.
Frequently Asked Questions
How do you get rid of nub marks on Gunpla?
Use a staged cut instead of one flush snip. Cut the part off the runner leaving a few millimeters of nub, trim the remaining nub closer to the part, then shave it flush with a sharp hobby knife or flush cutters. Finish by sanding through progressively finer grits, such as 400 to 800 to 1000, and polish with a nail buffer. This staged approach keeps pressure off the plastic, which is what causes most nub mark removal problems like dents and white stress marks.
What grit sandpaper should beginners use for Gunpla nub removal?
Start around 400 grit to level the remaining nub, move to 600 or 800 to remove the scratches the coarse grit left, then finish with 1000 grit or a glass file before polishing. Skipping straight to a fine grit wastes time because it cannot flatten a raised nub. Going too coarse on visible armor panels risks visible scratches. Sanding sticks in these grits give better control than loose sandpaper on small parts.
Can a nail buffer block remove Gunpla nub marks?
A nail buffer block works well as a final polishing step, not as the main removal tool. After you have cut and sanded the nub flush, a buffer block smooths the surface and reduces the dull, scuffed look sanding leaves behind. It is cheap, easy to control, and gentle enough for beginners. Use it lightly on flat surfaces and avoid edges, where a buffer can round off sharp detail.
How do you fix a nub mark that has left a dent?
A dent means too much plastic was removed, usually from cutting too close or pressing hard with a dull blade. Light sanding around the dent can blend the edge so it reads less sharply. For deeper dents, a tiny drop of thin plastic cement can soften and level the area, or you can fill and sand it smooth. On painted builds, primer and paint hide small dents well. Prevention is easier: leave a few millimeters on the first cut and shave slowly.
